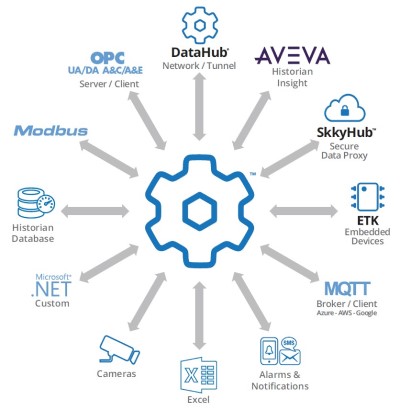
Cogent DataHub is known for its extensive connectivity to OPC DA, OPC UA, OPC A&E, Databases, Excel, ODBC, DDE, Linux, Modbus. As you may have already learned, the DataHub Version 10 now includes support for integration with a wide range of common external historians, expanding your options for which data sources are compatible for historization in your chosen historian solution.
In this blog post, we'll detail how to get started integrating your data sources accessible by DataHub with AVEVA™ Historian by writing data to your AVEVA Historian while also making that same historical data available for trending, visualization and reporting for both DataHub and external historical clients supporting OPC UA Historical Access (HA).
Now AVEVA™ (formerly Wonderware) Historian users are certainly used to historizing data from SuiteLink, DDE and even OPC data sources through AVEVA Historian's own client interfaces to those data sources (and through OI Gateway, formerly FS Gateway). However, DataHub V10's ability to integrate data sources goes beyond that to provide access to many other data sources through its variety of interfaces.
And even further beyond just expanding data sources, DataHub V10 provides AVEVA Historian users with the following additional capabilities:
- Store and Forward support to eliminate loss of data when there is a disconnect with the historian
- Secure tunneling of historical data for enterprise-wide integration
- Access to historized data from external OPC UA HA capable client applications
Separately, those features all contribute to a robust data source for AVEVA Historian. But when combined, DataHub V10 can take your AVEVA Historian projects even further.
This post specifically covers a basic configuration for getting DataHub connected to your AVEVA Historian instance and writing/reading data to AVEVA Historian from your process sources configured in DataHub.
DataHub Data Sources for Historization
The first step for integrating data with any of the external historians supported by DataHub, including AVEVA Historian, is having the data from your source or sources available in one or more data domains in DataHub. Whether that is data from an OPC UA or DA client or server, a DDE client or server, a database, an MQTT client or broker, a remote DataHub, a Modbus server, or one of the other many data sources DataHub supports, once it's in DataHub, it can be historized.
For example, towards the purpose of compiling the steps below, my DataHub V10 is sourcing data from an OPC server and storing that data in a DataHub data domain named "ToAVEVAHistorian". Regardless of the specific source, if the data is in a data domain in DataHub, the remaining steps in this post will help you get that data into AVEVA Historian.
Details on configuring specific data sources is beyond the scope of this post but our DataHub how-to video resources available here can help you get your data sources setup and ready for historization. You can also run DataSim or DataPid (installed with DataHub) to generate simulation data to test with.
How to write DataHub data sources to AVEVA Historian
1. Gathering Settings for Connecting to AVEVA Historian
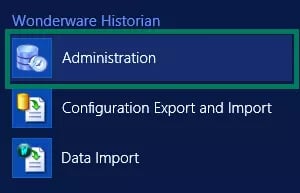
The easiest way to confirm what the correct values are to use in DataHub for an External Historian connection to AVEVA Historian is either to ask your AVEVA Historian administrator the correct DNS hostname or IP address and the user/password you should be using or, if you have access to AVEVA Historian, launch the Administration for Historian and confirm them yourself.
This brings up the System Management Console.
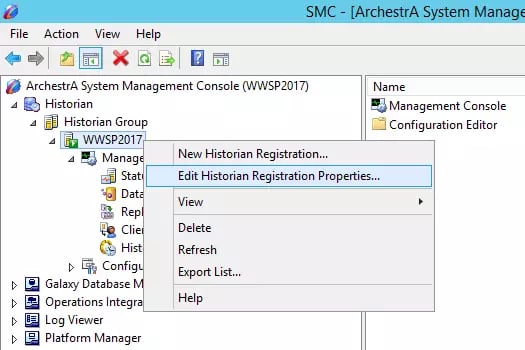
Right-click on the level under Historian > Historian Group - this is the Hostname that you can use in DataHub.
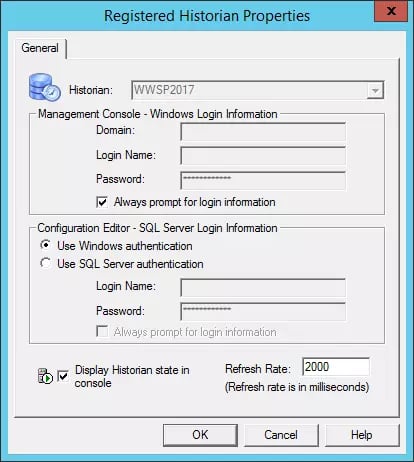
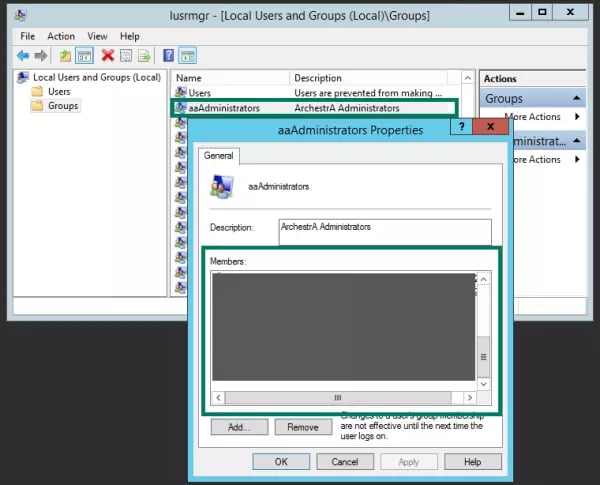
Confirm here also the log-in information. If there is a specific user listed here, you'll need to find out from your AVEVA Historian administrator what the password is for that user (since it obviously won't be listed here in readable form). Alternately, if Windows authentication is being used, you'll want to make sure there is a local user or domain user that you know (or can find out) the password for is part of the "aaAdministrators" group on the AVEVA Historian machine.
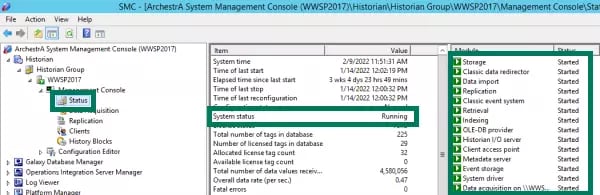
Back in the System Management Console, it's also a good idea to confirm AVEVA Historian is running - you can confirm this under the Status branch under Management Console for Historian.
2. Configuring AVEVA Historian connection settings in DataHub
Assuming you have the data you'd like to historize in DataHub, the next step is configuring DataHub for the connection to the specific AVEVA Historian instance where you'd like to historize your data using the information you just gathered. For the purposes of this post, we are using Wonderware Historian 2017 but DataHub is compatible with all newer versions of AVEVA Historian, as well.
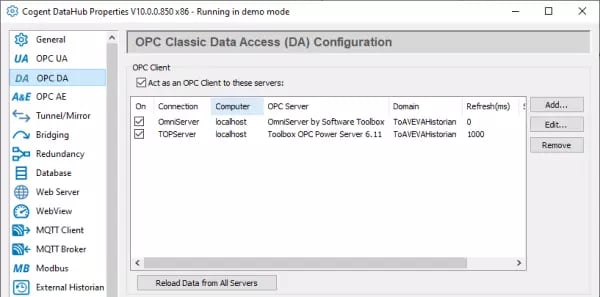
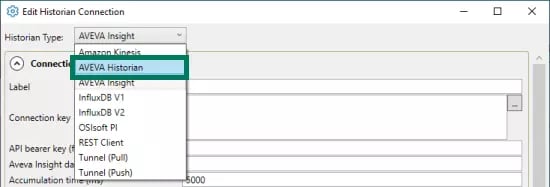
To start configuring a new AVEVA Historian connection, we go to the External Historian configuration section in DataHub and click the "Add" button:
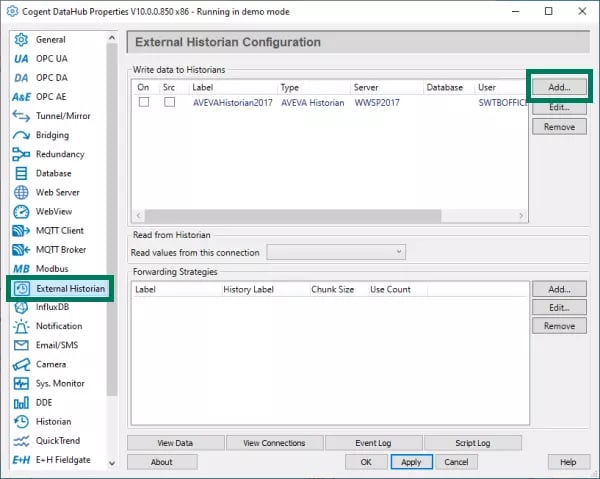
Then select "AVEVA Historian" from the Historian Type dropdown menu:
The key settings of interest here, for a basic connection, are in the Connection Settings and Storage Settings sections.
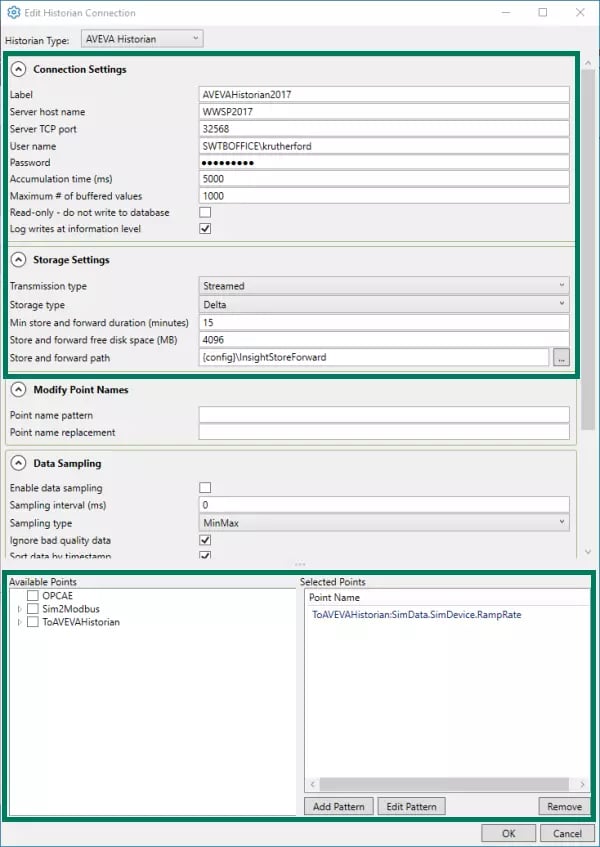
The Connection Settings are:
- Label - this is an internal name for this specific connection to AVEVA Historian - if you'll be connecting to multiple instances of AVEVA Historian, it is recommended to use a logical description for this label.
- Server host name - this should be the DNS hostname or IP address of the server machine where AVEVA Historian is installed. If DataHub is installed on the same machine as the instance of AVEVA Historian you wish to connect to, you can use "localhost" or the local machine's IP or hostname, as well.
In the example above, we are making a remote connection using the DNS hostname for the AVEVA Historian server machine. - User name - a user that has access to log into the AVEVA Historian instance you wish to connect with DataHub - whether a domain user or account local to the server where AVEVA Historian is installed, the user needs to be part of the ArchestrA Administrators group (aaAdministrators) on the AVEVA Historian server.
- Password - the corresponding password to the specified User name.
- Accumulation time (ms) - the number of milliseconds that DataHub will buffer data in memory before sending it to AVEVA Historian. Leave this field blank to send data as soon as it is available (this adds network overhead for remote connections but minimizes latency).
Specify a time here to accumulate data before transmission to improve network performance (adds latency to data availability in AVEVA Historian) - Maximum # of buffered values - the maximum number of values that DataHub will buffer in memory before transmitting them to AVEVA Historian. Setting this value to zero will allow any number of values to be buffered within the accumulation time. If this limit is reached before the accumulation time has been reached, the currently buffered data will be transmitted.
- Read-only - do not write to database - Enable this setting to prevent DataHub from writing to this configured historian instance.
And the key Storage Settings to be aware of are:
- Transmission Type - the AVEVA Historian transmission type for the forwarded data. The default option is Streamed. Unless advised to by your AVEVA Historian administrator, the default is recommended.
- Streamed data - time order is enforced - this can be real-time data with a timestamp in the past compared to current Historian time or late data with a timestamp far in the past compared to the current timestamp.
- Non-Streamed data - time order is not enforced
- Storage Type - The type of storage on AVEVA Historian. The default option is Delta.
- Not Stored - No values are stored
- Cyclic - Only values that occur at a specified time interval are stored.
- Delta - Only changed values are stored (Recommended)
- Forced - All collected values are stored (useful if you need all values historized even if the value for a tag hasn't changed)
- Min store and forward duration (minutes) - the minimum number of minutes that data will be saved in the store-and-forward queue while waiting to be transmitted. Data that cannot be transmitted within this time may be discarded so it is recommended to specify a time period that provides ample time for the connection to be recovered if maximum data retention is desired. The default is 15 minutes. (NOTE: the longer the time frame, the larger the data queue will be which will impact hard drive space on the local machine)
- Store and forward free disk space (MB) - the minimum amount of free space that must be available on disk for store-and-forward to retain data. When/if free disk space drops below this value then stored data will be discarded without transmission.
- Store and forward path - the directory on the DataHub machine where data will be buffered prior to transmission according to the previously specified duration and amount of disk space.
Other settings can be left at the defaults. Suffice it to say, there are additional settings that allow you to fine tune what and how much data to transmit to AVEVA Historian, such as the Data Sampling settings which allow you to send samples or "snapshots" of the data for specified time intervals to the supported historian, rather than the full data set. However, if capturing all value changes is desired, sampling settings should be left at the defaults.
In addition, DataHub also supports Forwarding of the same dataset to a separate remote instance of AVEVA Historian as a backup, which is beyond the scope of this particular blog post.
Last, but definitely not least, at that bottom of the Edit Historian Connection dialog, is the Available Points section, which provides the ability to browse the available data domains in DataHub and select the point or points from the domain or domains that you want to historize in AVEVA Historian.
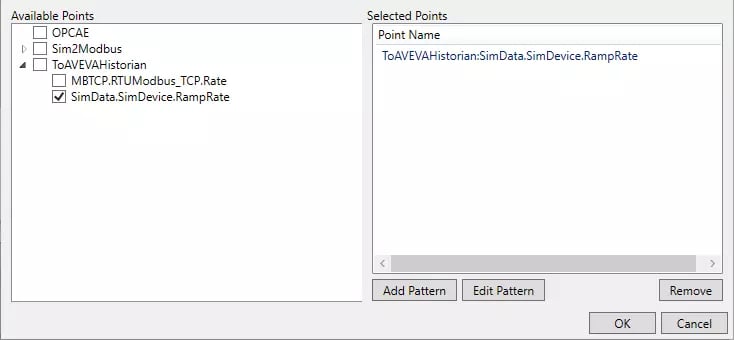
Simply expand the tree view of the data domains where your desired tags are located and tick the box next to each one and ensure the desired points are added to the "Selected Points" section on the right. For this example, we're simply historizing a single changing point from the underlying OPC server.
Once you've entered the correct information, you can click "OK" and then make sure to click "Apply" back in the main Cogent DataHub interface to ensure that all of your settings take effect.
3. Confirming DataHub is Successfully Connected to AVEVA Historian
And, to confirm your DataHub is connected to AVEVA Historian, you can check the following:
- View Connections in Cogent DataHub - you can confirm the running status for the AVEVA Historian connection including statistics on sends and receives

The resulting window includes all DataHub connections and allows us to confirm that DataHub is connected and transmitting data.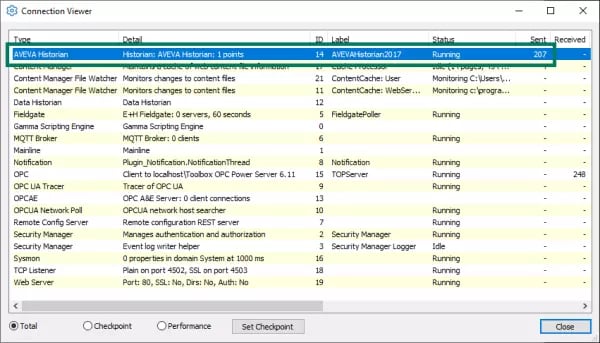
- Data Acquisition in the AVEVA Historian Management Console section - you can confirm that AVEVA Historian is successfully receiving updates from DataHub including how many values and for how many tags.

4. Verifying Historized Data from Cogent DataHub to AVEVA Historian
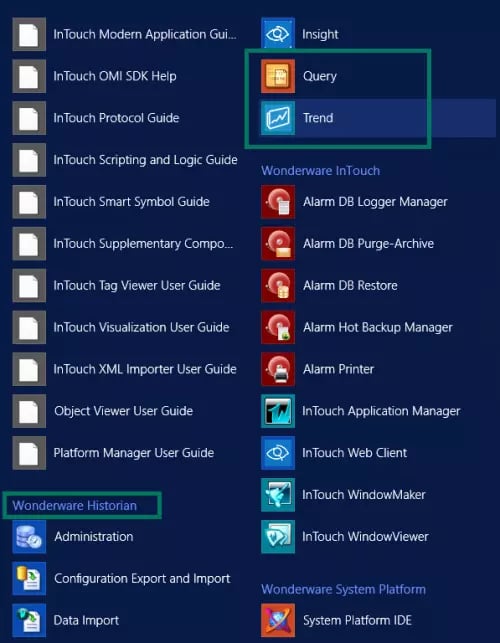
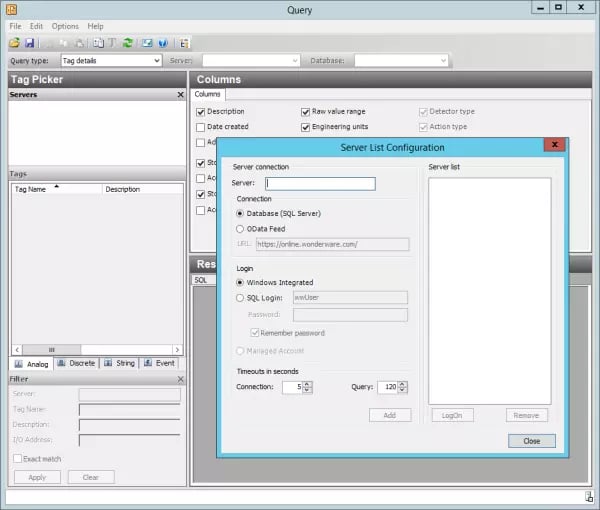
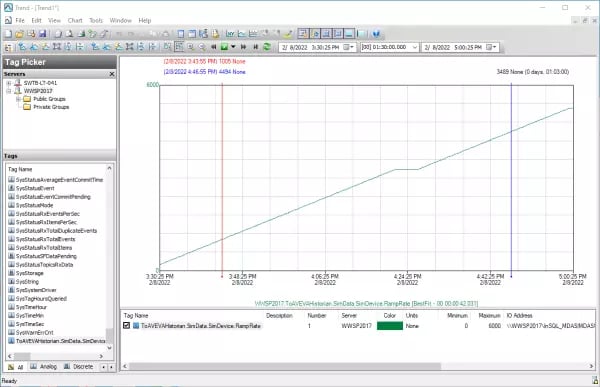
AVEVA Historian users may or may not be familiar with the Query and Trend tools that install with AVEVA Historian. These are the quickest options for confirming that your desired data is being correctly historized from DataHub (and to visually access that historical data).
Setup is similar for either utility - simply specify the AVEVA Historian hostname to connect to and the same user credentials you used for your Cogent DataHub connection.
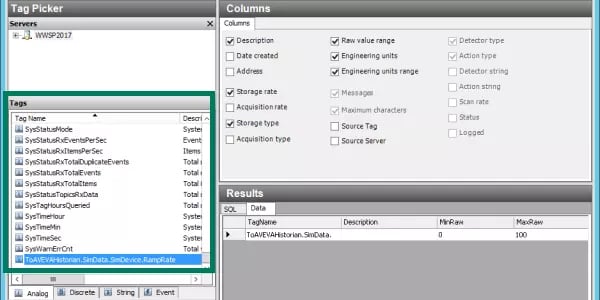
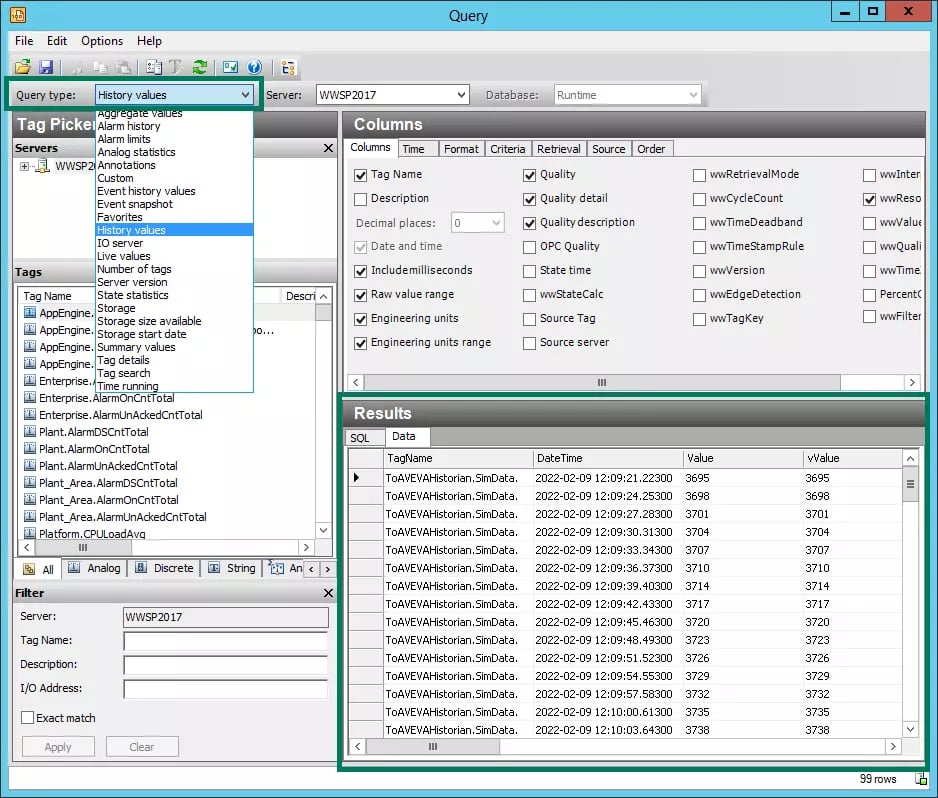
And find your tag or tags from DataHub in the Tag Picker on the left to add them to the query. You'll find them easily since they start with the data domain from DataHub.
The default Query Type is "Tag details" which isn't the most useful type so I would recommend changing this to either "History values" or "Live values" to confirm what AVEVA Historian is receiving from DataHub.
With the Trend tool, you can quickly visualize a specified range of historized data on a line trend for one or more of the tags you are historizing from DataHub.
How to Read Historized DataHub Data from AVEVA Historian
Now that your DataHub data is being successfully historized in AVEVA Historian, it's a simple incremental step to make it possible to expose that same historized data (this is only possible for data that is being historized to AVEVA Historian by DataHub, i.e. read operations are not possible for historized data in AVEVA Historian from other sources).
NOTE: If you have more than one external historian configured in DataHub, it is only possible to select one as the read source for historical data.
Simply select your configured AVEVA Historian that we just configured for writes from the "Read values from this connection" dropdown under the Read from Historian section. Alternately, you can just check the box "Src" next to your desired AVEVA Historian under the Write data to Historians section.

Now the tags you're historizing can be used by historical clients including the internal DataHub clients QuickTrend and WebView and by external OPC UA HA capable client applications.
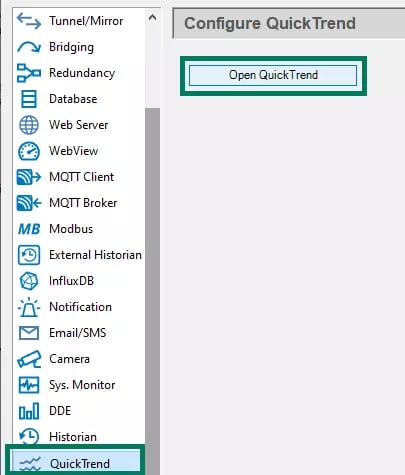
To quickly see this in action, we can use the DataHub QuickTrend to trend our historical data from AVEVA Historian. Just go to the QuickTrend section of DataHub and click "Open QuickTrend".
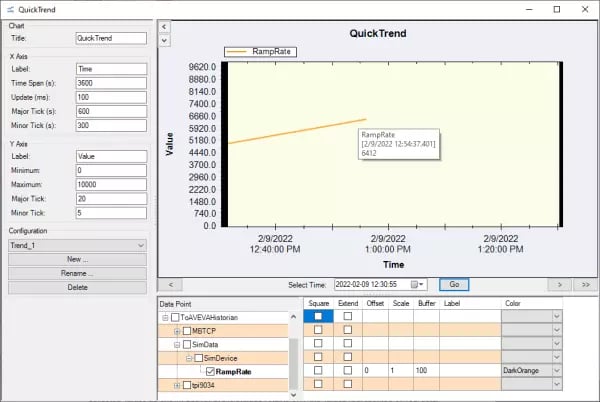
From the Data Point section at the bottom of the QuickTrend, simply select the desired tag or tags that are part of the data being historized and, on the left under "X Axis" specify the desired "Time Span" and "Update (ms)" rate. You can also adjust the scale Minimum and Maximum for the "Y Axis"
And it's just that easy to historize all of your DataHub accessible data sources to AVEVA Historian. In future posts, we will cover the more advanced features that we discussed earlier such as secure tunneling and store-and-forward and how they help you ensure all of your vital process data is there for decision making. To get started integrating your own data sources with AVEVA Historian with the Cogent DataHub, the free trial version is available here.
And don't forget to subscribe to our blog to not only be notified of future posts on DataHub V10 and also to find out about more relevant technical topics applying to industrial process automation and solving related challenges.