Are you or have you ever been in a situation where you were working with both an AVEVA™ solution and some other client or system (HMI, SCADA, other) and needed to share data? Perhaps your company acquired another company and its assets and a non-AVEVA HMI/SCADA came as part of the assets. Or perhaps your company merged with another and now your AVEVA system is expected to integrate with other systems. Your options for sharing data largely depend on what software interfaces these "other systems" support.
In this blog post, I'll discuss how to share your AVEVA System Platform 2020 (or newer) data via OPC UA (without using OI Gateway) using the Cogent DataHub® for situations where you have another non-OPC UA capable client application that needs access to process data in your AVEVA system.
So you're probably asking "How am I supposed to connect another HMI, SCADA, Historian or other solution to AVEVA System Platform? Starting with AVEVA System Platform 2020, a native OPC UA server interface is available in System Platform. Obviously, if your other system can act as an OPC UA client, you can connect it directly to System Platform. However, if your other system cannot act as an OPC UA client, how are we going to make this work?
Using an older version of System Platform? Click Here for Our Other How-To
Well, you could certainly use the OI Gateway to expose the System Platform data externally. However, for users looking for alternatives or needing to connect a system via an interface that isn't supported by OI Gateway, the Cogent DataHub makes it possible to convert data from OPC UA servers like System Platform 2020 or newer to other supported interfaces, including but not limited to databases, DDE clients/servers, OPC DA clients/servers, other OPC UA servers, MQTT clients/brokers, and more.
The key is that Cogent DataHub can support any or all different interfaces simultaneously and, once the data is in DataHub, it can be consumed by any other system with a supported interface.
To make an OPC UA Client connection to AVEVA System Platform, there are 3 main steps:
1. Configure the OPC UA Server Interface in AVEVA System Platform 2020 or Newer
The first step is creating and configuring an instance of the OPC UA Service in your System Platform ArchestrA IDE that will be accessible with the desired Port and security settings for external OPC UA client applications. So we need to do the following:
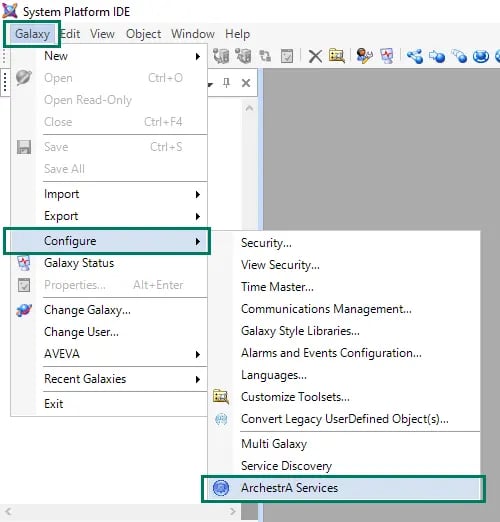
- Inside the ArchestrA IDE, in the menu bar at the top we select Galaxy -> Configure -> ArchestrA Services.
- This launches the "Configure ArchestrA Services" dialog where we need to expand the IDE name.
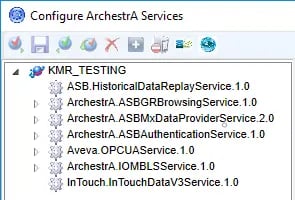
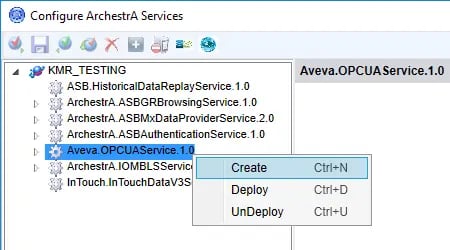
- Next, we find "Aveva.OPCUAService.[Version]" in the list, right-click and select "Create" to create a new instance of the OPC UA Service (if you have a default instance already created that you wish to use, you can skip this step).
- Expanding "Aveva.OPCUAService.[Version]" in the tree hierarchy shows the new instance with the default name of "OPCUAService_001" - to edit this, we need to right-click on the new instance and select "Check-out" to permit us to make the required changes.
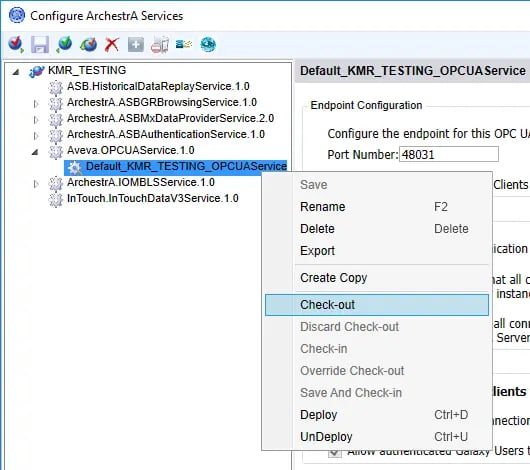
- It's now possible to make edits to the following properties of the OPC UA Service instance in the right-hand pane of "Configure ArchestrA Services".
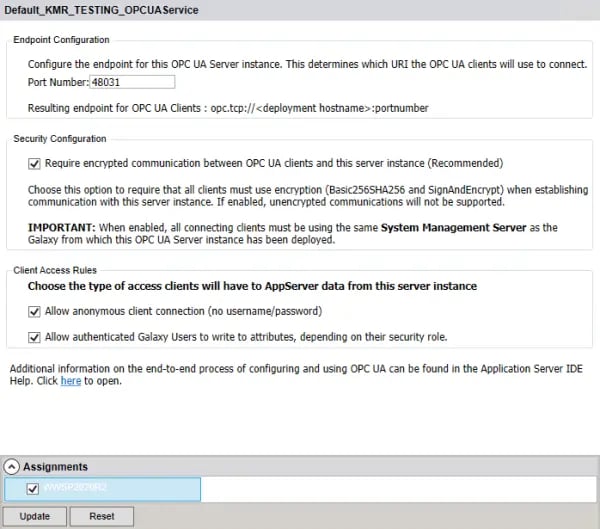
- Port Number - this defines the port portion of the endpoint that OPC UA clients will need to use to access this OPC UA server instance (as well as, the port that will need to be allowed in any firewalls between the OPC UA client and server machines). The default is 48031. Consult your IT department for the best port to specify for your particular application.
- Require encrypted communication between OPC UA clients and this server instance - By default, this setting is enabled, requiring that all OPC UA clients that want to connect to this OPC UA server instance must be using encryption (System Platform currently supports Basic256SHA256 with SignAndEncrypt - so the OPC UA client needs to use the same exact level of encryption).
Disabling this setting, which is not recommended, will allow OPC UA clients to connect without using any encryption, lowering the security level on your System Platform IDE and adding risk from outside security threats. This is especially true for applications where you plan to allow OPC UA clients to write to your IDE. Consult your IT department to discuss the risks of disabling this setting on your network. - Allow anonymous client connection (no username/password) - Leaving this setting enabled will allow any OPC UA client to connect to this OPC UA server instance without specifying an approved username and password. This is not recommended, as it removes an additional layer of security.
- Allow authenticated Galaxy Users to write attributes, depending on their security role - Leaving this setting enabled will allow IDE/Galaxy users that have provided a valid username/password when connecting to this OPC UA server instance and that user has the appropriate security role for changing attributes to perform writes. Disabling this setting will essentially make all OPC UA connections to this server instance read-only regardless of the authentication used.
- Assignments - Deployment hosts that are available for deploying this OPC UA Server instance will be available to select here. Depending on what host you select, the Assignment plus the previously defined Port Number will determine the OPC UA Endpoint URL that an OPC UA client will need to use to connect.
For example, if the hostname is "WWSP2020R2" with the default Port of 48031, then the OPC UA Endpoint URL will be:
opc.tcp://WWSP2020R2:48031
- Port Number - this defines the port portion of the endpoint that OPC UA clients will need to use to access this OPC UA server instance (as well as, the port that will need to be allowed in any firewalls between the OPC UA client and server machines). The default is 48031. Consult your IT department for the best port to specify for your particular application.
- Once the above settings have been configured as desired or required for your application, we click the "Update" button to apply any changes.
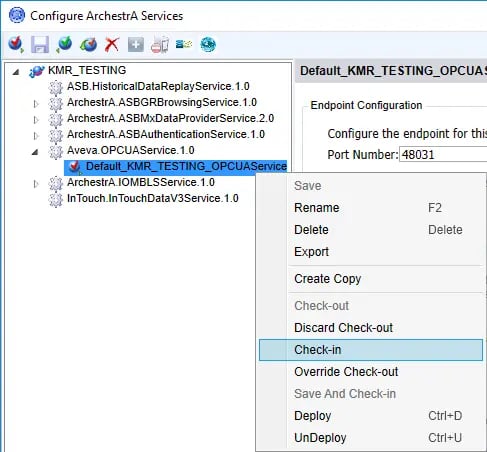
- Next, we need to right-click on the instance again in the tree hierarchy and select "Check-In" to check the instance back in after the edits have been applied.
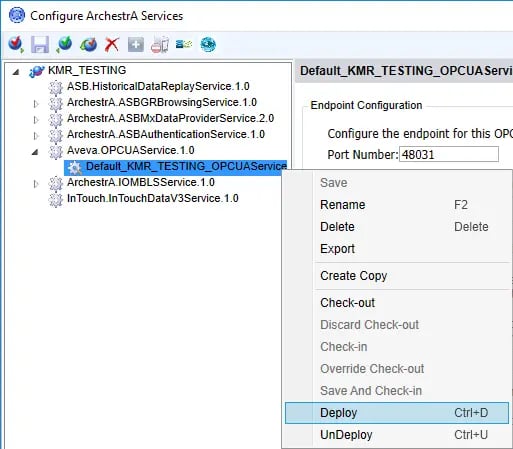
- And last but not least, we need to deploy the new OPC UA server instance by right-clicking on the instance again and selecting "Deploy". This pushes the service to the selected Assignment node where it will begin running and be available to OPC UA clients.
- We can now go ahead and close out of the "Configure ArchestrA Services" dialog window, as configuration on the OPC UA server side is complete for now (we'll revisit trusting the OPC UA client certificate after the initial OPC UA client connection attempt from Cogent DataHub).
NOTE: Depending on how your IT department has security configured on both the client and server machines, it may be necessary to request a firewall exception for the TCP port you specify for the OPC UA server. Please consult your IT department.
2. Configure Cogent DataHub as an OPC UA Client Connecting to AVEVA System Platform
Now that the OPC UA server service for System Platform has been configured and deployed, the next step is configuring the DataHub to act as an OPC UA client to that server with the following configuration:
-
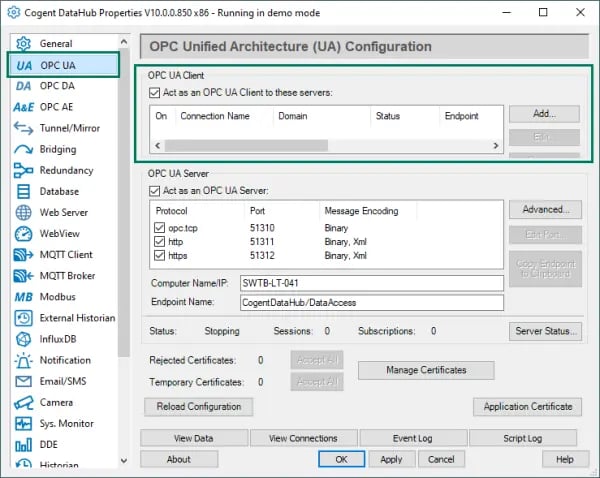
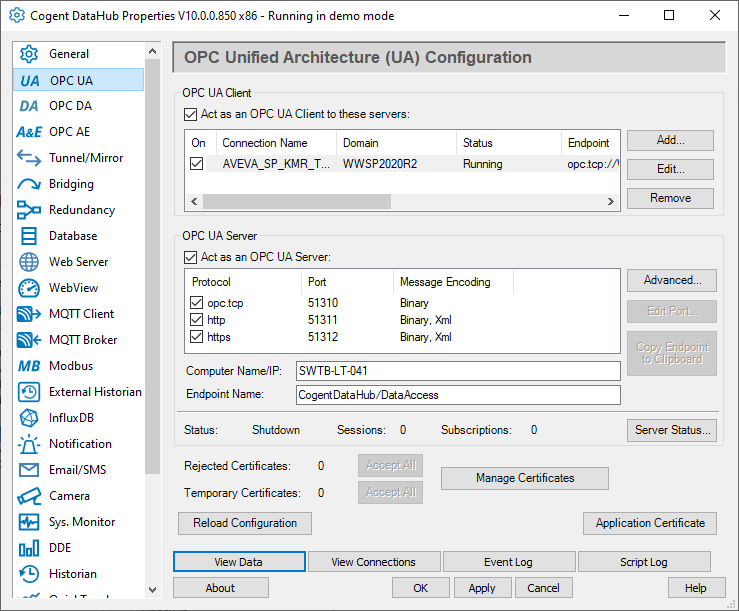
The settings relevant to OPC UA (both client and server) in the DataHub Configuration are all located in the OPC UA section of the configuration, as shown below. For this use case, we're specifically interested in the OPC UA Client section at the top. We need "Act as an OPC UA Client to these servers" to be checked here.
- Clicking "Add" brings up the following available settings for connecting DataHub to a new OPC UA server (we'll cover just the key settings that need to be configured to connect with System Platform - all other settings can be left at the defaults):

-
Connection Name - user-defined friendly name used by DataHub to identify this connection.
-
Discovery Domain - While DataHub doesn’t install with one, this setting is available to define any Local Discovery Server (LDS) services that you may have installed either on the same machine or on another machine that is network accessible by DataHub. This includes the Local Discovery Server available from the OPC Foundation (available to registered users).
If you have an available LDS, here is where you would enter the IP or hostname of the computer where the LDS is located - this allows the "Endpoint URL" setting to be populated with OPC UA servers that have registered with that LDS for selection.
If an LDS is not available, you can just enter the IP or hostname of the computer where the OPC UA server is located - for this application, the hostname of the System Platform galaxy where the OPC UA server was deployed - from our example, this would be WWSP2020R2. - Endpoint URL - For an OPC UA server, the endpoint is how an OPC UA client specifies a connection. In connecting with System Platform, this is where the endpoint that we referenced earlier would be entered: opc.tcp://WWSP2020R2:48031. You can either manually enter this or, if you entered the Discovery Domain, you can select this from the dropdown.
- Security Policy - For connecting to other OPC UA server, DataHub currently supports (in order of most to least secure): Basic256Sha256, Basic 256, Basic128Rsa15, or None (Default). For the connection to System Platform, we need to select Basic256Sha256.
- User Token Type - For authentication, DataHub supports Anonymous or User Name. If you wish to perform writes or if you disabled anonymous connections in the OPC UA settings in System Platform, you'll select "User Name" and then enter the relevant User Name and Password for your galaxy.
- Connection Test - This button allows you to confirm that your connection settings are correct. However, with OPC UA, there are some additional steps required before the test will complete successfully due to the require certificate exchange for encrypted OPC UA connections. So, first, we need to click the button:
- We get the following warning, since we have not yet trusted System Platform's security certificate for encryption - we can do so by simply clicking "Accept".
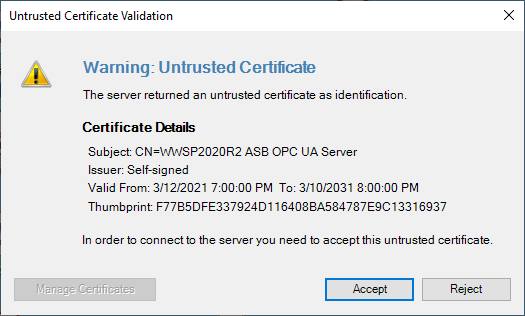
- However, the first attempt will still fail due to DataHub's certificate not yet being trusted by System Platform. So prior to being able to browse and select items we want to access from System Platform, we need to establish that trust relationship.
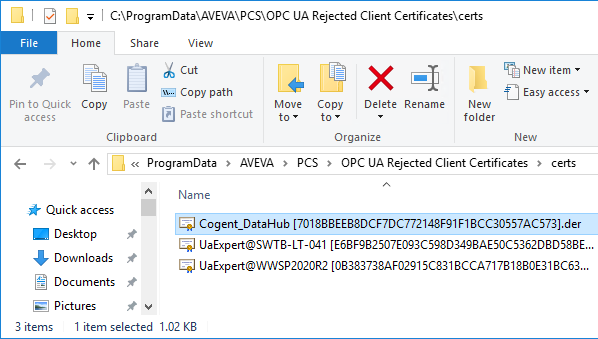
- On the System Platform galaxy machine, we need to browse to C:\ProgramData\AVEVA\PCS\OPC UA Rejected Client Certificates\certs where we find the .der certificate for Cogent DataHub.
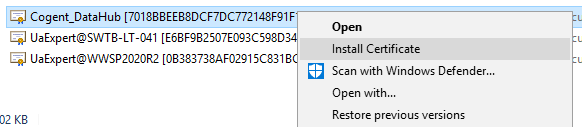
- Next we need to install the certificate so that it will be trusted. To do this, we need to right-click on the .der file and select "Install".
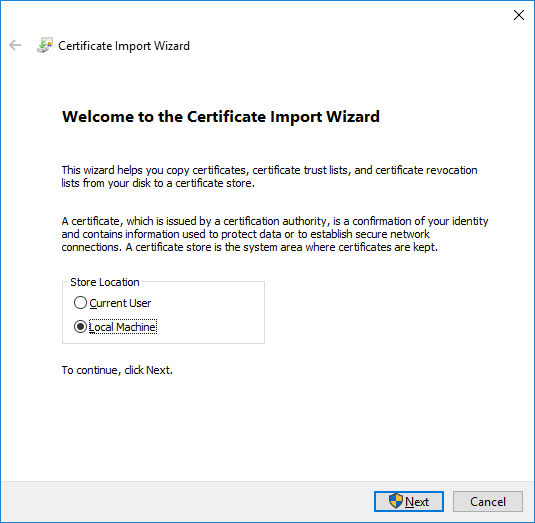
- This launches the Certificate Import Wizard. We need to select "Local Machine" for the Store Location and click Next.
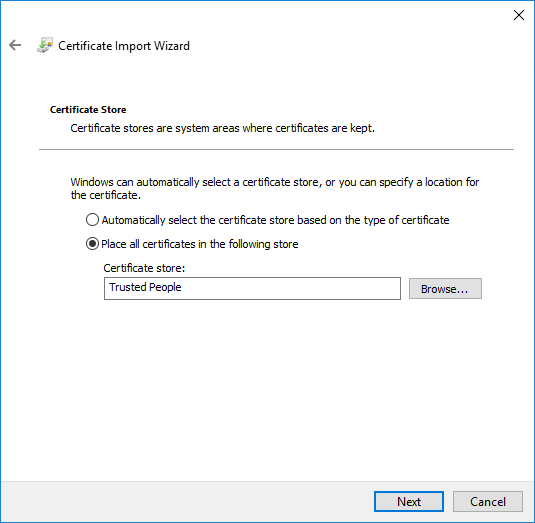
- Now we select "Place all certificates in the following store", click Browse and select "Trusted People" from the list, then click Next.
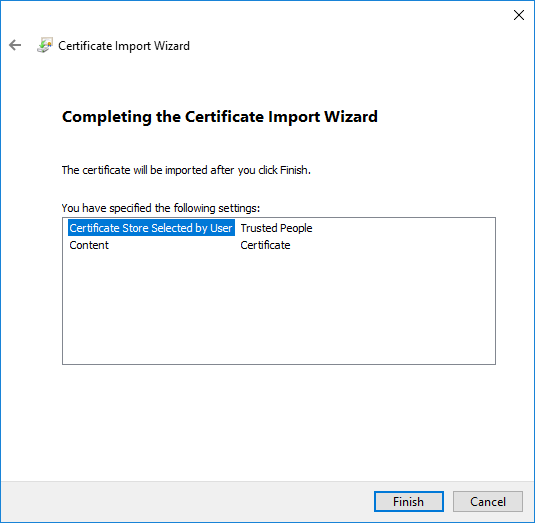
- Confirm the settings are correct and click Finish.
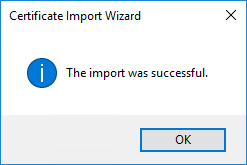
- Then you'll get a confirmation that the certificate was successfully imported.
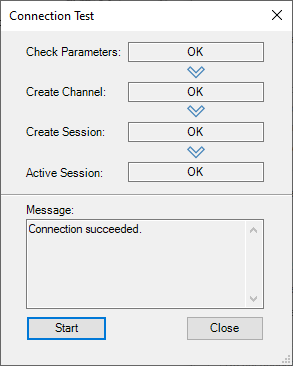
- Now, back in the DataHub, you can click the Connection Test button again and it will now complete successfully. Now we can proceed and configure the Nodes (i.e. items or tags) we'd like to access in System Platform.
- We get the following warning, since we have not yet trusted System Platform's security certificate for encryption - we can do so by simply clicking "Accept".
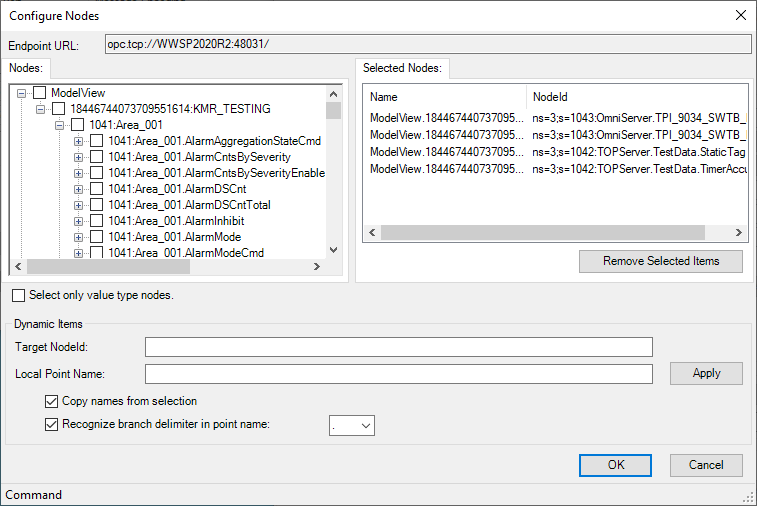
- Item Selection - here you will select either "Load All Nodes on Server" if you wish to access all items/points in the galaxy or "Manually Select Nodes" to browse and choose the specific items/points you wish to access. We'll select manually and click the "Configure Nodes" button to browse and select items.
- Data Domain Name - The data domain is the group where the items you select here will be accessible by other interfaces supported by DataHub. A meaningful, descriptive name is recommended here.
- Once all of the settings are complete, click OK and then always make sure to click Apply at the bottom of the main DataHub window to save and apply the changes, which will initiate the connection. Once connected, the status will show as Running.
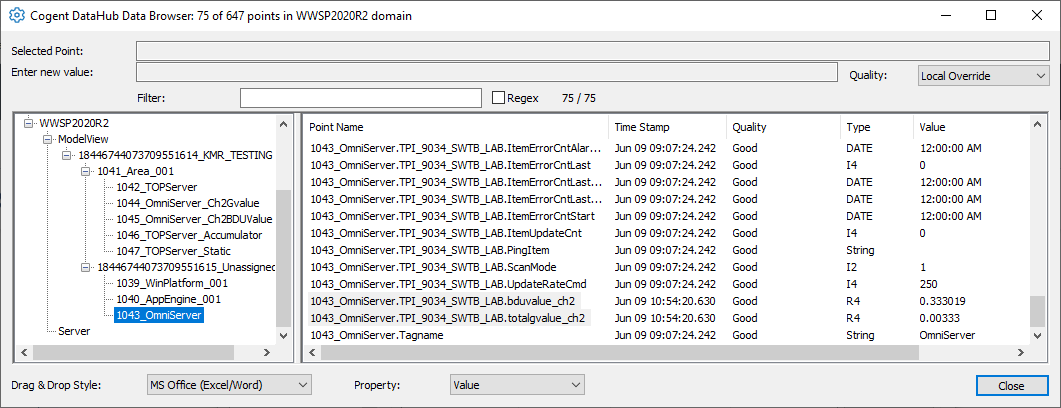
- And we can confirm successful connection, values and good quality by clicking "View Data" at the bottom and drilling down into our data domain in the Data Browser.
- Now that the data is available in DataHub, it can be shared with any of DataHub's other supported interfaces.
-
3. Configure One of the Other Cogent DataHub Interfaces to Use the Data Points from AVEVA System Platform
With DataHub, once the data is in a data domain in DataHub, it is just data. It can be used with any of the other supported connectivity interfaces that DataHub supports, including OPC DA client/server, MQTT client/broker (including Sparkplug B), and more simply by selecting/reference any of the points/items in the data domain that was specified in the OPC UA client settings.
For a wide selection of how-to resources for the other connectivity interfaces in DataHub, visit our Cogent DataHub videos resources repository for free on-demand tutorials.
So, as you can see, the Cogent DataHub makes it very straightforward and painless to share your AVEVA System Platform data with a wide variety of systems that can't natively act as an OPC UA client applications. Try it for yourself with our fully functional free two hour trial of Cogent DataHub.


