Unlike off-the-shelf OPC servers and drivers that talk to specific devices or protocols and no others, OmniServer can be configured to talk to virtually any device or combination of serial, USB, or Ethernet connected devices with some outliers based on the complexity of the protocol. OmniServer helps you bring data that would otherwise be inaccessible into your process and business systems, helping you make more effective decisions. In our experience there are still many software applications that do not have open interfaces such as OPC for data input. This is particularly common in quality control and test stand applications. Operators use a digital device to capture a measurement, and then have to type that into their test stand or QC software. This slows testing rates and can be error prone. There is a better way.
What you may not know is that since PCs were created, even in pre-Windows operating systems, software developers could write software that would “wedge” into the keyboard input interface in the operating system and could send data in as if it were typed on a keyboard by a human! Users would put the cursor on a software application input field, trigger something externally, and the value would magically appear. Barcode readers in text-based operator screens in some stores still operate this way! The wedge capability lives on today in Windows operating systems, and “wedge” software lives on.
OmniServer in addition to delivering data from serial & ethernet devices via digital interfaces such as OPC, can also operate as a keyboard wedge. The “wedge” term was so popular when OmniServer 2 was first developed, the extensions for it that can log data to databases, text files, and send emails were and are still called “Wedges” even though they have nothing to do with the keyboard input! We plan to migrate those extensions to be called plug-ins, but for now, they are still called wedges. It has been quite some time since we last talked about the features included with the OmniServer Wedge plug-ins. In this blog post, we will be highlighting the Keyboard Wedge.
The OmniServer Keyboard Wedge, included with OmniServer Wedge and Professional Editions, is a built-in component that allows you to send your device data to any Windows programs that accept keystrokes. This is a cost effective and time-saving alternative to manual data entry.
In this blog, we'll show you how the OmniServer Keyboard Wedge is an effective way of transferring data from your devices to programs such as spreadsheets, word processors, data loggers, custom applications and more.
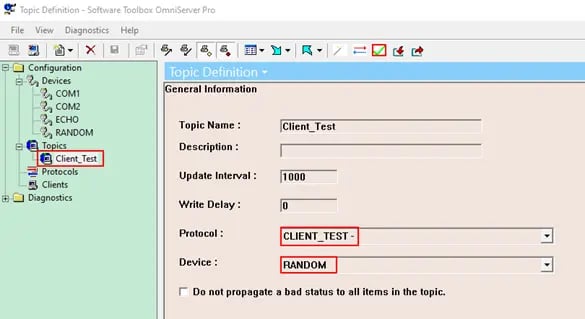
The following example illustrates how to configure the wedge to write device data to the application Notepad++, which is used by many developers as a supercharged Windows Notepad. This specific example will be utilizing the OmniServer Client_Test protocol, which comes with the installation of OmniServer, and the pre-built in “Random” device to generate values. Below you can see the configuration of our Topic, Client_Test. You may follow along by either configuring the same testing environment as seen below, or utilize the Device, Topic, and Protocol you may have previously configured. If you are going to follow along, you’ll want to download the OmniServer free trial software and install it and bring up the configuration UI.
Configuring the OmniServer Keyboard Wedge
To configure your first OmniServer Keyboard Wedge, you will need to navigate to the client sections available in the tree view of the configuration window. If you are not seeing any of the wedges available in your client section, that would indicate you currently have a license installed other than the OmniServer Wedge or Professional Edition or trial version. The Wedges will only be available if you are utilizing the free trial version of OmniServer or have a Wedge or Professional Edition license applied.
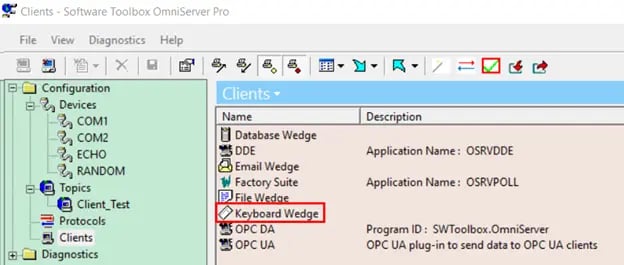
Next, you will double-click on the Keyboard Wedge to open the dialogue window. This is where we will define a new wedge. You can also modify and delete existing wedges from the window.
General Tab
After clicking New, you will be presented with the Keyboard Wedge properties.
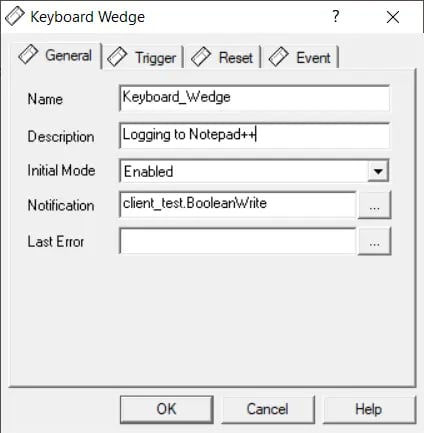
- Name: A descriptive field to represent this wedge.
- For our example, we will name this Keyboard_Wedge_Test.
- Description: this field is an optional field to provide additional details of what this Keyboard Wedge does.
- Our description will tell users where this wedge logs to.
- Initial Mode: Indicates whether the wedge will be active once you apply all wedge settings. By default, this is enabled.
- Notification: This option can be utilized to specify an item used to notify an HMI or SCADA that a Keyboard Wedge action has taken place.
- Specify a Boolean item that is configured in our protocol that to set as True once the wedge has been activated.
- Last error: This option will log to a string item if there is an error in the function of this file wedge. The error reported will be populated in the specified string item.
Note: Notification and Last Error properties are not required to be configured. You will only need to configure these properties if you plan on monitoring the Keyboard Wedge activity from a client application like your HMI, SCADA, MES, etc.
Trigger Section
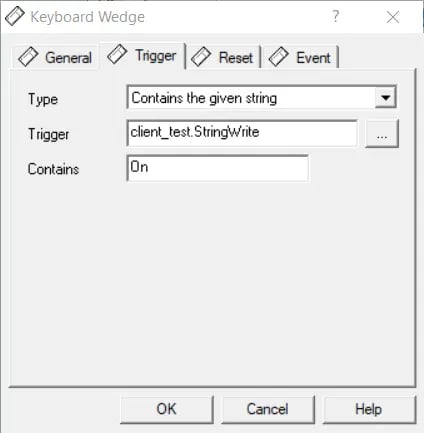
The Trigger tab where you define the conditions on which a keyboard event occurs.
- Type: specifies the condition on which the trigger activates. The available options are:
- Any New Value: will be triggered upon the receipt of any new value for the trigger item.
- Non-zero Value or Non-empty String: triggers when the value of the trigger contains a non-zero or non-empty string.
- High Limit: triggers when the value of the trigger item moves above a set value.
- Low Limit: triggers when the value of the trigger item moves below a set value.
- Matches a Given String: triggers when the value of the trigger item matches the string specified.
- Contains the Given String: will be triggered when the trigger contains a given string. String parameters are set in the “Contains” field.
- Deviates from the give value: will be triggered when the value of the trigger deviates from a target value.
Depending on the Type property selected, the remaining property configuration options will vary. In this instance, we have opted for Contains The Given String as our designated trigger condition.
We must now specify the trigger item that we want the wedge to monitor. By selecting the ellipsis button, you can navigate to the available items configured within your protocol. We have chosen the item “StringWrite” with the data type string to align with our selected trigger condition. Lastly, it is necessary to specify the string against which the trigger will be checked. The wedge will compare the value of our item, StringWrite, with the string value configured in the Contains setting.
Reset Tab
The Reset Tab is the section where you specify which item the wedge should reset and to what value, right before the wedge's action is performed. The most common use of the Reset Item and Value is to reset the value of the wedge trigger once the wedge has completed its action, thereby forcing the wedge to record all occurrences of the trigger and not just new values.
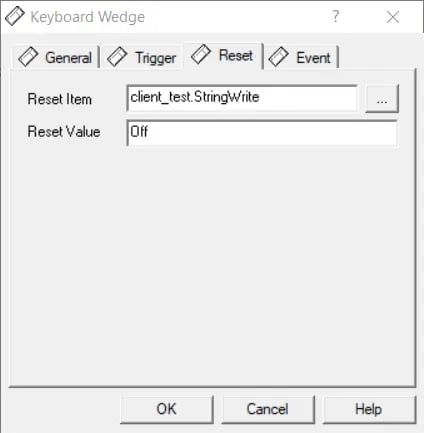
For our example, we will reset the configured trigger item, StringWrite, to the string value “Off”.
Event Tab
The last section of our configuration is the Event section. This tab defines the application title, application name, and keyboard sequence to which the wedge will send trigger information.
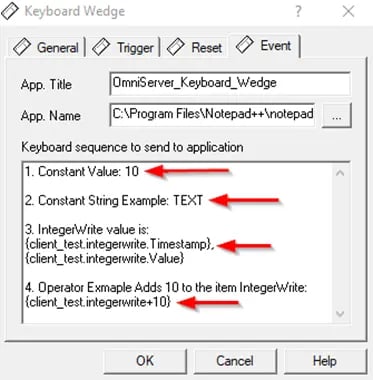
- App Title: The name of the application the wedge will send the data to once triggered. If this were your test stand software, it would be that application’s name. For our application we are going to have the wedge send the data to a text file via Notepad++.
- In our case, we have saved a .txt file on the Desktop of the machine running OmniServer. Once triggered, the wedge will open this file and write the data contained in Keyboard Sequence.
- If this were your test stand software, this App Title and App.Name is how OmniServer would “Find” the application that it needs to send the keyboard input to.
- Name: The executable filename of the application, such as your test stand software, that will be used to open the Application Title. You will need to input the entire file path and executable name in this field.
- For our case, we will be utilizing the executable notepad++.exe.
- Keyboard Sequence to send to application: This is the data sent to the application once the wedge is triggered. Similar to an OmniServer protocol, anything in this field will be treated as an ASCII text, what you see is what you get.
- For our example we will use several different expressions to showcase the Keyboard Wedge functionality.
An expression is any sequence of Items, Constants (numeric or string), and/or Operators that, when evaluated, produces a single result.
- Constants are simple numeric of string expressions. They are called “Constants” because their value never changes.
- In the screenshot above you can see that we will be logging the constant integer value of 10.
- In the screenshot above you can see that we will be logging the constant integer value of 10.
- When logging String Constants the value of the constant must be enclosed by quotes.
- Items are made available by the server. An Item is expressed using its "topic.Item" naming convention.
- For our example, client_test.integerwrite.Value, will log the value of the item IntegerWrite. We will also be logging the timestamp of the item by using client_test.integerwrite.Timestamp syntax.
- For our example, client_test.integerwrite.Value, will log the value of the item IntegerWrite. We will also be logging the timestamp of the item by using client_test.integerwrite.Timestamp syntax.
- An Operator performs functions on items and or constants. Arithmetic, Comparison and Logical operators are included in this group.
- For our example, we will be adding 10 to the value of the IntegerWrite item found within the Client_Test protocol in use.
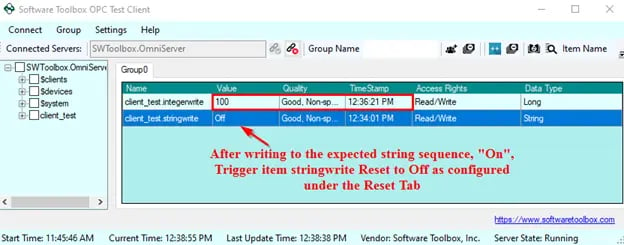
Keyboard Wedge In Action
To test our configuration, we will be utilizing the OPC Test Client that is installed with OmniServer by default. You can launch this test client from the OmniServer configuration window by clicking the green check mark enclosed by a red box found on the tool bar.
Below you can see we have written a value of 100 to the item IntegerWrite at 12:36:21 PM. Next, we write our string syntax the wedge trigger is monitoring, “On", to the trigger item, StringWrite. The value automatically reverted to the Reset string syntax, “Off”, after launching NotePad++.
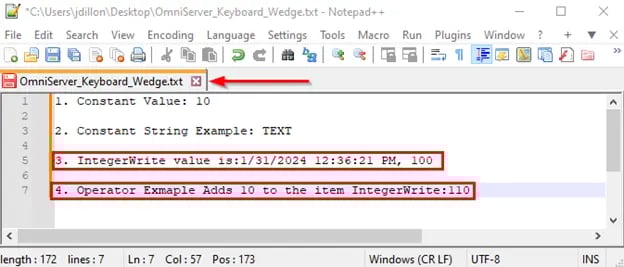
Upon launching NotePad++, you can see the correct application file name was opened and the configured Keyboard Sequence was logged. If this had been your already running test stand software, and you put the cursor on the right field to enter the data in, it would have just appeared as if an operator typed it!
Here we can see the Timestamp and Value of IntegerWrite match, and our sample Operator sequence was completed correctly.
We hope this blog has provided meaningful insight into the configuration of OmniServer’s Keyboard Wedge. If you are new to OmniServer, please check out our OmniServer Video Resources to help you get started.
As always, let us know if you have any questions, and don’t forget to subscribe to our blog to find out about the latest updates on our products.
Ready to log data from your own non-standard devices using OmniServer? Download the fully-functional free trial.