OPC Router provides connectivity to a wide range of data sources including ERP systems such as SAP, a variety of relational and other databases, conversion of file data including CSV, XML, JSON and others, IIoT systems including REST and SOAP web services and MQTT brokers and more. It's often necessary for OPC UA client applications (such as HMIs, SCADAs and other software clients) to need access to such data sources. OPC Router also supports acting as an OPC UA server.
In this blog post, we will cover the basic steps to map such non-OPC UA data sources supported by OPC Router to OPC UA nodes/items for access by external OPC UA clients.
There are six basic steps users will need to follow to get non-OPC UA data sources into OPC UA client applications using OPC Router.
1. Configuring Non-OPC UA Data Sources in OPC Router
Once your data is available in OPC Router it can then be transferred for use with any of the other supported connectivity interfaces that OPC Router supports, including SAP, OPC DA client, OPC UA client, OPC UA server, MQTT client/subscriber, a variety of databases and more all via visual workflows (think drag-and-drop flow charts allowing you to wire together different data sources logically).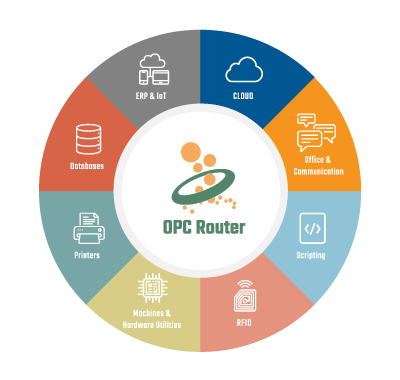 For tutorials on configuring specific data sources in OPC Router, here is our list of on-demand OPC Router training videos.
2. Configuring Global Variables in OPC Router
So in order to expose the variables from your other system / data source as OPC UA Nodes, they will need to first be mapped to what are referred to as Global Variables in OPC Router. You will need to configure one Global Variable for each corresponding variable from your data source. Global Variables are defined under the Plug-ins in OPC Router, under Advanced -> Variables.
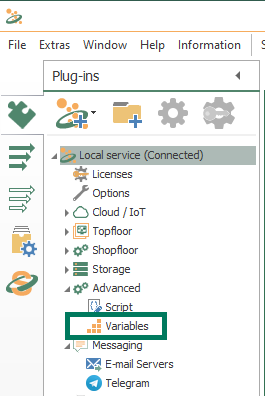
You'll notice there are Global Variables and Local Variables - it's necessary to use Global Variables, since Local Variables are only available for use internally and we need the variables to be visible to OPC UA clients.
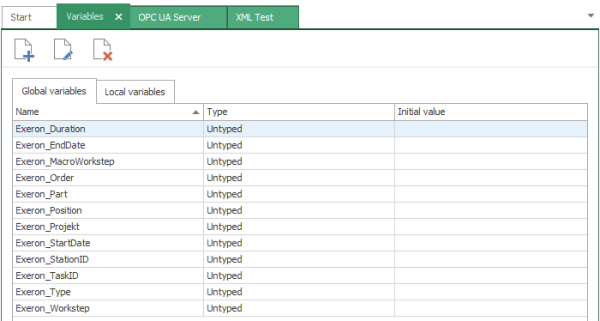
3. Configuring Connections between Source Variables and Global Variables in OPC Router
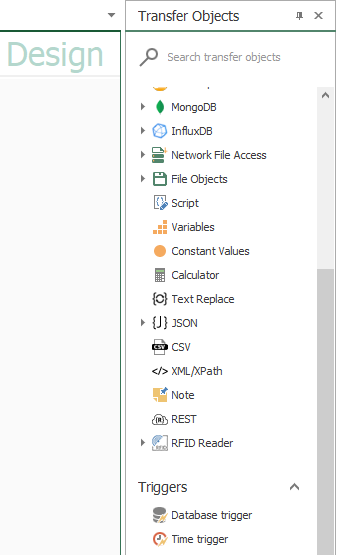
For the purposes of this post, we'll refer to an OPC Router example that parses data from an XML file into Global Variables. Sources and Destinations and Triggers (which determine what "triggers" a data transfer from source to destination) can be dragged/dropped to the connection Design space from the Transfer Objects pane on the right-hand side of the interface.
The process would be similar for other data sources with respect to the arrow connectors shown coming from the variables in the source and going to the destination Global Variables.
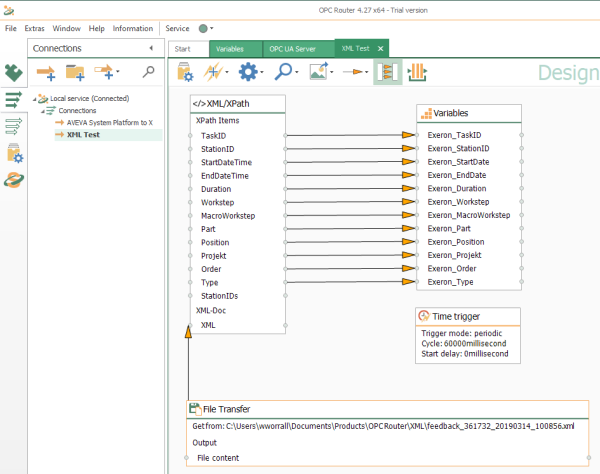
The visual workflow for connections in OPC Router makes it easy to drag the connector from the source point/variable to the destination point/variable - in this case, from individual variables parsed out of an XML file to the Global Variables that were created previously. This connection results in the values from the XML file being exposed in those Global Variables, where they are then visible to any OPC UA client applications connected to OPC Router.
4. Configuring OPC Router as an OPC UA Server
Now that the data from your source system is available as Global Variables, the OPC UA server endpoint and settings just need to be configured. The settings for connecting OPC UA clients to OPC Router are configured via instances of the OPC UA Server plug-in.
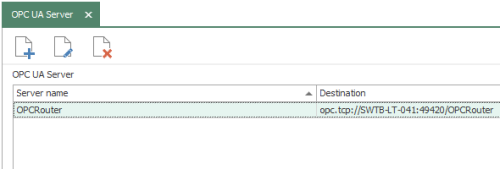
Each instance is a separate OPC UA server endpoint with its own specific port and security options (configuring the Address space, which defines data variables and objects that will be available to OPC UA client, is beyond the scope of this post. Clicking "New" or "Edit" buttons presents the following available setting:
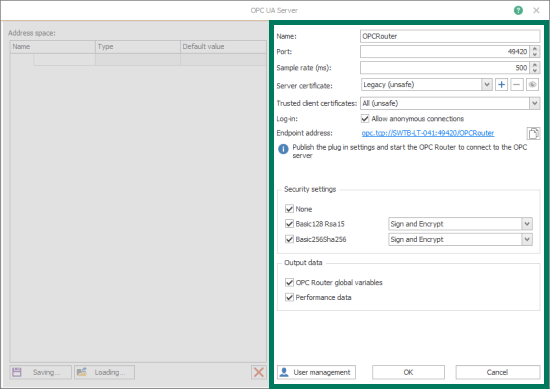
Here are some details on the key settings pertaining to security you will need to configure for the OPC UA server endpoint (the other settings shown above either don't pertain to security or can generally be left at the defaults):
- Name - user-defined friendly name used by OPC Router to identify this OPC UA server endpoint.
- Port - the TCP port associated with this OPC UA server endpoint for OPC Router - this will be appended to the end of the endpoint URL.
- Server certificate - this dropdown allows you to select an certificate (either a self-signed certificate that you've already create in OPC Router or a third-party certificate you've imported in Certificate Management.
Alternately, you can:
-
Click the "+" button to define a new self-signed security certificate for use with this endpoint.
-
Click the "-" button to delete the selected security certificate.
-
Click the "eye" button to view the details of the selected security certificate.
-
- Trusted client certificates - selects which OPC UA client security certificates to accept/trust for this endpoint. The default setting is "All" which will result in the certificate of any OPC UA client attempting a connection to this endpoint getting trusted automatically. Other options include:
- Router - if the certificate has not already been imported and trusted through certificate management, you will be prompted to either trust or reject the OPC UA client's certificate when attempting to connect.
- Windows - use this option if you've imported your OPC UA client's certificate to the "Third-Party Root Certification" section in the Local Machine Certificate Manager in Windows (Just search for "certificates" in Windows and select the options for "Manage computer certificates").
- Router - if the certificate has not already been imported and trusted through certificate management, you will be prompted to either trust or reject the OPC UA client's certificate when attempting to connect.
- Log-in - Allow anonymous connections - enabled by default, this checkbox being enabled allows OPC UA clients to connect to this OPC Router endpoint without providing a username and password for authentication.
When disabled, any OPC UA client connecting to this endpoint will need to provide a valid username and password as defined in the "User management" configuration for this endpoint.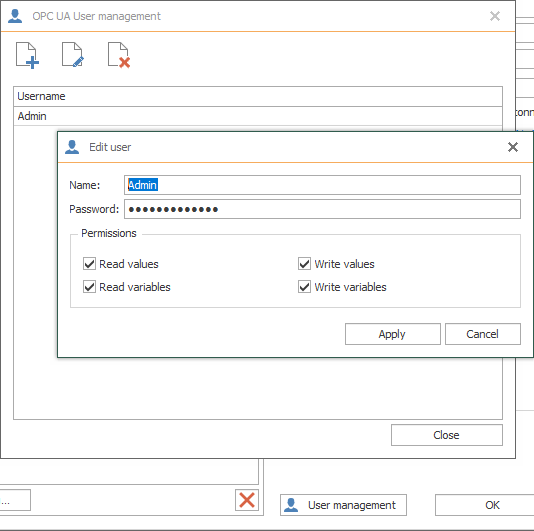
- Endpoint address - this is the actual endpoint you will need to specify in your OPC UA client for connecting to this endpoint and is based on the previous settings. Click the "Copy" button to the right of the endpoint to copy it, making it easy to paste right into your OPC UA client (consult the documentation for your OPC UA client for how to specify the OPC UA server endpoint to connect to).
- Security settings - these settings define which encryption and signing options will be available for connections to this specific OPC Router UA server endpoint from OPC UA clients. All options are enabled by default.
- None - least secure, no encryption will be used for UA connections using this option.
- Basic128Rsa15 - available signing options include Sign and Encrypt (default and most secure), Sign or both can be available.
- Basic256Sha256 - most secure. Available signing options include Sign and Encrypt (default and most secure), Sign or both can be available.
- Output data - It's imperative that "OPC Router global variables" be enabled here. Otherwise, the source data mapped to Global Variables earlier won't be available to OPC UA clients.
Once you've edited the OPC UA Server settings for connections from an OPC UA client, just click OK to save and exit the dialog.
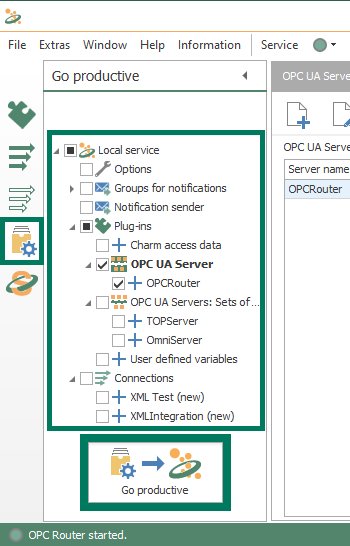
5. Setting All OPC Router Changes Productive
As with any other changes in OPC Router, make sure to go to the "Go Productive" section of the configuration and select the elements being used in your project and click the "Go productive" button to publish the changes.
6. Connecting OPC UA Client to OPC Router
Now you can configure the OPC UA client interface of your application, making sure of the following:
- Use the "Endpoint Address" discussed earlier from the OPC UA Server endpoint of OPC Router.
- Use a Security Policy in your client that is also supported and enabled in OPC Router - Basic256Sha256, Basic128Rsa15, or None.
- If you wish to use authentication, make sure to use the user/password that you've configured in the "User Management" section of the UA endpoint discussed earlier or to enable "Allow anonymous connections" (if you don't wish to use authentication).
- Depending on your network architecture, firewall setup and security, you may also need to add a firewall exception for the "Port" specified in the OPC Router OPC UA server endpoint.
For this post, we'll use the example of connecting to OPC Router using the Unified Automation UAExpert test client. The process will likely be slightly different with your own client but the basic steps will be the same.
- Add a New Server Connection:
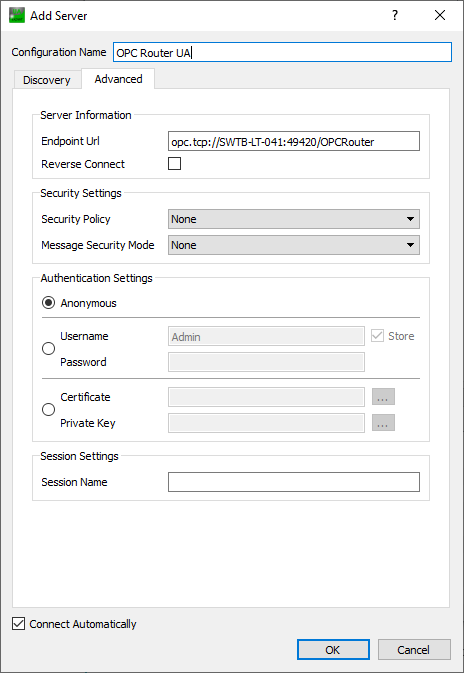
- Under Advanced Settings:
- Specify a meaningful Configuration Name.
- Paste the endpoint from OPC Router in the Endpoint Url field.
- Specify the Security Policy (Basic256Sha256, Basic128Rsa15, or None) - by default, OPC Router has all three enabled.
- Specify the Message Security Mode (Sign & Encrypt, Sign, or None)- by default, OPC Router has all three enabled.
- Specify Authentication Settings - either "Anonymous" or specify a Username and Password from OPC Router.
- Click OK to initiate the connection to OPC Router.
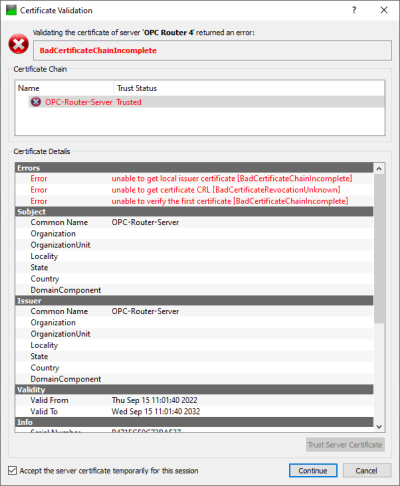
- Click Trust Server Certificate to trust the OPC Router's security certificate and click Continue to complete the connection.
- Under Advanced Settings:
- Browse OPC Router's UA namespace:
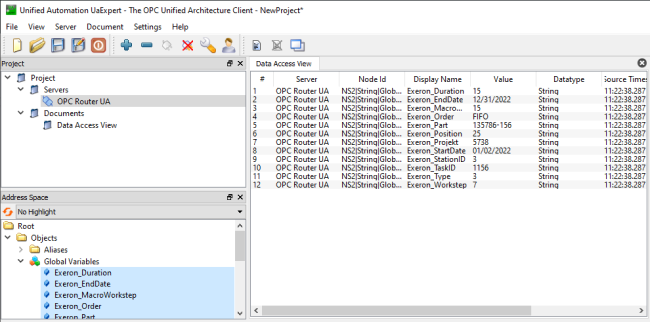
- Under Root -> Objects, you'll find a branch for Global Variables that, when you expand it, the Global Variables from OPC Router are available.
- They can then be dragged/dropped to the "Data Access View" of UAExpert, where they'll start to update with the current value.
This indicates you're receiving data all the way from OPC Router through the OI Gateway and into System Platform via OPC UA, for easy access to all of the data sources supported by OPC Router over secure remote OPC UA connections.
Don't forget to subscribe to our blog to not only be notified of future posts on OPC Router and AVEVA applications but to also find out about more relevant technical topics applying to industrial process automation and solving related challenges.
Want to try the latest OPC Router for yourself with your own OPC UA Clients? Download the free trial.