As someone who has worked with non-standard device connectivity using OmniServer for over 10 years, I sometimes take for granted the knowledge that I have gained over that time. If you're anything like me, once you figure out the data you need from your device's protocol document, you just want to get your protocol knocked out as quickly as possible so you can start communicating.
In this post, I'm going to cover 4 key tips that I've learned over the years when working in OmniServer to build a protocol that you may not have realized and that could add convenience and save you a lot of time, which is time you can be spending on other important tasks.
In case this is your first time hearing about OmniServer, a quick word about OmniServer's most basic purpose:
OmniServer is a user-configurable I/O Server which means if you have a protocol document that tells you the format of the commands and responses for your device, there's a very good probability that OmniServer can be configured to communicate with your device. ( .)
.)
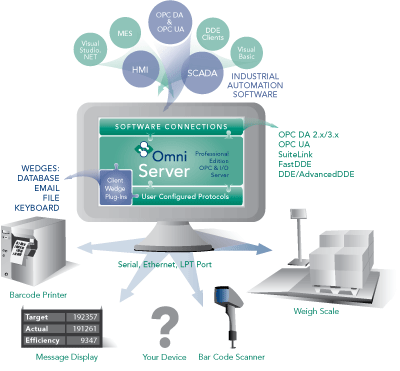
With that flexibility comes a whole host of functionality to accommodate the widest range of devices. Below are are some useful tips to help as you work with OmniServer to configure your protocol. (To learn even more about working with OmniServer protocols,  .)
.)
1. Basic syntax for Decimal and Hex Numbers
While the OmniServer sequence builder provides all of the tools to properly format the different parts of your protocol messages, there are many OmniServer users who like to type the messages freehand. This gets easier as you learn what the different formatting means.
A key format that is used frequently is sort of a "shorthand" syntax for defining a decimal or a hexadecimal number in an OmniServer message, which can save a lot of time when you're defining a lot of number sequences.
- For Binary Decimal Numbers (0 - 255) - You can use the \nnn format in your OmniServer message. For example:
- To send a Decimal 56 -> \56
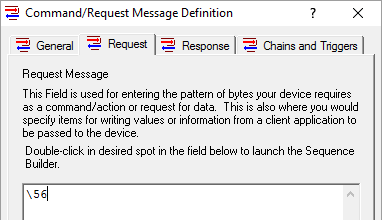
- To send a Decimal 56 -> \56
- For Hexadecimal Numbers (00 - FF) - You can use the \xhh. For example:
- To send a Hexadecimal A6 -> \xA6
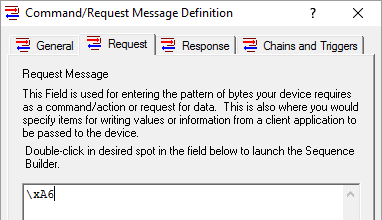
- To send a Hexadecimal A6 -> \xA6
Alternately, in the sequence builder, you would define such numbers by double-clicking in the proper location of your message to open the sequence builder, then select "Single Assignment" and proceed to the "Number" section, as seen below:
- For Decimal (Binary 0-255):
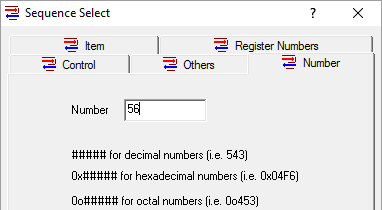
- For Hexadecimal (00-FF):
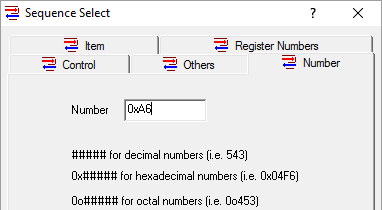
Either method of defining the number sequences gives you the proper result - you simply have options based on your preference and what allows you to work in the most efficient manner possible when building your protocol.
2. Changing the Default Byte Order
While the majority of devices send and receive numeric binary data in the Least Significant Byte to Most Significant Byte order (LSB to MSB), also known as Little Endian, there are many cases where the Most Significant Byte needs to come first (known as Big Endian or MSB to LSB).
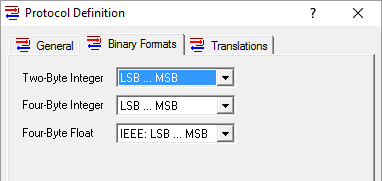
It's quick and easy to swap the default endianness in your OmniServer protocol:
- Select and open your OmniServer protocol.
- Double-click on "Protocol Settings".
- Go to the "Binary Formats" tab.
- For each different data type select either LSB...MSB (for Least Significant to Most Significant) or MSB...LSB for Most Significant to Least Significant.
And, if you need individual items or sequences treated differently from the specified endianness for the overall protocol, keep reading for how to specify ordering on an individual sequence level.
3. Flexible Sequence Byte Ordering
For those protocols where byte ordering doesn't follow the "rules" of Big or Little Endian, OmniServer provides the flexibility to switch around bytes into any order you need for any sequence of bytes. Simply use the Format Code "O", for Order, and then type in your desired byte order.
For example, suppose your data came in from the device looking like this:
DBCA
But you would rather have it in alphabetical order. Consider the following format (where StrVal is your item name):
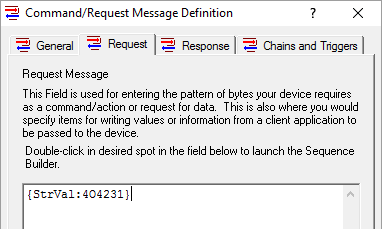
Using this formatting, OmniServer will read in four bytes, then "order" the bytes with the 4th byte first, the 2nd byte second, the 3rd byte third, and the 1st byte fourth, so your final result will looking like this instead:
ABCD
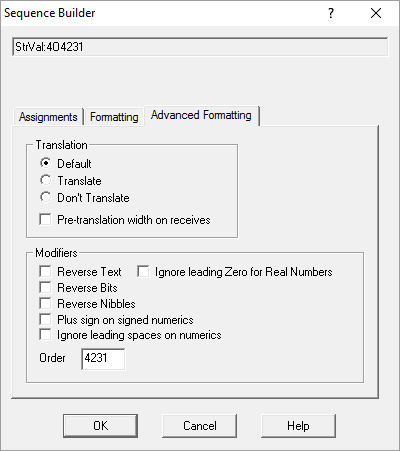
Alternately, in the sequence builder, you would define such ordering by double-clicking on the desired sequence and selecting the "Advanced Formatting" tab, then entering the desired sequence in the "Order" setting, as shown below.
4. Notification & Message Count Items Keep You Informed
You can always tell when a Command/Response Message has completed by the use of an associated Notification Item or Message Count Item. But what are these special types of item?
A Notification Item is an Integer or Discrete Item that is set to One (or True) if the Command/Response Message has completed successfully, or set to Zero (or False) if the Host Message errored in some way. Some common errors include the expected response not being received within the timeout, an error response being received instead, or there was an error with an Error Detection Code calculation on the response. (For a guide to using OmniServer's built-in troubleshooting tools,  .)
.)
A Message Count Item is an Integer Item that is designed to increment by one each time a Command/Response Message or an Unsolicited Message completes successfully. If you prefer to have a value change for each successful communication or if you'd like to keep a count of how many times a command/response has completed, the Message Count Item is the option to use.
To set up a Notification Item, do the following:
- Select and Open your OmniServer protocol.
- Select File | New | Item from the OmniServer menu. Give your item a name, and select a type of Integer or Discrete and click OK.
- Open the desired Command/Response Message.
- On the General Tab, select the item you just created as the Notification Item and click OK.
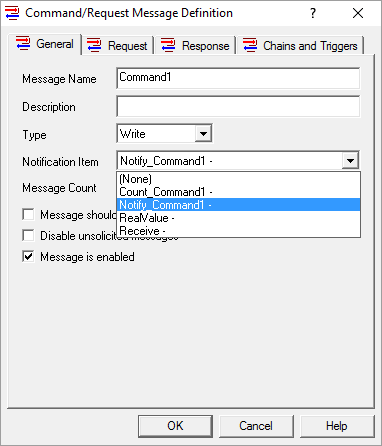
To set up a Message Count Item, do the following:
- Select and Open your OmniServer protocol.
- Select File | New | Item from the OmniServer menu. Give your item a name, and select a type of Integer and click OK.
- Open the desired Command/Response or Unsolicited Message.
- On the General Tab, select the item you just created as the Message Count Item and click OK.
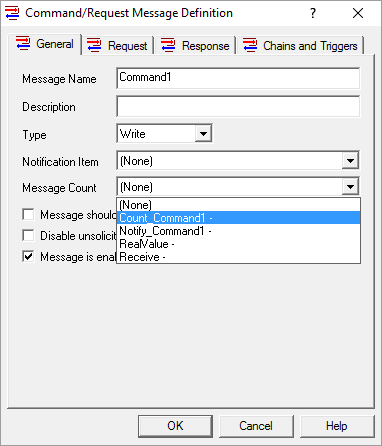
Finally, you'll need to create corresponding items in your client application for the Notification or Message Count Items. When monitoring a Notification Item in your client, as long as the value remains at One, you can be assured that the Host Message was successful.
If the value ever reverts to "0", your operator will know there was an issue with the Command/Response message and that troubleshooting in OmniServer is necessary using the available diagnostic tools to determine what the issue was and resolve it quickly.
For monitoring a Message Count Item in your client, as long as the value is incrementing at the desired frequency, you will know the message is operating normally. What that desired frequency is ulitmately depends on the frequency with which you are sending the command or expecting a response from our device, which will be specific to your own implementation.
Where can I get more information?
If you're new to non-standard device connectivity, perhaps you have a protocol that you’re not really sure about how to get started. As always, we're happy to help with a  or to
or to  .
.
Email us at  with your questions and remember to
  for more quick and easy OmniServer tutorials and tips. Then, make sure to
  .
.


