As you may be aware, Wireshark is an incredibly useful freeware tool for capturing network traffic on a computer. Our support engineers find it to be invaluable for troubleshooting Ethernet communications issues, as it provides visibility into more than just the protocol data packets, including handshaking calls and responses.
Wireshark also provides options for specifying capture filters (for defining a smaller subset of data to be captured that you're interested in) or you can capture all traffic and apply a display filter to narrow down the traffic that is visible.
Continuing our Tech Support Corner blog series, this blog post covers how to go even further using Wireshark by defining scripted custom Wireshark captures for specific use cases, which is helpful for capturing infrequent issues without wasting a lot of unnecessary hard drive space.
Do you ever find yourself in need of troubleshooting Network Traffic using Wireshark, but you are concern with at how much storage the captures will take on the system? Well, you are in luck because today, we will learn how to write a simple script for running custom Wireshark captures.
If you haven't used Wireshark before and aren't familiar with the basics, we strongly suggest you first take a few minutes to read the Tech Support Corner: Using Wireshark as a Supplemental Troubleshooting Tool post. That post will provide you with a great explanation on what Wireshark is and how to use it to troubleshoot network communications. However, if you are already familiar with how to use Wireshark’s graphical interface and run simple captures, feel free to continue with the rest of this post.
How to Determine the Parameters for Custom Wireshark Captures
Configuring the script is simple and it only requires setting five Wireshark properties and one command. Those five properties are as follows:
- InterfaceID – This property tells Wireshark which Network Interface it needs to use for the capture. If you are not sure which interface it needs to be, you can do the following:
- Open Command Prompt and Run the command ipconfig:

- Then look for the network interface that you would like to run the capture for:
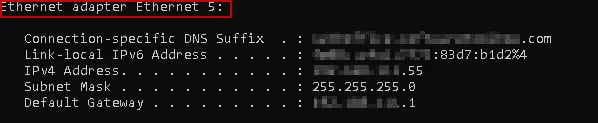
As you can see above, the interface that we will be using in this example is called “Ethernet Adapter Ethernet 5”. - Now, from Wireshark’s Install directory, run the command tshark –D:
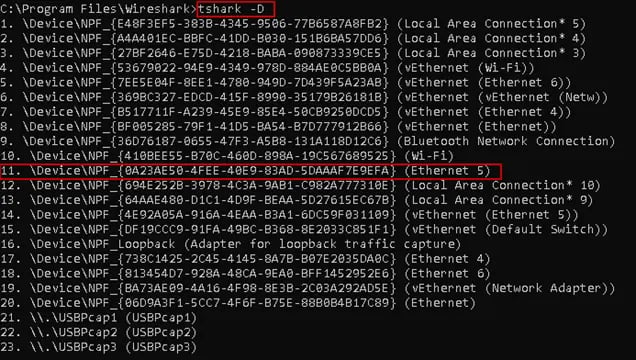
- As you can see above, the adapter we are going to use for this example is going to be Interface 11. This means that our property will look like the following:

- Open Command Prompt and Run the command ipconfig:
- Folder – This property will tell Wireshark where to place the captures. Here is how it should look:

- Filter – This property tells Wireshark the capture filter to use for narrowing down which packets to capture. For example, in order to only capture traffic to/from a specific IP address, the filter would look like this:

- Interval – This property will tell Wireshark when to switch to a new file when time is an exact multiple of the value configured in seconds. So, if you are looking to have the captures split out per hour, you would want to set up the property to 3600 as follows:

- Files – This property tells Wireshark how long it should retain files. In other words, this property will limit the memory consumption by telling Wireshark when to overwrite the oldest file.
For example, if you would like to run the capture over the weekend, you could configure this setting to be “72”. This will capture 72 hours’ worth of traffic.
Keep in mind that this property in combination with the interval property will provide you with the window of captures that you are targeting. In this example, we are looking to capture a 3-day window with a separate file every hour so the property will look like this:
Now that we've determined all the properties we need, we need to tell Wireshark to start the customize capture with the one specific command I referenced earlier. Here is how we are going to do it:

And now that we have discussed each property and the command to run the capture, it's time to discuss how to create the actual batch script that will allow you to run this custom capture with the click of a button.
How to Configure a Batch File for Custom Wireshark Captures
If you are not familiar with batch scripts, it's alright since you won't need to be an expert in the deep technical aspects of batch scripting to make use of this example. You only need to know that a Batch file is simply a text-based script file that stores commands that are executed via Windows Command prompt.
Here is what our batch file looks like with the previously discussed properties and command:
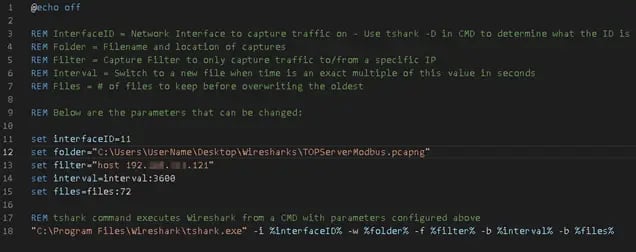
And, just for clarity, anything after the letters REM is considered to be a comment and it will not be executed by the script. You can use that syntax to provide meaningful descriptions of what the script is actually doing.
To create this batch file, simply follow these basic steps:
- Using any text editor of your choice, create a new text file. (You can even use Notepad if you would like.)
- In the body of the file, enter the properties and commands. We recommend you start with “@echo off”. This command will prevent the command prompt window from appearing while the script is being executed. However, if you would like to see the command prompt window, you can use “@echo on” instead.
- Enter the properties with your specific settings as shown above (using the values we discovered earlier).
- Finish with the command to be run as shown in the image above on Line 18.
- When you are done, go to File > Save as and enter a name for the file (i.e – MyFirstBatchFile.bat) make sure you finish up with “.bat” extension, which tells Windows to treat this as a batch script when you launch it.
- Now, to run the batch script, simply double-click the file!
Congratulations! You have written a simple batch script to run a custom Wireshark capture. It's another useful tool in your troubleshooting toolbox and is especially useful for capturing network behavior that tend to occur at inopportune times (such as late at night or over the weekend) or that happen infrequently.
Don't forget to subscribe to our blog to get more useful tech support tips like this one and for the latest Software Toolbox product news every week.