With the rising security demands of Industry 4.0, OPC UA provides us with the means to encrypt data as it is transferred between client and server. But what if encrypting data to prevent outside extraction is not enough? What if UA client applications become compromised? What tools do we have to protect against deliberate or even accidental manipulation or consumption of data?
Continuing our Tech Support Corner blog series, this post covers how to leverage the built-in TOP Server User Group Security settings, alongside OPC UA username and password authentication, for greater control over which users have read/write capabilities as well as what tags a user is permitted to access.
If you had a chance to look at our post last week on the OPC UA layered security model, at the very top of that model sits the concepts of user authentication and session security. With TOP Server, leveraging its User Group Security settings, alongside OPC UA’s username and password authentication, TOP Server allows for a much more granular level of control over access to your critical process data.
To have access to these features necessary to secure your data, you will first need to make sure that you have installed the TOP Server Security Policies plug-in. This plug-in was introduced as a paid plug-in with the release of Version 5.12. With the secure out-of-the-box focus of the TOP Server Version 6 major release, the Security Policies plug-in is now included as standard functionality with no additional licensing required.
The following images highlight the steps necessary to enable these features on a new TOP Server installation. Users currently running TOP Server have the option of activating these settings, too. It simply requires running the installer again and selecting “Modify” at the beginning. If you do not have the latest TOP Server Installer, you can download TOP Server here.

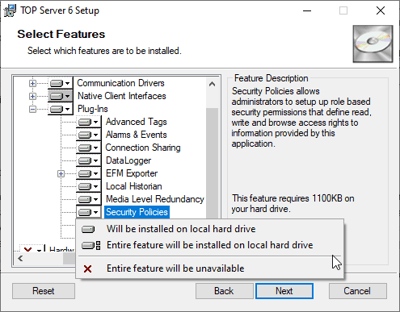
Begin by running the TOP Server installer and proceed through the installation process, addressing any prompts appropriately as requested. Once you are prompted to select the features and device drivers you wish to install, be sure to enable the Security Policies plug-in.
Do this by expanding the “Plug-Ins” drop-down and right-click “Security Policies” and select “Entire feature set will be installed on local hard drive”. Continue with the installation, again addressing additional prompts appropriately and completing the install. Now that TOP Server has finished installing, we can begin configuring our Security Policies.
Securing Your Industrial Process Data
Let us start by making sure that username and password authentication is required for users of UA clients to connect to the TOP Server. Open the TOP Server Configuration window and right-click on the folder labeled “Project” at the top left of the config window and selecting “Properties”.
From here, click on the OPC UA tab and make sure that the option “Allow Anonymous Login” is set to “No.” From here, we can close the configuration window. For a step-by-step tutorial on how to connect UA clients to the TOP Server, click here.
Next, we want to open the TOP Server Administrator settings and add Users and User Groups. To do this, you need to right-click on the TOP Server Administrator icon in the Windows system tray, select “Settings” and then select the tab for “User Manager”.
By default, you will have three groups already enabled and one user for each. For our purposes, we will create one Group and one User of our own. To do this we need to:
- Click on the “New Group” button and add a new group of users to this TOP Server instance:
- Here you can manage the group’s name, description, and what permissions this group has
- Here you can allow or deny access to entire groups of tags by right-clicking the dropdown list and selecting “Allow all” or “Deny All”
- This particular section does apply the granular access for specific individual tags that we alluded to earlier, but broadly controls user access for overall server-level permissions.
- For this demonstration, I have enabled access to all tags for my new user group “User Group A”
- After selecting the newly created group, click the “New User” button to add a new user to this new group:
- Here we specify a username, description, and password. Be sure to remember your username and password.
- The password must be 14 characters in length
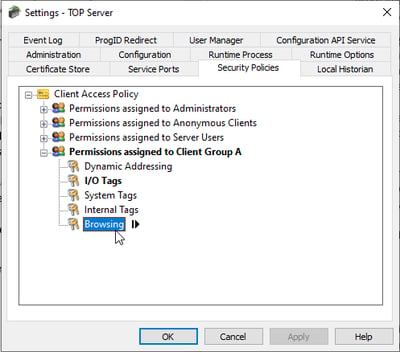
 Now, with our new user group and user generated, all that is left to do is manage our security policies. In the same settings menu from the previous paragraph, click the tab labelled “Security Policies”. You will see all available user groups underneath the icon labelled “Client access policy” and you should see the group that you just created. If you expand your user group you will see five Client Access Policies that you can modify.
- Dynamic Addressing
- I/O Tags
- System Tags
- Internal Tags
- Browsing
Each Client Access Policy affects specific functionality in the TOP Server. Dynamic addressing refers to what are known as dynamic tags, tags that are not statically defined in the server but are passed to us from a client application. I/O tags refer to user defined tags in the server project that correspond to data points on the device and system tags are diagnostic tags generated automatically by the TOP Server. Internal tags are not available for all devices but you still have the option of denying access. Finally, browsing permissions allow us to manage whether a client can browse the OPC Server project. If you highlight the Client Access Policy and click the arrow that appears to the right, you have the option to allow or deny access for entire channels, devices, or specific tags.

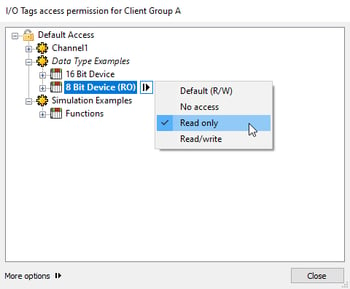
For this example, I will be manipulating the Client Access Policies for I/O tags and Browsing. Start by highlighting the I/O Tags, click the arrow button, and click the “Custom Permissions” icon to begin configuring . From here, you will see a new window that displays all I/O tags currently configured on the server. If you highlight any portion of this window (channel, device, tag group, individual tag), you will have the option to click on another arrow button and select one of four
Default (R/W)options:
- No Access
- Read Only
- Read/Write
In this example, I will be giving myself read and write permissions for all tags under the simulated device “16 Bit Device”, read only permissions for tags under “8 Bit Device”, and no access to all tags under “Function”. Following the same process described above, if we open “Browsing”, we have the option of allowing or denying access. We can choose to deny access to specific tags but for this example, I have denied browse access for “Channel 1.”
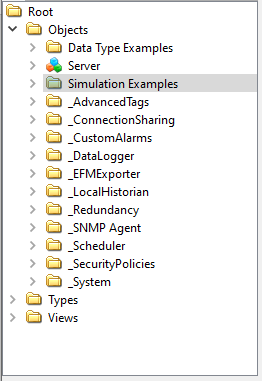
 Finally, let's look at these tags from a client application (the UA Expert sample client from Unified Automation, in this case). We won’t go into detail on SSL encryption in this post; however, more information can be found here. Instead we will focus on the results of our security policies.
For our connection to the TOP Server, we simply enter the endpoint URL, relevant encryption level, and username and password into our client application. If everything was configured correctly, you should see the TOP Server deny or allow access to the tags you specified. In my example outlined above, you can see several things have occurred.
- I do not have permission to browse Channel 1 in my client application.
- I do not have read or write access to any tags configured under the “Simulation Examples” channel.
This results in the security messages you can see below in the TOP Server event log:

As you can see, TOP Server Security Policies provide administrators with the necessary tools to secure your OPC UA data and finely tune and manage OPC client access down to the individual tag level.
Of course, security doesn’t solely rely on the TOP Server Security Plug-in. For additional reading on how to further secure your TOP Server deployment, click here. Finally, If you’re interested in trying the TOP Server for yourself click here. If you have any questions about anything you saw here today, please contact us. We are always happy to answer questions about our products.
And don't forget to subscribe to our blog to find out about the latest updates on TOP Server, security and other relevant technical topics applying to industrial process automation.


