With Modbus having been around since 1979, I’m sure you have had some interaction with it or at least awareness of it if you work in the automation industry. Our TOP Server is very widely used for its Modbus TCP/IP Ethernet Driver and variety of Modbus serial drivers to enable users to connect to any Modbus devices that they have in the field. For that common use case, the device is the Modbus Server, and the TOP Server is the Modbus Client.
But what if you needed to configure TOP Server to be the Modbus TCP/IP Server (i.e. the “device”)? That is the purpose of this next post in our continuing Tech Support Corner blog series – to discuss and tell you how you can configure TOP Server to act as a Modbus server device, which is a common need for systems where either a device or other software application can only act as a Modbus Client and you have other systems that need connectivity to that Modbus client.
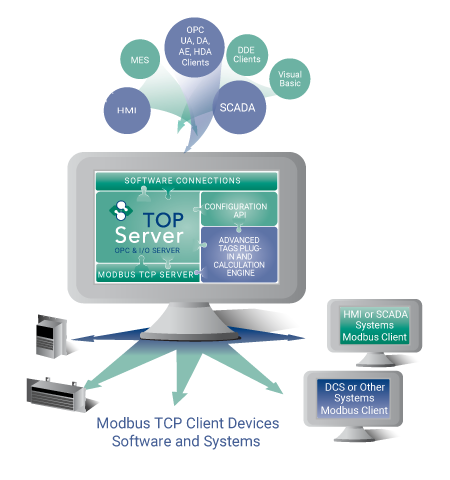
So, you’re likely still reading if you have now or have in the past needed the ability to interface a Modbus Client with some other software or devices that cannot act as a Modbus server, but do support OPC, SuiteLink or another protocol or interface that TOP Server supports. The most common use case we see for this is needing your HMI, SCADA, or MES system to appear to be a Modbus device to another system as shown below. If this feels backwards from the traditional connection of a system to Modbus, it is. This is not the most common application, but since 1996, we have implemented a lot of systems in this architecture!
 Before we cover how enable that functionality using TOP Server, let’s first make sure we understand the Modbus Client-Server relationship and what their roles are.
What is the Role of a Modbus Client?
A Modbus Client initiates the transaction and tells the Modbus Server what action to take in the form of a read/write by sending a certain function code. For more detailed information on the specifics of the types of requests a Modbus Client can make to a Modbus Server, see our blog post on Demystifying Modbus Function Codes. A Modbus Client cannot send requests to other Modbus Clients.
Modbus Clients come in all shapes and sizes. As mentioned before, TOP Server is often used as a Modbus Client for facilitating OPC and SuiteLink clients that don't natively support Modbus to communicate with Modbus Servers/Devices. Some HMI/SCADA applications can also come with their own Modbus Client interface. Some devices and controllers can be a Modbus Client instead of, or in addition to being a Modbus Server. For instance, it's not uncommon for some DCS (Distributed Control System) controllers to be Modbus Clients.
What is the Role of a Modbus Server?
A Modbus Server only acts in response to a Modbus Client’s requested action. They cannot initiate communication to Modbus Clients, or to other Modbus Servers. Sometimes, a Modbus Server will limit the number of Modbus Clients that can connect to it concurrently.
Modbus Servers will most commonly be seen in the form of a device, like a PLC. But we have found that users will sometimes need to have TOP Server be the Modbus Server, and allow Modbus Clients to send requests to it. If you connect your HMI, SCADA, or MES to the TOP Server using one of it's supported interfaces (OPC DA, OPC UA, Suitelink) then that system can read/write data from the Modbus Device namespace that you create in the TOP Server acting as a Modbus Server.
Configuring TOP Server as a Modbus Server is a fairly straightforward process, let’s take a look.
How to Configure TOP Server as a Modbus Server
Configure a Channel in the TOP Server configuration using the Modbus TCP/IP Ethernet driver. Give it an appropriate name. The remaining Channel settings can be left at the default values for most use cases.

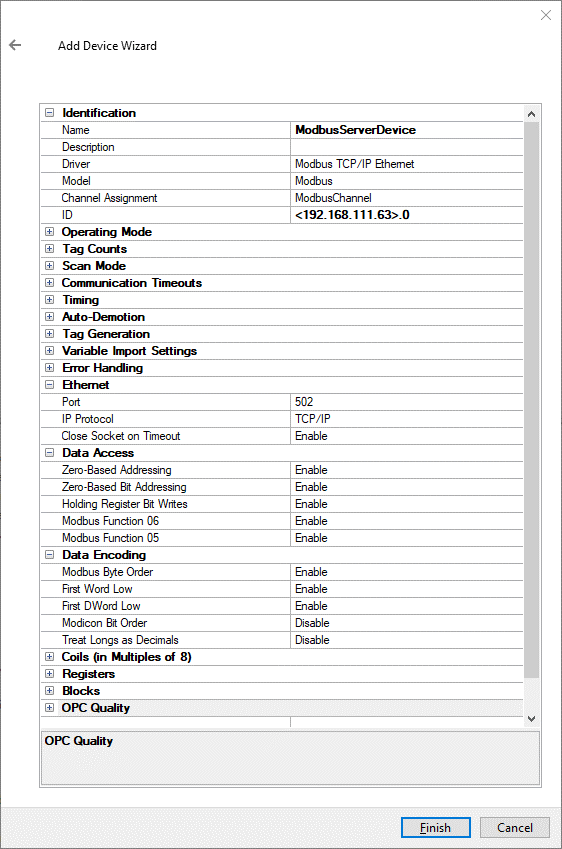
Add a Device to your configured Channel and give it an appropriate name. When it comes time to enter the Device ID (where you would normally enter the IP Address of a target device or PLC), enter the IP Address of your local machine (i.e. the machine where TOP Server is installed). This is the most important step of this configuration process. In my case it is <192.168.111.63>,0 where 0 is the Modbus Bridge Index of the device, which should be left as 0 in this situation.
It is important to be aware of the TCP/IP port that is used, which defaults to 502, but can be configured to any valid TCP Port required or desired for use with your Modbus TCP Client. It is also worth being aware of the Data Access and Data Encoding properties, as this will affect how the data consumed by the Modbus Client is returned and interpreted.
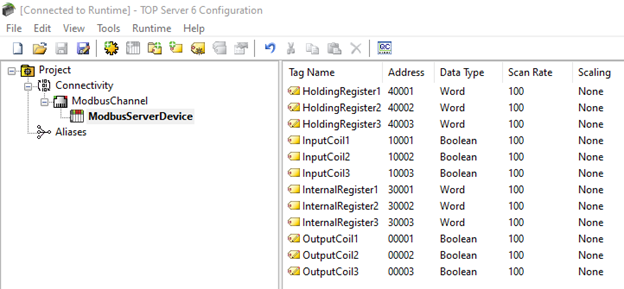
Configure some tags in your Device. These will be the Modbus addresses that are accessible from your Modbus Client. These can be Input Coils, Output Coils, Internal Registers, or Holding/Output Registers. I have added a few of each to my project. As with other drivers in TOP Server, it's also possible to use dynamic address references from the OPC or SuiteLink client connected to TOP Server. For more details on static vs. dynamic addressing with TOP Server, click here.
Launch the OPC Quick Client by going to Tools > Launch OPC Quick Client, or by right-clicking on the Device (ModbusServerDevice) and selecting ‘Launch Quick Client Here’ (This feature was added in TOP Server V6.13 and will only load the tags configured under that device).
In the OPC Quick Client, you should see all your tags with default values of 0 with a Quality of Good.
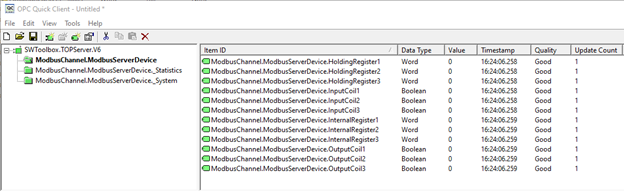
More importantly, you need to confirm in the TOP Server Event Log that you see the following message:
Created memory for Modbus server device. | Modbus server device ID = 0.
This is confirmation that TOP Server is now acting as a Modbus Server, with a Device ID of 0.
Now, the reason the values are all zeroes is because TOP Server needs an external client to tell it what those values should be, such as an OPC or SuiteLink client application writing to those tags/addresses. Since all zeroes makes for a boring demonstration, let’s use the Advanced Tag Plug-In (must be purchased and licensed separately) to link the Holding/Output Registers and Output Coils to something else with changing data. The function of the Advanced Tag Plug-in here is "bridging" the value from a source tag to a target tag (the target tags being the Modbus tags).
For the sake of this post, we will use simulated data within TOP Server for the source tag values, but you could link the target Modbus items to other tags from any data source, like another PLC (Siemens, ControlLogix, etc.), another OPC Server, or you could simply have your HMI/SCADA or other OPC or SuiteLink client write to those values.
Here is the view from the Quick Client now that we have some data in the items besides 0.
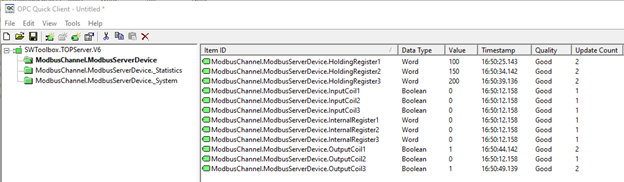
NOTE: Linking data with the Advanced Tag Plug-In will not be an option for Internal Registers and Input Coils because those items are Read-Only. For this demonstration, they will remain at 0.
From here, let’s connect a Modbus Client to our newly created Modbus Server. For this, we will be using our Cogent DataHub, which has a Modbus Client as an option, on a different machine in the Network. It would also be an option to use a second TOP Server for this. The goal of this is to read the data from our Modbus Server and confirm that it matches what we see in the Quick Client.
A detailed description of the DataHub Modbus Driver Configuration is beyond the scope of this blog, but here are the settings we have set when adding a Modbus Server to connect to:
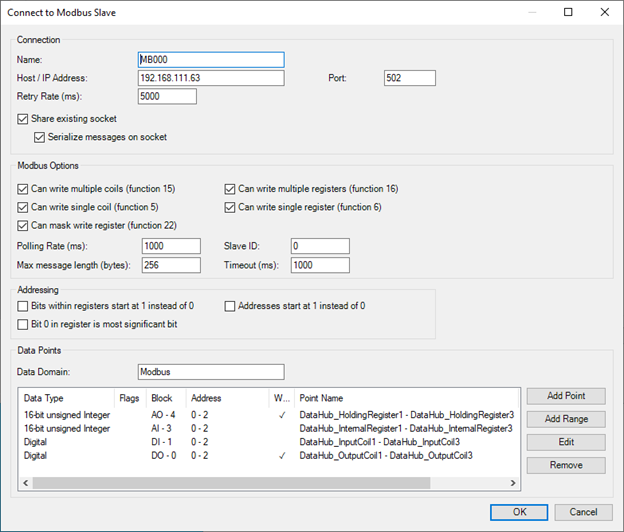
Here are some things to highlight:
- The Host/IP Address is the IP Address of the machine where we had TOP Server configured.
- The Port matches the Port that was configured in the TOP Server driver.
- Node ID is 0, as indicated in the TOP Server Event Log message from above.
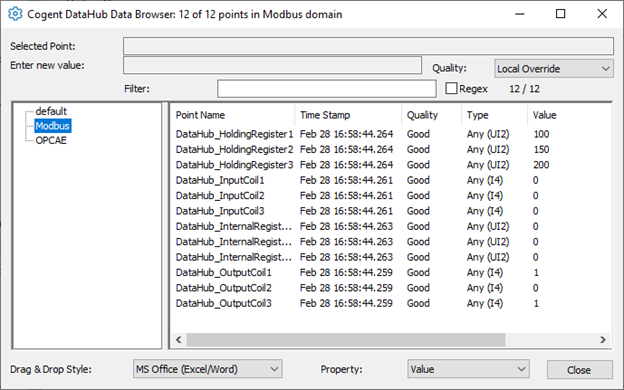
After applying those changes and checking the values of our DataHub points, we can see that they match the data from TOP Server perfectly. At this point, you can issue writes to your Holding Registers and Output Coils from DataHub or whatever your Modbus Client is and you will see the values update accordingly. You can also push updates down to TOP Server from your HMI, SCADA, or MES system and see those items update in the Modbus Client.
In review, we showed you:
- How to set up the TOP Server Modbus TCP/IP Ethernet Driver to behave as a Modbus TCP Server
- How to verify that a memory space for the Modbus Server was created by checking the TOP Server Event Log
- Using the Advanced Tag Plug-In as an option for feeding data into your Holding Registers and Output Coils
- Connecting a Modbus Client to our newly created Modbus Server will reflect the expected values from TOP Server
This procedure can be advanced for someone who is new to TOP Server or Modbus in general. If you still have questions or need further guidance, we suggest you take advantage of our TOP Server Learning Resources as a great place to get started. And as always, please feel free to contact our team to discuss your project needs and determine whether we have the right solution for you.
Don't forget to subscribe to our blog to find out about the latest updates to TOP Server and for other useful tutorials and resources as well as take a look at our other Modbus related Technical Blog posts.
Ready to put try out TOP Server as a flexible Modbus Server to work with your own Modbus Clients?