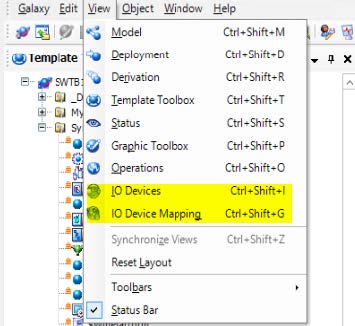
TOP Server for AVEVA™ users are probably aware that TOP Server supports several methods for connecting AVEVA™ software solutions. TOP Server simultaneously supports SuiteLink, OPC DA Classic and OPC UA (as well as DDE for legacy applications). Users of AVEVA System Platform specifically commonly connect to TOP Server via either SuiteLink or OPC DA.
In this blog post, we will cover the basic steps to connect AVEVA System Platform to TOP Server via OPC DA, expanding connectivity options for AVEVA users. We'll also make our step-by-step quick start application note available for getting started.
While AVEVA™ users certainly have their own options for device connectivity, via OI and DA Servers, it's commonly needed to expand those connectivity options using TOP Server for AVEVA using TOP Server's wide variety of protocols and drivers. To that end, one option for integrating devices and other data sources is the OPC DI (Device Integration) object in AVEVA System Platform.
There are three basics steps AVEVA users will need to follow to get System Platform connected to TOP Server.
1. Configuring AVEVA System Platform OPC DI Object
The first step is creating/adding an instance of the OPC DI object in the desired System Platform (ArchestrA) galaxy.
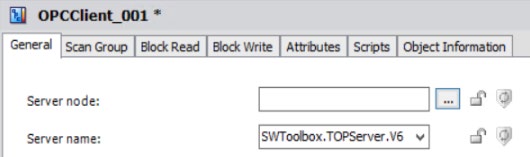
The OPC DI object involves configuring the following:
- Defining the "Server node" or IP / DNS name of the machine where TOP Server is installed on your network (if TOP Server is installed on the same machine as System Platform, the Server node gets left blank).
- Browsing to or entering the "Server name" for TOP Server (this is the OPC DA ProgID which, for TOP Server V6, is SWToolbox.TOPServer.V6).
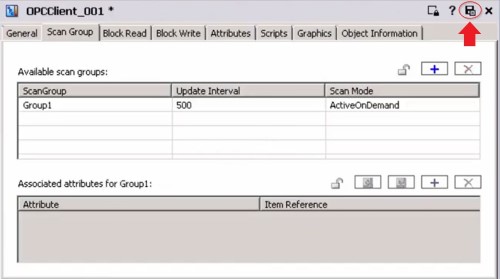
- Creating an OPC Scan Group under the "Scan Group" section (this includes specifying the desired Update Interval for tags/items added to the scan group, also known as the update rate, poll rate or scan rate which controls the frequency that TOP Server will poll the device/devices).
These are the high level settings that get System Platform connected to TOP Server through the OPC DA interface. You'll be able to request the detailed quick start application note further on in this post.
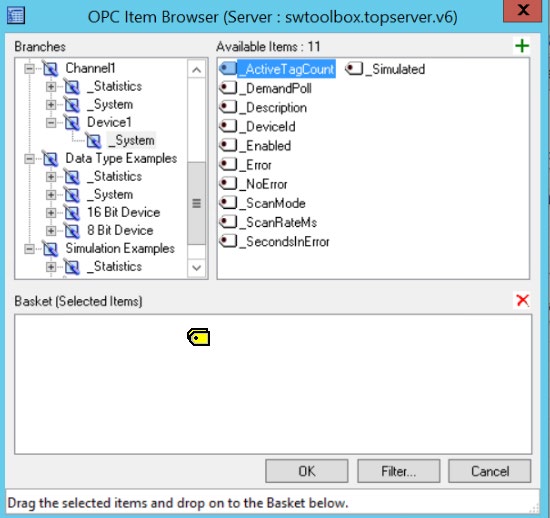
2. Adding OPC Items to OPC Scan Group
Once the OPC DI object is configured, it will be necessary to specify which data points (referred to as tags or items) you need to access to from TOP Server. System Platform provides two options for adding items/tags to the OPC DI object scan group:
- Using Automatic IO binding, which automatically creates dynamic I/O references
- Manually adding tags via OPC DA browsing (or CSV import)
Both methods are covered in detail in our quick start application note that you can request later in this post, including the Application objects needed for your application. TOP Server supports dynamic references (where there are no static tags defined in your TOP Server configuration) or static tag references (where there are tags defined for each device in your TOP Server configuration).
OPC browsing will only be possible if you have static tags defined in TOP Server. CSV import will work with either dynamic or static tag references. And Automatic IO binding will also work with either dynamic or static tag references. Our AVEVA users typically prefer NOT to have a separate tag database in their TOP Server configuration by using dynamic references wherever possible to minimize maintenance.
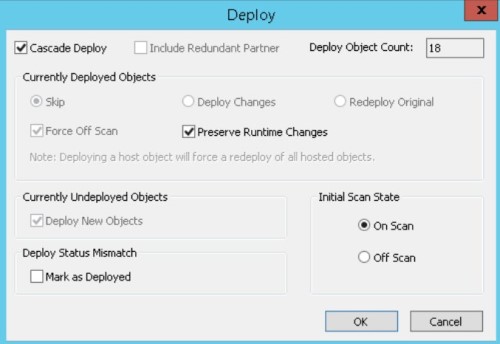
3. Deploying the OPC DI Object in System Platform
And last, but not least, once the OPC DI object is configured with the desired items/tags and assigned appropriately depending on your galaxy architecture, it's necessary to deploy the OPC DI object and related Application Objects for the associated tags. This deployment is accomplished the same way as for deploying any other objects and changes in System Platform - by right-clicking on the Galaxy object in System Platform (in the Deployment view) and selecting the "Deploy" option.
And the System Platform Object Viewer can then be used to confirm you are successfully connected and communicating.
While this post is intended to provide the highlights on how quick and easy it is to integrate a variety of different PLCs, RTUs and other types of devices and data sources using a large selection of drivers and protocols, make sure to request the full quick start application note below for detailed, step-by-step instructions.
And don't forget to subscribe to our blog to not only be notified of future posts on TOP Server and AVEVA applications but to also find out about more relevant technical topics applying to industrial process automation and solving related challenges.
Want to try the latest TOP Server for yourself with AVEVA System Platform? Download the free trial.