When working with non-standard protocols based on protocol documentation from a device vendor, there will always be some expected amount of testing, trial-and-error and troubleshooting in order to fine tune communications with a device.
Continuing our "OmniServer Did You Know?" blog series, this blog post focuses on how to use the built-in Item Values window in the OmniServer diagnostic tools and the included OPC Test Client to test communications using OmniServer.
In general, it is typically the full responsibility of the client application to control the testing mechanism for an OmniServer protocol, given that OmniServer operates based on a true client/server architecture. This means OmniServer won’t establish a connection to or attempt to communicate with a device unless a client application is requesting it from OmniServer. This is by design and prevents unnecessary communication and undue overhead on your system.
If you missed our any of our other "OmniServer Did You Know?" posts, get caught up here!
However, this does not mean building an entire client application just for testing (depending on the complexity of the client application), which potentially takes up valuable development time just for the purposes of proving out communications with the non-standard device.
Fortunately, it is possible to test your protocol via the Item Values Diagnostic Window and using the OPC Test Client that is included with OmniServer without needed to first configure your actual client application. This allows users like you to prove out your systems prior to building your client application.
How Can I Do This?
To begin with, you need a configured OmniServer protocol. (For tutorials on configuring your OmniServer protocol, make sure to read our blog series on protocol design.)
And, as mentioned previously, a client connection is necessary for OmniServer to even connect to a device – to that end, we include a basic OPC Test Client that can be used for making an OPC DA client connection to OmniServer. All that’s really necessary on the test client side is simply creating a connection, OPC Group and subscription to a "tag" (or “item) - we'll step through that shortly.
Alternately, you could also set up a basic connection to a tag in your own client application to accomplish the same effect, if you prefer. For the purposes of this blog post, though, we will focus on using the OPC Test Client, since that is something all OmniServer users should have access to. (If you’re a Wonderware user, the videos under the “Wonderware Client Connectivity” section of our OmniServer Video Resources page step you through making a basic connection to OmniServer.)
For the purposes of this blog, we'll use the "MARQUEE" sample protocol that installs with OmniServer.
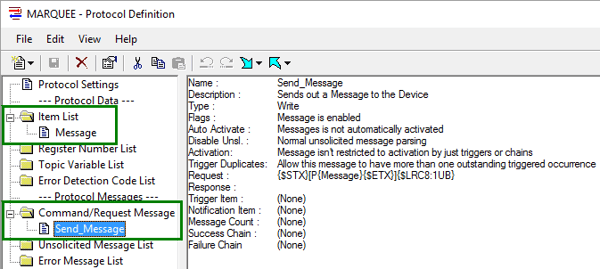
The item that we'll want to connect to in the OPC Test Client is the "Message" item, as shown in the above screenshot - the "Message" item is used by a client to pass the ASCII string to be displayed on a marquee display using the "Send_Message" command/request message, also shown above.
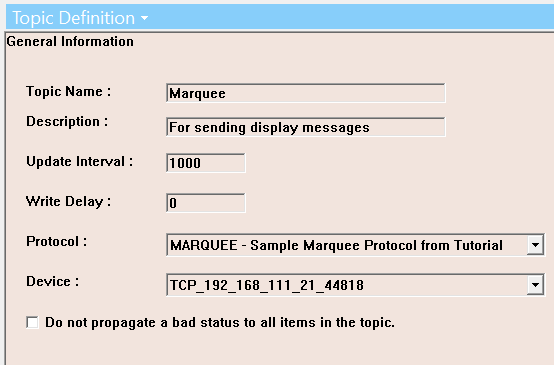
Before we connect our client, though, we need an OmniServer Topic configured to use the "MARQUEE" protocol and an Ethernet device that is already configured with the IP/Port of my marquee device (or, if it were a serial marquee, we would select the appropriately configured COM port device).
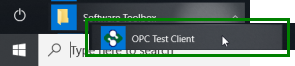
Now, we can make our connection using the "OPC Test Client" provided with the OmniServer installation, which can be launched from All Programs -> Software Toolbox (you can also search for "OPC Test Client" and launch from the search results).
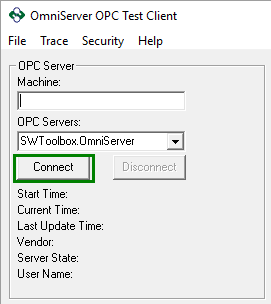
With the test client open, the first step is making the actual OPC connection to OmniServer. We make it easy by automatically populating the OPC ProgID for OmniServer - "SWToolbox.OmniServer". All you have to do is click the "Connect" button to establish the connection.
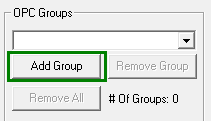
And, as with any OPC DA connection, an OPC Group is necessary. So the next step (just to the right of the connection) is adding an OPC Group. We can simply click the "Add Group" button to add an OPC Group with the default name of "_Group1" (or, if desired, we could enter any descriptive name prior to clicking the "Add Group" button).
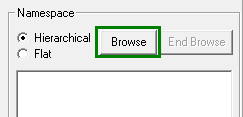
Next, we need to add the "Message" item that we identified earlier to this OPC Group. So, in the "Namespace" area of the test client, we need to click the "Browse" button to display the available topic and items namespace in OmniServer.
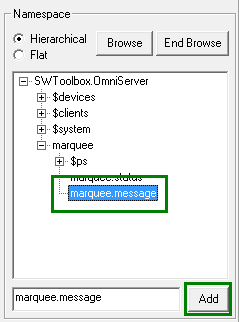
Now that we've started browsing, we just need to expand down through the hierarchy and find the topic we created earlier, under which you can see the item listed as "marquee.message" (using standard topic.item syntax that is common to all items in any OmniServer protocol). We just need to highlight the item and click the "Add" button here.
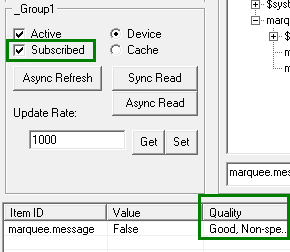
Now, all that's left is simply subscribing to this item - to do so, we just need to enable the "Subscribed" checkbox under our OPC Group.
At this point, we can head back over to our OmniServer Configuration windows. Specifically, we want to go to the Diagnostics section in the tree view and select the Item Values window.
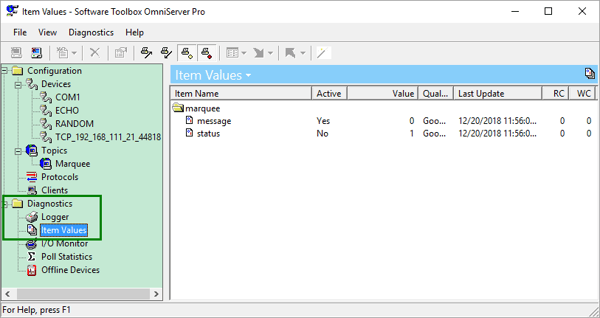
As you can see, our topic is displayed with two items - the actual "Message" item we've subscribed to and a system item called "Status". You can tell that we're subscribed to "Message" because the "Active" field displays "Yes" for that item but "No" for Status. (Status is a system item that can be monitored by client application for certain protocols in order to detect unresponsive devices - for a detailed explanation of how the Status item works and its limitations, you can refer to our knowledge base article here.)
There are some key behaviors to be aware of when we're talking about the Item Values Window and how items display here:
- In general, Topics and any items for the protocol associated with that topic will only display in the Item Values window when a client application is connected for that topic and item/items. If our protocol had more than one item and we had added a subscription to additional items, they would also be displayed here.
- The caveat to the above is an item in a protocol that has the setting "Item should be automatically activated" - this tells OmniServer to set the item active when a client simply connects to OmniServer, even if it isn't actively subscribing to or requesting reads or writes for that item.

- While there are use cases for "automatically activating" an item (such as protocols requiring an automatic startup sequence), my typical recommendation is to NOT enable that setting - it makes troubleshooting more difficult when you have a lot of topics and items - however, it is always possible to tell if a client is actually requesting items or not by it's "Active" state.
- The "Status" item will always be listed for a topic, even if a client is not actively requesting it.
Now that we have that out of the way, we can get to the meat of the post - using Item Values for more than just monitoring whether or not a client is connected to a topic and subscribed to any items (though that is a VERY good use of Item Values when troubleshooting whether or not your client is configured correctly - access our OmniServer Troubleshooting Brief in the knowledge base for even more tips on that front).
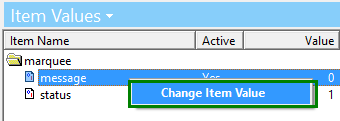
If we right-click on an item, we have the option to select "Change Item Value", which we want to select here (you could also just double-click on the desired item, as well).
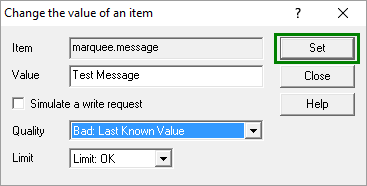
In the resulting dialog window, we have full control over simulating value changes (including testing your client application with different available Quality and Limit properties for the selected item, as well as, simulating write requests.
Changing the Value, Quality and Limit values are reflected back in the client application, so this is a useful tool for simulating how your client will behave in certain error conditions such as a communications failure (without having to force that condition in your device or network).
You simply define the desired Value, Quality and/or Limit you'd like the client application to see and click the "Set" button to apply it.
And if we take a look back in the OPC Test Client, we can see that the simulated bad quality and the value propagated up to the client.

Additionally, by setting the "Simulate a write request" along with defining a new Value, you can trigger an actual write in OmniServer without even having to go back to the client application. Setting "Simulate a write request" will do two things: Set the value of the item and send out any protocol messages in which this item is associated (specifically for "Write" type messages where the value of the item is used in a message sent to the device or where an item is the "Trigger" for a Command/Response message in a protocol).
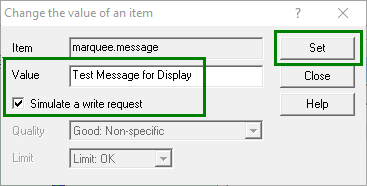
In our case, once we click "Set", the message will be sent to the marquee device including the specified value to display as if the client application had changed the value of "Message" itself.
Why Would I Need To Do This?
Where can I get more information?
You can test and troubleshoot with your own protocol in OmniServer using the Item Values window using the latest trial version. And, as always, we're happy to help answer questions you may have - if you're just getting started and need some advice on where to start with your protocol, don't hesitate to submit a request for a free protocol consultation.
Another great place to start is our available online video resources for OmniServer - access those here.
You can also email us at support@softwaretoolbox.com with your questions and I encourage you to subscribe to our blog for more quick and easy OmniServer tutorials and tips.


