IoT, IIoT, MQTT, Connectivity of Things, Big Data, The Cloud - I'm sure you've at least heard these terms in the course of your day (whether in the scope of your job or in an advertisement during a football game you happen to be watching). Maybe you're even working on a project requiring you to push and/or pull important process or business data to/from a cloud solution - possibly for big data analytics applications ranging from predictive maintenance to "smart" manufacturing, amongst many other use cases.
And Amazon© - well, I'd wager there isn't a single person out there who doesn't know who Amazon is. But did you know they have their own cloud solution called Amazon IoT Core©? And maybe you didn't also know that Amazon AWS (Amazon Web Services©) IoT Core acts as an MQTT broker for storing and sharing important data in a secure cloud along with artificial intelligence and analytics and many other IoT services.
But how do you go from your data sources to AWS IoT Core? In this post, we'll step through how you can configure "things" in Amazon AWS IoT Core and connect them to your process and business data sources with the Cogent DataHub IoT Gateway©.
So I won't beat around the bush here - the reason you clicked on the "Continue Reading" button was because the above description of this post resonated with a use case you must have. A use case to take some data source whether it's OPC data, data in a database, data in an old DDE server or Excel, or some other data source and get that data into the cloud. And you're considering Amazon AWS IoT Core as the potential cloud service you use for that purpose.
You want to know "HOW" - let's dive right in to stepping through how you can setup Amazon AWS IoT Core with a "Thing" which will represent that data that you need to get into the cloud and how to setup the Cogent DataHub to exchange data (whether pushing or pulling) with that "Thing" in AWS (and you can even do it with a free trial version).
The following steps cover the bare minimum, quick start steps you'll need to follow to push data to Amazon AWS IoT Core from an OPC DA server specifically. However, it's just as easy for any other data interface supported by DataHub including OPC UA, OPC AE, databases (ODBC), Modbus TCP devices, DDE data sources and more. And it's easy to consume data from AWS with DataHub, as well. (Don't get discouraged by the fact that you see 12 steps - they go quickly so it's not a measure of difficulty by any means!)
First, it's assumed that:
- You have an AWS account (free or paid) that includes IoT Core
- You have a data source configured in Cogent DataHub for the data you'd like to push to AWS
- If not, we have a full list of detailed how-to's here on configuring various data sources in the Cogent DataHub!
Now, let's get started!
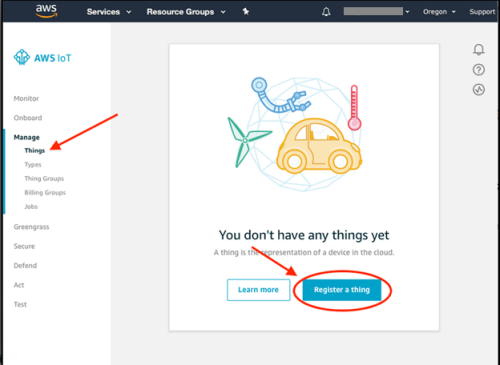
Step 1: Create a new Thing in AWS
So, while logged in to your AWS account in the AWS Management Console, you'll click on "Connect an IoT device. Under Manage > Things you then need to Register a thing (see screenshot below):
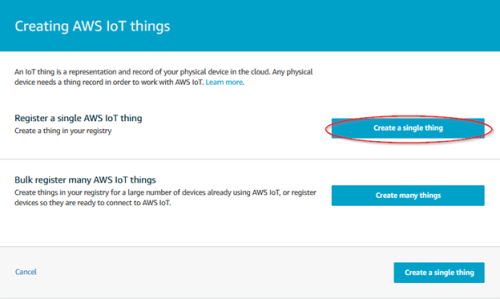
Next, you'll click the Create a single thing button to begin the creation process - think of a "Thing" as the virtual or digital representation of your device or data source in the cloud.
Step 2: Add your AWS Thing to the AWS Thing Registry
Now that you've started the creation process, it's necessary to define a name for your thing (such as a device name, OPC server name, functional area or other descriptive label for your data) as part of the registration process for your thing in AWS.

Once you've selected a descriptive name, you can leave the other settings at the defaults and click Next.
Step 3: Add a certificate for your AWS Thing
The next step is adding the required security certificate that will be associated with your thing in AWS. Just click Create certificate here to proceed.

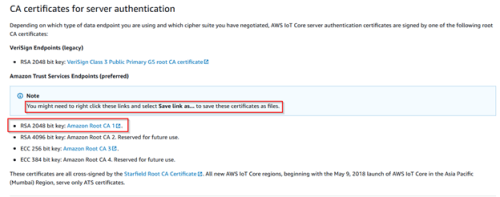
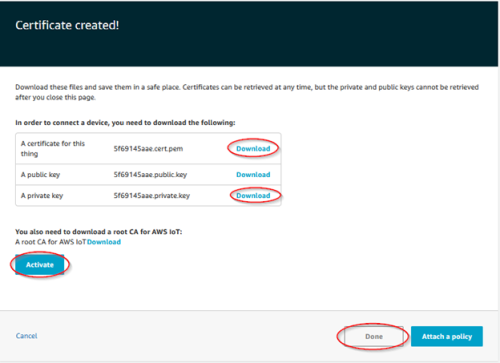
Step 4: Download / Activate Certificates for your AWS Thing
Now that your certificate and associated public and private keys (for secure encryption purposes) have been created, you need to download a root Certificate Authority for AWS IoT for use with the MQTT Client in Cogent DataHub IoT Gateway.
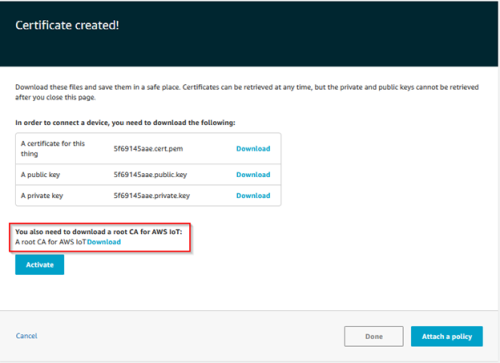
Once you've clicked the link to download the root CA for AWS IoT, you'll need to choose which key to download - right-click on the link next to "RSA 2048 bit key" to download that Verisign root CA certificate for use with DataHub.
And last but not least here, you'll need to download the certificate and private key that were just created for your thing in AWS. Then simply click the Activate button and Done to complete this portion of the thing creation.
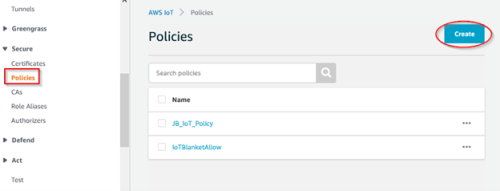
Step 5: Define a Policy in AWS
Next, you'll need to define a policy to associate with your certificate that defines a set of authorized actions on resources (a thing is a resource, as well as topics and topic filters). So, under the Secure > Policies section, you'll need to click the Create button to start creating a new policy to be used with your security certificate for your new AWS thing.
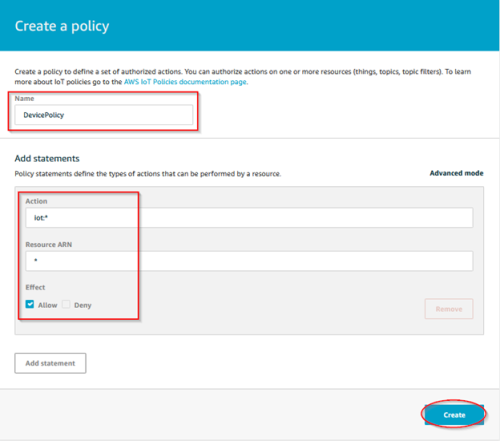
Define the policy with a meaningful name and, under Add statements, define the following (per the below screenshot):
- For the Action field, enter iot*
- For the Resource ARN field, enter *
Then simply click the Create button to create the new policy which will make it possible for MQTT Clients using the associated certificate and keys that were just created to access your AWS thing.
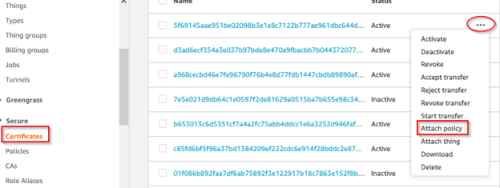
Step 6: Attach Your AWS Policy to Certificate for your AWS Thing
Now that your new policy is created, you need to attach it to the certificate that you just created for your AWS thing. So, under Secure > Certificates, click the Elipses (...) to the right of the new certificate (it should be at the top since it's the newest) and select Attach policy.
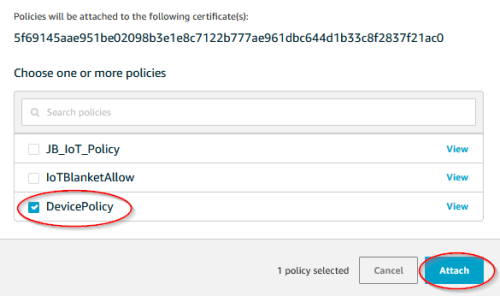
Then just check the box next to the policy you just created and click Attach.
Step 7: Define a Data Source in Cogent DataHub
Now that your AWS thing is configured, you can proceed to your Cogent DataHub. DataHub is multi-functional and can aggregate data from a wide variety of data sources into "Data Domains" which is essentially a grouping of data points of interest from devices and other data sources such as databases.
As I mentioned earlier, DataHub supports OPC UA, OPC DA, OPC AE, DDE, ODBC databases, Modbus devices and so much more. For a full list of supported interfaces, click here. For our purposes here, an OPC DA server data source already exists in the DataHub with data in a Data Domain named "OPC_DA".
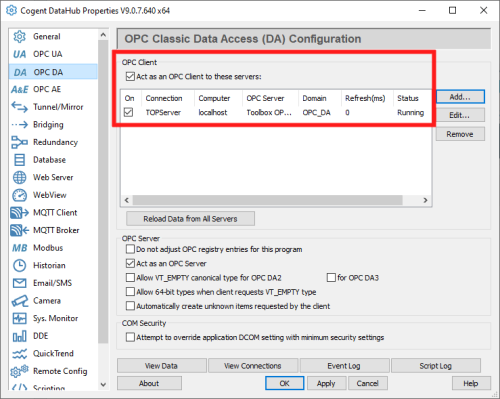
For detailed information on creating OPC DA connections, OPC UA and other supported data sources, click here for our how-to video library.
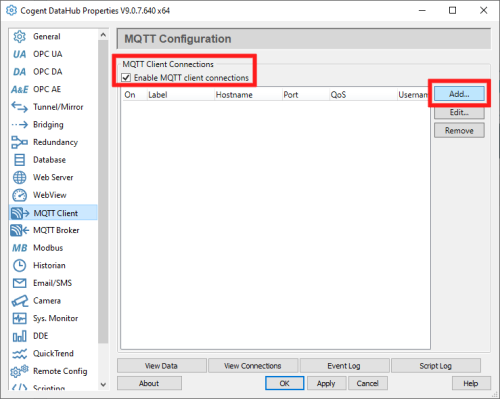
Step 8: Define a new MQTT Client configuration in Cogent DataHub
Next, you'll need to configure an MQTT Client connection in the DataHub with settings specific to the AWS thing you just created. So click the Add button (making sure to "Enable MQTT client connections").
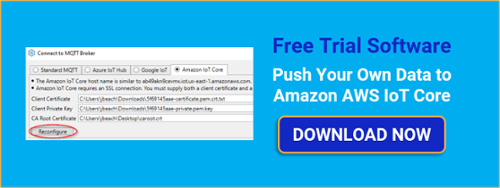
Step 9: Import Certificates for your AWS Thing into Cogent DataHub
Then, under the specialized section for Amazon IoT Core, you'll need to browse to the certificate, private key and the CA root certificate that you downloaded earlier while configuring your certificate for your AWS thing - browse for each respective field and select the corresponding file that you downloaded.

Click the Reconfigure button and DataHub will automatically create a certificate file of its own and fill in the required fields of the Authentication and Message Content tabs, streamlining the configuration process and ensuring compatibility with your AWS thing.
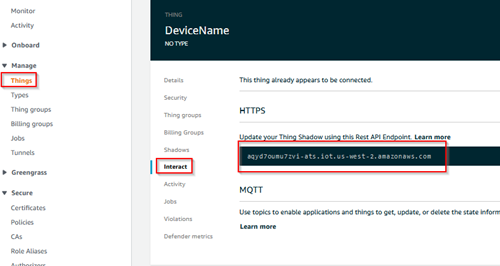
Step 10: Copy the AWS Endpoint for your Thing to Cogent DataHub
Next you'll need to complete the Connection section of the MQTT Client settings - to do that, you'll need the Rest API endpoint for the AWS thing you created, which corresponds to the Host Name/IP field of the connection.
So, to find that information, you'll need to quickly switch back to AWS and under Manage > Things, find your thing and copy the Rest API Endpoint listed (per the screenshot below):
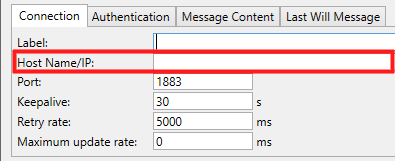
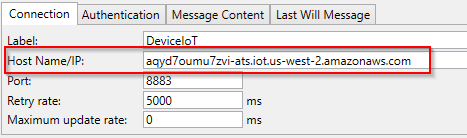
Now, simply go back to your DataHub and paste that endpoint URL into the Host Name/IP field of the Connection. For the other Connection settings, you'll need to enter a meaningful, descriptive Label.
And, since we're using TLS security for the MQTT connection to AWS, the standard MQTT/TLS port is 8883. The default settings for the remaining fields can be maintained.
Step 11: Select Data to Push to AWS from Cogent DataHub
Now that the connection to your AWS thing is configured, you need to tell DataHub what specific data you'd like to push to your AWS thing from your configured data source or sources (this example will simply push a single OPC DA point).
Under the "Push data points to the MQTT broker (with AWS IoT Core being the MQTT broker here), you'll find a tree view of available DataHub data domains.
As you saw earlier, there is already an OPC DA data source configured with a data domain of "OPC_DA", expanding that data domain exposes the available data points and checking the box next to the desired data points in the domain adds them to the "Selected Points" list.
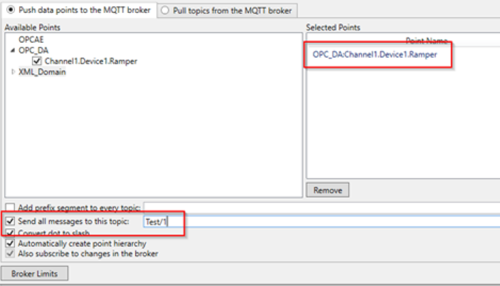
Also in this section, you need to define the desired MQTT Topic to publish your data to in the AWS MQTT broker - check the box "Send all messages to this topic" and define the desired meaningful label for your Topic which will get created in your AWS thing and will be the repository for your data from this connection.
Then, click OK in DataHub and make sure to click the Apply button at the bottom to ensure your settings are saved and your connection to AWS is initiated and established.
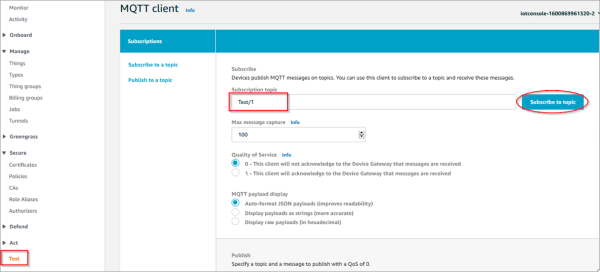
Step 12: Define AWS MQTT Client to consume data
Now that your AWS thing is configured and you have DataHub pushing data to your Topic in that thing, you'll need to consume that data for use in a wide variety of available functions available with AWS IoT Core. To use the data, you need to define an MQTT client in AWS IoT Core to consume the data being pushed by DataHub.
Under the Act section, you'll need to define a new MQTT client to subscribe to the topic you defined in the DataHub that is now created in your thing and receiving data. Simply enter the same topic you defined in your MQTT client connection in DataHub under Subscribe to a topic and click Subscribe to topic.
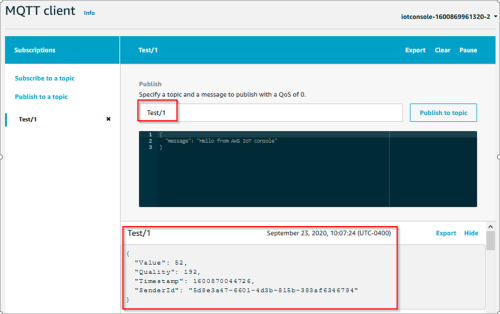
Or, alternately, if you wish to push other data to the same Topic in your thing from another source, in your AWS MQTT client, under Publish to a topic, you'll simply specify the same Topic and click Publish to topic (you can see the MQTT payload with the information for the data in each publish, for reference, at the bottom).
So, in closing, due to the specialized interface in the Cogent DataHub IoT Gateway with settings specific to Amazon AWS IoT Core, it's straightforward to get setup integrating your own process and business data to the Amazon cloud.
And though the above steps focused on pushing data from an OPC DA server to AWS, it's just as easy to consume data from Amazon IoT Cloud - simply define the desired MQTT topic for other Things you may have configured in your the Amazon cloud under "Pull topics from the MQTT broker" and define the data domain in DataHub where you wish that data to be available. Once in the DataHub, you can use it for bridging to other data sources or in any other function supported by the DataHub using data.
As long as you have a free or paid AWS account that includes IoT Core, you can test things out with your own data sources with a free trial of the Cogent DataHub. And make sure you don’t miss future useful topics on Cogent DataHub and other helpful industrial automation topics by subscribing to our blog.