Whether you're running a production system in manufacturing, oil and gas, building automation, or energy, safety and uptime are of the utmost importance, especially with cybersecurity attacks increasing in frequency and complexity.
That’s why when running an application with widespread user access, managing user permissions and configurations is so important, and you need a solution that is as security centric as you are. In this blog post, we delve into how to manage user groups and permissions inside the TOP Server’s User Manager and Security Policies Plug-In to ensure a robust and secure gateway to your TOP Server Configuration.
While this blog offers an overview of TOP Server’s security offerings, it is not a substitute for our in-depth TOP Server Secure Deployment Considerations Guide. This is a good resource for ensuring your TOP Server is following best practices for maximum security. The guide covers in detail security considerations regarding:
- Network Environment and System Configuration
- Host Operating System
- Installation
- Post-Installation (including details on specifying Application Data folder permissions)
- Secure Interfaces
- Configuration API
- Ongoing Maintenance
Secure Out-of-the-Box
TOP Server leverages every opportunity to be secure without limiting usability. Everything is user-configurable, but the default selection of most settings take the more secure approach. Let’s look at some options presented by the installer.
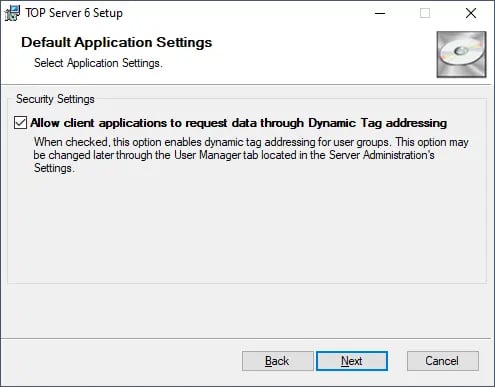
The user is presented with an option to enable dynamic addressing. Doing so would allow user groups to dynamically address tags from your HMI, SCADA, MES, Historian, or any other client applications. This can later be changed through the User Manager tab located in the Server Administration Settings.
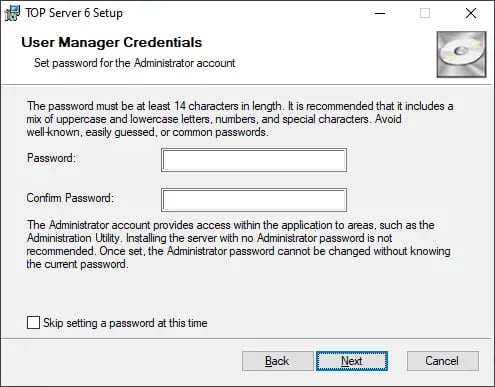
Starting with TOP Server V6.5, users are also prompted to enable User Manager as part of the installation by choosing a strong Administrator account password. It is recommended that the password be at least 14 characters in length and include a mix of uppercase and lowercase letters, numbers, and special characters. Avoid well known, easily guessed, or common passwords. Store passwords securely as they are not recoverable and will require re-installing the product if lost.
Although we cannot recover passwords, additional administrative users can be added to the
Administrator user group. Best practices suggest each user with administrative access be assigned unique accounts and passwords to ensure audit integrity and continual access through role and staff changes.
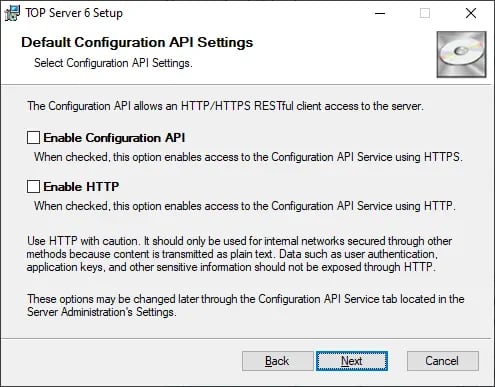
The TOP Server Configuration API is also disabled by default. And even once the Config API is enabled, it defaults to HTTPS.
After installation, it is recommended that you disable client interfaces that are NOT used by your application. Because they are commonly used, the OPC DA and OPC UA interfaces are enabled, but you should disable any OPC DA interfaces (1.0, 2.0, 3.0) that are not in use. For OPC UA, the UA Endpoint is security-enabled by default and Anonymous logins are disabled, but OPC UA should also be disabled completely if not in use.
The other client interfaces such as SuiteLink/FastDDE, OPC A&E, OPC HDA, OPC .NET, and DDE are all disabled by default after installation.
User Manager
TOP Server allows total project control with the built-in User Manager to help you prevent unauthorized changes to your configuration and other cyber threats. In order to access the TOP Server User Manager, open the Administrative settings by right-clicking the TOP Server icon in the system tray and choosing Settings.
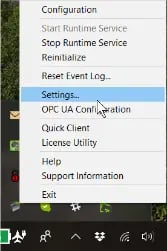
From the Settings window, you can access the User Manager by clicking on the User Manager tab.
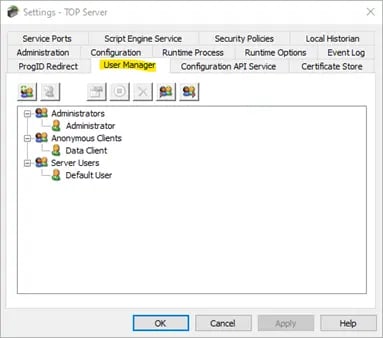
The User Manager window in TOP Server’s settings is used to configure users that you would like to define into groups with access to certain configuration tasks such as:
- Stopping the TOP Server Runtime Service
- Accessing and making changes to the TOP Server configuration
- Accessing Administration Settings for the TOP Server application
- Viewing/changing the OPC UA configuration
- Running and making changes with the License Utility
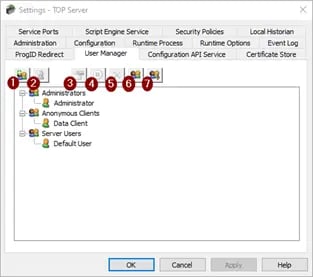
- New Group (Alt + G) :Creates a new TOP Server user group. Groups cannot contain illegal characters.
- New User (Alt + U): Adds a new user to the selected user group. Note that this function is disabled for anonymous clients. Additionally, usernames must not contain illegal characters. Forward (/) and backward (\) slashes are NOT allowed. Trying to create users or groups with these characters causes a failure message that describes illegal characters.
- Edit Properties (Alt + P): Opens the User Properties window, which we'll provide a detailed explanation of below!
- Disable Selected User/Group (Alt + D): Disables the selected user or user group. This function is exclusively accessible to custom users and user groups. Please note that disabling a user group results in the deactivation of all users within that group.
- Delete User (Delete): Deletes the selected user or user group. This function is exclusively accessible to custom users and user groups. Please note that deleting a user group results in the deletion of all users within that group.
- Import User Information (Alt + I): Imports user information from an XML file. To ensure a successful import, the selected file must have been previously exported from the server's Administration utility. It's worth noting that this function is only active when a user who is a member of the built-in Administrators group is logged in.
- Export User Information (Alt + E): Exports user information to an XML file, offering a valuable feature for users who need to migrate their project from one machine to another. Additionally, administrators have the option to password-protect the XML file. When this feature is utilized, the correct password must be entered during the import process on the new machine to ensure its success. Notably, the exported XML file cannot be edited and re-imported.
User Group Properties
Establishing user groups with designated access to specific configuration tasks is a crucial security measure to prevent unauthorized access within your configuration. Create a new user or new group when users need varying levels of permissions. While setting up a new group, you will be prompted to provide a name, description, and specify the permissions that the group will be granted:
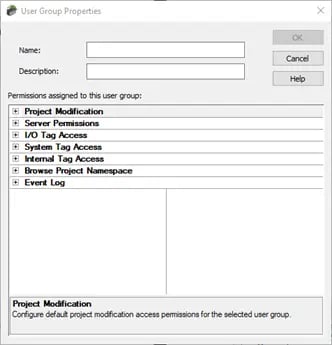
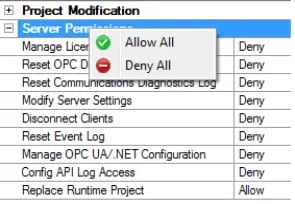
These actions are categorized into seven distinct groups, offering the flexibility to grant or restrict permissions for the user group in the following areas: Project Modification, Server Permissions, I/O Tag Access, Internal Tag Access, Browse Project Namespace, and Event Log.
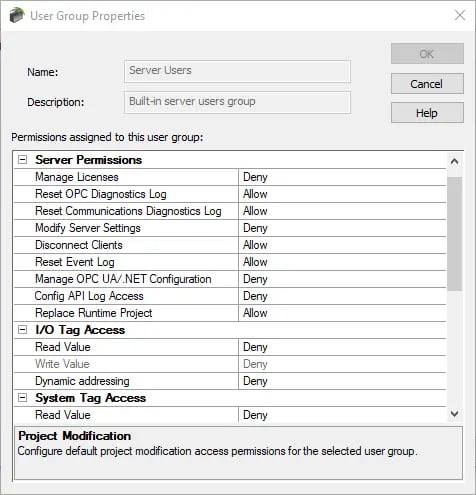
Tip: To update multiple permissions at the same time, right-click on the property group and select the desired permissions.
User Properties
When creating a new user, you will be prompted to enter a name, description, and password for the user:
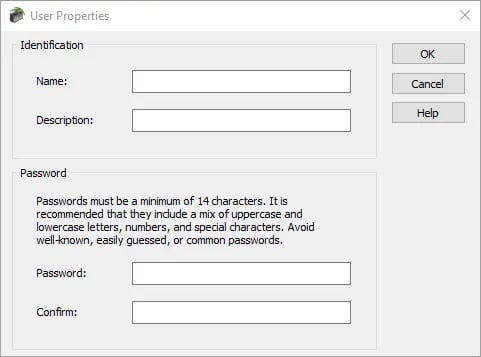
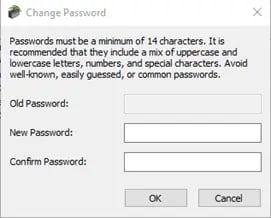
The User Properties may be accessed by double-clicking on the user, or right-clicking on the user, and selecting Properties. This window allows the user to change their password; however, it is important to note that it is case-sensitive, with a minimum of 14 and a maximum of 512 characters. The password must include a mix of uppercase and lowercase letters, numbers, and special characters. Avoid well-known, easily guessed, or common passwords.
Security Policies Plug-in
You may recall a component called the Security Policies plug-in that was available in TOP Server V5. In the past, that has always been a $395 optional licensed feature. With TOP Server V6, we realized that with the importance of security in today’s industrial landscape, such a tool should just be part of the core server functionality.
So, TOP Server V6 includes the Security Policies plug-in at no additional cost. Simply select it as an option when installing TOP Server to have it available in your TOP Server admin configuration settings. But what is the Security Policies plug-in?
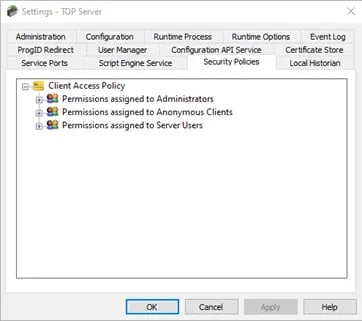
The Security Policies Plug-In enables users to selectively apply security access permissions to specific objects, such as channels, devices, and tags, within a runtime project. This functionality works alongside the server's User Manager, which sets global permissions based on user groups.
To set access permissions at the object level, a user must be part of a user group that has been granted access in a particular category. Users can assign varying access permissions to different objects within the same project. Notably, modifications to access permissions take effect dynamically as they are made, eliminating the need for a Runtime restart or reinitialization.
Users can assign custom permissions to objects within an access category. To do so, first select it, then click the actuator and select Custom permissions.
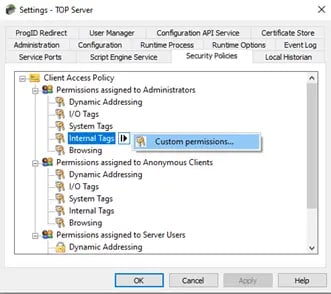
The available permissions are contingent upon the selected object. Here are descriptions of the available options:
- Allow: allows Dynamic Addressing or browsing
- Deny: denies Dynamic Addressing or browsing
- No access: denies read and write access
- Read only: allows read access but denies write access
- Read/ write: allows read access and write access
For OPC UA connections, this additional functionality is especially useful for user authentication. Forcing OPC UA clients to authenticate will require that they specify a username and password defined in one of your user groups in the TOP Server User Manager. Since you can now define granular access policies for each user group, you have full control over what any user from an OPC UA client can access in your TOP Server.
For other types of client connections such as OPC DA or Wonderware SuiteLink, blanket permissions apply under the Anonymous Client user group, so it is still possible to define channel, device and tag-level access rights. Just know that they will apply for all such client connections not supporting user authentication.
For more information on TOP Server’s security policies, please refer to the Security Policies Plug-In Help File.
Conclusion
In this post, we walked through the User Manager and its use to secure access to the TOP Server configuration. When running an application with many users, managing who can access it is a big deal. The User Manager is the key to having complete control over your project. It allows you to decide who gets access to important project elements like channels, devices, and tags.
We also discussed how this user management system aligns with the Security Policies Plug-In. By configuring custom permissions for specific objects within access categories, users can fine-tune access control. This integration ensures that the security policies seamlessly complement the User Manager, providing a robust framework for securing your application. By learning these user management techniques, you can make sure your application is secure.
We hope this has shown you that TOP Server can provide an easily configurable solution for your user management needs. Check out our TOP Server Learning Resources for more information and tutorial videos to help you get started collecting real-time data from your devices using TOP Server.
As always, please contact our support team with any questions, and don’t forget to subscribe to our blog to find out about the latest updates to TOP Server.
Ready to try TOP Server with your devices? Download the fully-functional free trial.


