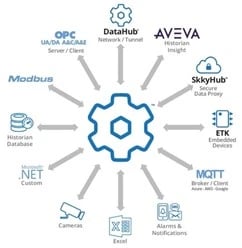
If you've been keeping up with our previously released Cogent DataHub blogs, you're already aware that Cogent DataHub is renowned for its extensive connectivity. However, it's worth emphasizing that DataHub's connectivity includes MQTT, IoT, OPC DA, OPC UA, OPC UA Alarms & Conditions, OPC Classic Alarms & Events, Modbus, Excel, ODBC & more. These methods of connectivity help users realize that with DataHub, data has the freedom to seamlessly traverse across various platforms. We truly believe that "once the data is in DataHub, it can go anywhere, securely".
In this blog post, I'll provide insight into using DataHub to log to an ODBC database like Microsoft SQL Server. Unlike loggers that only work with OPC data sources, DataHub’s capability to securely tunnel data and aggregate from diverse sources besides OPC empowers many different types of applications.
Here are some use case examples of some of the many ways you could use DataHub with a database:
- Reading machine and/or batch setup data
- Data verification
- Displaying query results in web pages
- Playing back historical data in the QuickTrend feature
Step 1 - Create a DSN
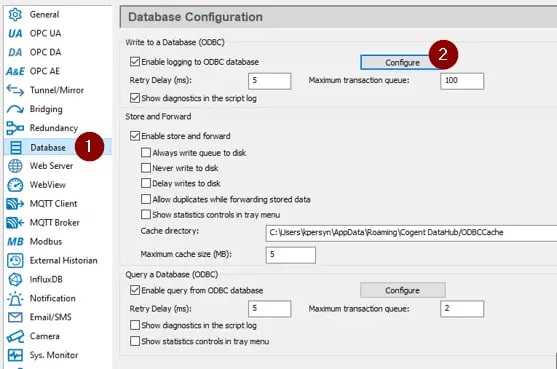
In this blog, we will set up a database in DataHub's Database Configuration window. Begin by choosing the Database tab on the right, then select the Configure button in the Write to a Database (ODBC) section at the top of the screen.
To follow along with this blog, as a prerequisite, you will need to have a ODBC Data Source Name (DSN) configured. Once configured, you will connect DataHub to that DSN under the DSN Tab. Next, you can either create a table or select an existing one. We will be creating a new table inside DataHub for this example.
For more information on connecting and reading from a Database, please see our video tutorial on configuring DataHub to read from a database.
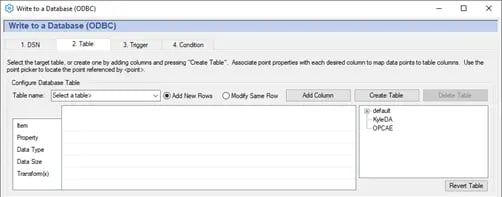
Step 2 - Table Selection or Creation
When writing to a database, you can choose between writing to an existing table or creating a new one. Opting for an existing table enables you to utilize a table you've previously created in your database manager application. However, it is important to note that when selecting an existing table, you are restricted from adding columns or modifying column names on that table inside the DataHub. If you need to modify your table that can be done from inside your database manager application. To select a table, simply choose a table name from the drop-down list.
![]()
Creating a table provides you with a way to design and create a table from within the Datahub interface.
- From the Table Name drop-down list, select <Create a new table>.
- In the dialog box, type in a table name and click OK. Now you will have to add at least one column.

- Click the Add Column button to create a column.
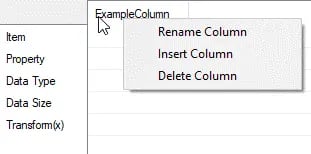
- In the dialog box, type in a column name and click OK. At this point you can add more columns. You can easily rename, insert, or delete a column by right-clicking on the column name and selecting Rename Column, Insert Column, or Delete Column from the pop-up menu.
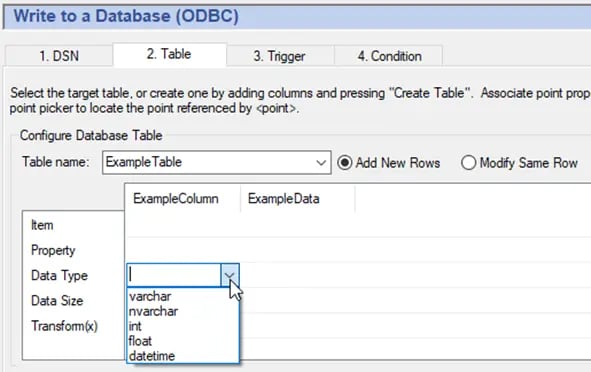
- When all your columns have been created and named, you must assign a datatype. You can do this by selecting the drop-down menu for the Data Type property. The available types are varchar, nvarchar, int, float, and datetime. If you require different data types, we recommend making the table inside your database admin software which will have more options for data types.
- You can now create the table in your database by clicking Create Table.
Note: Once the table is created, you cannot add columns to the table inside the DataHub and will need to use your database manager application.
Tip: Should you find the need to make alterations to a table after its creation, and there is data within it, consider clicking the “Delete Table” button. This action removes the table from the database while preserving all the configurations you’ve set up in this window. Subsequently, you can add more columns or adjust points and properties before recreating the table. Feel free to repeat this process as often as necessary.
Step 3 - Assigning a Key
When creating a new table, you have the option to designate a column, often the first in the table, as a key column. Every value in the key column is unique. By designating a key in a table, you are providing the database engine with a guarantee that any search on the key will produce either zero or one row. Effectively, when a search matches a value in the key column, the row containing that key is guaranteed to be unique in the table. The key is effectively a hint to the database engine to improve efficiency and to guarantee uniqueness. You can still search and modify a table that has no key.
Your choice of key will depend on whether you have chosen Add New Rows or Modify Same Row for your database table.
Add New Rows or Modify the Same Row
For any given table, whether existing or newly created, you will need to decide whether you are going to add new rows or modify the same row with new data each time it triggers a log.
Adding New Rows:
- If you decide you would like to add new rows, this does not require a key column. Each new logging event will create a new row and populate it with the data that you have configured.
- If you do wish to have a key column in your table, it must be automatically generated and guaranteed to be unique. The key value cannot be derived from a DataHub point.

Modifying Same Row:
- Must have a key column. The key column can be any type and does not need to be auto-incrementing. Since the row is overwritten whenever new data is available, no new key is generated.
- The key value you enter here is evaluated in the Gamma engine as an expression or symbol. If it is a string, it must be written inside quotes to prevent causing an undefined symbol error.

Step 4 - Assigning Points and Properties
When you have selected a table, or you have at least one column in a table you are creating, you can assign points and their properties to the various columns.
Item:
This is where you will be assigning your point names. When selecting a value for the item row, you will want to select a point from the list on the right (as illustrated in the image below, where "IsEnabled" has been selected). Then in the item row you will choose to select <point> from the drop-down list. You may also leave the Item blank, which allows you to log the machine’s system time to the database. This will be covered in detail below.

Property:
This setting allows you to decide which property of the point you want written to the column. When the Item above has been left blank you will have the option to set the Property to one of the following:
- Clock
- The current system time. This will include milliseconds, but like timestamp many databases ignore the milliseconds and only store seconds.
- ClockUTC
- The current system time, but in UTC time.
- Clockms
- The millisecond component of the clock, generally used in conjunction with the clock property. You only need this if your database can store the millisecond component of clock and you wish to store time down to the millisecond level.

If the Item above was not left blank, you will select the property of the point you want to be written to the database in this column:
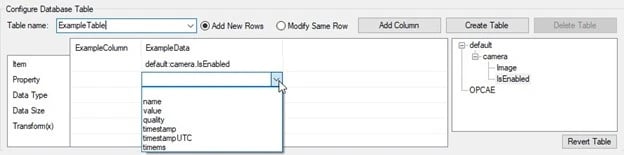
- Name
- The name of the given point.
- Value
- The value of the given point.
- Quality
- The quality of the given point as a string.
- TimeStamp
- The timestamp associated with the given point, this will include milliseconds, however many databases ignore the milliseconds and only store seconds.
- TimeStampUTC
- This is the same as the timestamp, but in UTC time.
- Timems
- The millisecond component of the timestamp, generally used in conjunction with timestamp. You only need this if your database cannot store the millisecond component of timestamp.
Data Type:
This needs to be set as the data type that the database should associate with the Property setting.
Data Size:
In certain instances, this is automatically entered, while in others, it remains unused. However, there are situations where entering a size becomes either possible or necessary, such as specifying the number of characters in a text string or determining the number of bytes required.
Transform(x):
This allows you to modify the entry or to insert a text string. With x being the value of the Item + Property combination. For example:
- Using the expression on a Value property (x * 50) + 15 could be used to multiply a point value by 50 and add 15 to the result.
- Typing “Warning” would insert the string ‘Warning’ overriding any property set.
This flexibility can be applied for various purposes, such as setting a specific value to null, or transforming a decimal into a percentage. You can customize it based on your preferred representation of the value.
Step 5 - Assigning a Trigger
Nothing happens without a trigger. A trigger is an event that causes a row of data to be written to your database table. A trigger event can be either a point value change, a timer event, or a calendar event. You can assign a different trigger for each row, or an identical trigger to any number of rows. An action can be configured to execute on every trigger event, or you can assign trigger conditions that are evaluated whenever a trigger occurs, to determine if the action should be executed.
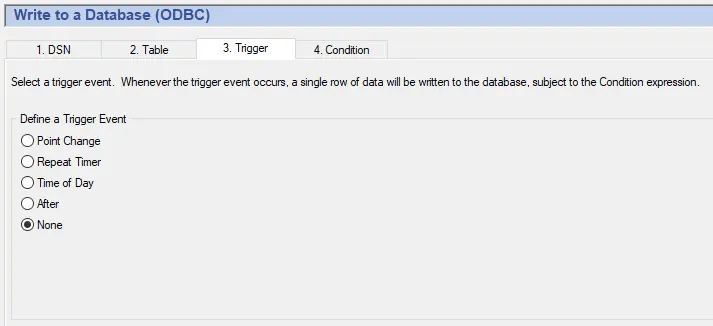
The five options for the configuration of triggers are:
- Point Change
- Fires whenever a specified trigger point changes.
- Repeat Timer
- Fires cyclically, each time the number of seconds elapses.
- Time of Day
- Fires at the time specified.
- After
- Fires once when the number of seconds has elapsed.
- None
- Configures no trigger.
For the purpose of this blog post, we will be configuring a repeat timer to go off every 60 seconds. Many users use Point Change to trigger when a tag value changes.
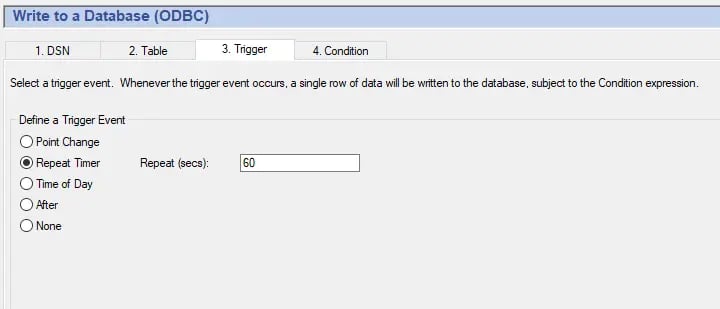
You will then be able to observe in the Script log as the trigger is set off every 60 seconds.

You can optionally add conditions to the triggers that will determine when and why the trigger is executed. There are a few different types of conditions to choose from such as: Point Value, Time, and Custom. These conditions exist so that you can fully customize the triggering of when values are pushed to your database.
Conclusion
We hope this blog has provided meaningful insight into the configuration of database tables while showcasing the valuable properties available in Cogent DataHub that make anything possible.
Ready to try out logging and querying a database for yourself? We believe in having you try our software for yourself, and helping you get started quickly. Check out our video tutorials on writing to a database and reading from a database, and download a free trial to start using DataHub with your own systems.
As always, please contact our support team with any questions, and don’t forget to subscribe to our blog to find out about the latest updates to Cogent DataHub.