As you may have seen in our recent posts in our ongoing Exploring OPC UA blog series, we've been going into the specifics of OPC UA security configuration in key Software Toolbox solutions that are OPC UA capable.
In this sixth post of the series, we will focus on Cogent DataHub, focusing on stepping through what the settings are in DataHub and how to get connected both for your OPC UA clients and servers.
Cogent DataHub, by nature of being a gateway between different interfaces, can act as both an OPC UA client and an OPC UA server. This, coupled with those other interfaces, allows conversion to and from OPC UA for a variety of different systems that don't natively support OPC UA yet.

OPC UA Configuration Components in Cogent DataHub
The settings relevant to OPC UA (both client and server) in the DataHub are all located in the OPC UA section of the configuration.

1. DataHub OPC UA Client Settings
In the consolidated OPC UA settings in DataHub, the top portion of the section covers adding, editing and removing connections to OPC UA servers.
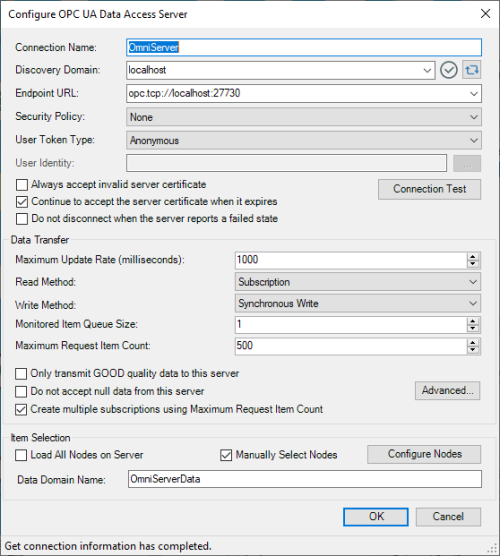
Clicking "Add" or "Edit" brings up the following available settings for connecting DataHub to an OPC UA server:
-
-
Connection Name - user-defined friendly name used by DataHub to identify this connection.
-
Discovery Domain - While DataHub doesn’t install with one, this setting is available to define any Local Discovery Server (LDS) services that you may have installed either on the same machine or on another machine that is network accessible by DataHub. This includes the Local Discovery Server available from the OPC Foundation (available to registered users).
A discovery server for OPC UA is a dedicated service with which an OPC UA server can register, allowing OPC UA clients to then look at the LDS to “browse” for available OPC UA servers they can connect to. For those familiar with OPC DA Classic, this is similar to what you might be used to with OPCEnum for browsing OPC DA servers.
If you have an available LDS, here is where you would enter the IP or computer name for where the LDS is located - this allows the "Endpoint URL" setting to populated with OPC UA servers that have registered with that LDS for selection.
If an LDS is not available, you can just enter the IP or computer name where the OPC UA server is located. -
Endpoint URL - For an OPC UA server, the endpoint is how an OPC UA client specifies a connection. For those familiar with OPC DA, this would be equivalent to the OPC DA Server ProgID at a very basic level. This setting is the URL for the OPC UA server you want to connect to - you can either select it from the dropdown list, if available for browsing (per the Discovery Domain setting) or you can manually enter the correct URL.
A server endpoint consists of the syntax “opc.tcp://” followed by either the IP address or Hostname of the machine where the OPC UA server is installed, followed by a colon and then the Port Number, which may or may not be configurable in the endpoint of the OPC UA server you're connecting to. You can specify the Network Adapter the endpoint should use (which will determine the IP address or Hostname that is used) or if the connection should only allow local OPC UA clients to connect to it.
Additionally, the endpoint is where the level of secure encryption options that the OPC UA client applications must support and use to make a connection to that endpoint. You'll need to confirm what sign and encrypt options are supported for your OPC UA server.
Generally, for each supported encryption option (other than None, of course), you can also select whether the endpoint requires Sign and/or Sign and Encrypt (for full details on Sign and Encrypt, have a look at Part 1 of this blog series on OPC UA Certificate Basics). - Security Policy - For connecting to other OPC UA server, DataHub currently supports (in order of most to least secure): Basic256Sha256, Basic 256, Basic128Rsa15, or None (Default).
- User Token Type - This setting specifies what user authentication method, if any, should be used to connect to the OPC UA server. DataHub supports the following options:
- My Certificate - this option uses the self-signed security certificate generated by DataHub for use with authentication - When selected, the certificate name will be displayed in the "My Certificate" field.
- Another Certificate - this option allows you to import a different security certificate file (such as from a 3rd party certificate authority such as Verisign or Thawte) for use with authentication - When selected, the "Certificate File" field will allow you to browse to the .pfx certificate file.
- User Name - this option requires a user name and password (corresponding to a user configured in the OPC UA server) - when selected, you can enter the User Name and Password in the resulting fields.
- Anonymous (Default) - this option, which must also be supported by the UA server, doesn't use any authentication for connecting to the OPC UA server.
- Always accept invalid server certificate - Disabled by default, when enabled this setting tells DataHub to basically ignore whether the OPC UA server's security certificate is invalid now or in the future. (NOTE: This setting is provided as a flexible convenience and should only be enabled with the understanding that it lowers the security of your OPC UA connection).
- Continue to accept the server certificate when it expires - Enabled by default, this option allows a UA certificate to be accepted outside of its valid time window, meaning that expired certificates can continue to be used. Keeping this setting enabled also keeps the OPC UA server and client connected if their respective system clocks ever get out of synch. Additionally, you'll want to keep this setting enabled if you're connecting to an OPC UA server running on an embedded system without a system clock, or where the system clock cannot be kept in sync.
- Do not disconnect when the server reports a failed state - Disabled by default, so if the OPC UA server is in a non-RUNNING state, DataHub disconnects and logs a message to the Event Log. Enabling this setting overrides that behavior and maintain the connection to the OPC UA server.
- Connection Test - Once you've configured the Endpoint URL, Security Policy and User Token Type, you can click this button to initiate a test connection to the OPC UA server to confirm those settings are correct (if there are any issues, a meaningful message indicating what the problem was will appear in the Message section of the dialog).

- Maximum Update Rate - This setting specifies the fastest data will be requested from the underlying OPC UA server and is useful for slowing down the rate of incoming data. The minimum value is 10 and the default is 1000 ms. This value is also used as the polling for non-subscription options selected in the "Read Method" setting.
- Read Method - This setting defines how DataHub will read data from the underlying OPC UA server. The following options are supported (in order of most efficient to least efficient):
- Subscription (Default) - This is the recommended option - updates are requested from the OPC UA server that are event-based (i.e. updates should only be sent if the value for a point actually changes).
- Asynchronous Read - A non-blocking read method where DataHub will send a read request at the "Maximum Update Rate" but doesn't stop performing other operations while waiting for the response.
- Synchronous Cache Read - A blocking read method where DataHub will send request for the latest cached value for points from the last time a device read was performed and wait for the response.
- Synchronous Device Read - A blocking read method where DataHub will send a read request at the "Maximum Update Rate" for the latest value from the device and waits for the response before performing other operations.
- Write Method - This setting defines how DataHub will write data to the underlying OPC UA server. The following options are supported (in order of most efficient to least efficient):
- Asynchronous Write - DataHub performs a write/writes to points in the OPC UA server and does not wait for a response.
- Synchronous Write (Default) - DataHub performs a write/writes to points in the OPC UA server and waits for a response prior to performing other operations - this can be useful with UA servers that either don't support async writes or that can't handle a large quantity of async writes. This can also be useful if order of operations with your writes matters (such as with writing recipe information).
- Monitored Item Queue Size - The maximum number of items between polls that get stored for this server.
- Maximum Request Item Count - The OPC UA spec allows a UA server to specify the number of items it will allow per request. This setting allows you to adjust the DataHub to what the server allows, if necessary. Defaults to 500 items.
- Only transmit GOOD quality data to this server - Setting restricts point updates from the DataHub to the server to only those with "Good" quality.
- Do not accept null data from this server - Setting rejects point updates from the server to the DataHub if the values are null.
- Create multiple subscriptions using Maximum Request Item Count - The "Maximum Request Item Count" specifies the maximum number of nodes (points) per subscription. Coupled with this setting being enabled (default), DataHub will use that number to decide the maximum number of nodes per subscription.
However, if this number is small and the total number of nodes is large then the number of requested subscriptions could exceed the subscription count limit of the server.
Unchecking this box will solve that problem by putting all of the nodes into a single subscription. - Advanced - The settings available in the Advanced section covered a number of timeout and length limits - it is recommended not to adjust these timing settings, as the defaults work best in the majority of situations. As such, they are beyond the scope of this post.
- Load All Nodes on Server - Enabling this option will result in all available nodes (points/items) available in the underlying OPC UA server being loaded in DataHub (not recommended unless you need to access every available node/point).
- Manually Select Nodes - Enabled by default, this allows you to click "Configure Nodes" and manually browse and select the nodes/points you wish to access with DataHub.
- Configure Nodes - Click this button to open the "Configure Nodes" dialog where you can browse and select one or more nodes/points from the OPC UA server to access.

- Data Domain Name - This is the DataHub domain or group where the nodes/points from this OPC UA server will be placed and available for access by other functional modules and interfaces in DataHub.
-
As with other sections and settings in the DataHub, once you've edited the OPC UA settings for connecting to an OPC UA server, always make sure to "OK" to save and exit the dialog. Then make sure, once back in the main DataHub configuration interface, to click the "Apply" button to ensure the settings you changed take effect.
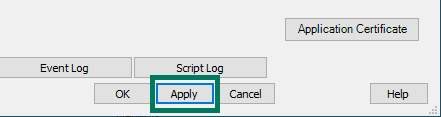
This includes making sure to enable the checkbox "Act as an OPC UA Client to these servers" and clicking "Apply" - otherwise, DataHub will not connect to your configured OPC UA server/servers. Additionally, if you ever need to disable just one of multiple connections to OPC UA servers, you can uncheck the box next to each configured connection and click "Apply".
2. DataHub OPC UA Server Settings
In the consolidated OPC UA settings in DataHub, the bottom portion of the section covers the settings related to OPC UA client applications connecting to DataHub.

-
- Act as an OPC UA Server - When unchecked, DataHub's OPC UA server interface will not be available for OPC UA clients to connect to - it should be checked if you plan to connect other OPC UA clients to DataHub.
- Protocols - By default, all supported OPC UA protocols are enabled in DataHub - the most common is opc.tcp, but DataHub also supports connections from OPC UA clients via http and https transports, as well.
Each protocol has a different TCP port, which is configurable by highlighting the desired protocol and clicking the "Edit Port" button.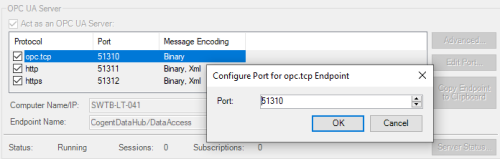
- Computer Name/IP - Automatically populates with the local Computer Name for use in the endpoint that OPC UA clients will use to access DataHub.
- Endpoint Name - An optional meaningful name that can be appended to the OPC UA server endpoint that OPC UA clients will use to access DataHub. This defaults to "CogentDataHub/DataAccess" but can be edited to the desired label.
- Copy Endpoint to Clipboard - When you highlight the desired "Protocol" option, you can click this button to copy the fully qualified OPC UA endpoint to ensure you have the right syntax. This makes it easy to transfer the right endpoint string to your OPC UA client. For example:
opc.tcp://SWTB-LT-041:51310/CogentDataHub/DataAccess - Advanced - Most of the sections in the Advanced options are beyond the scope of this post and should be left at their defaults. We will cover the "General" section, which is where the security policies and authentication settings are defined for each endpoint and several relevant settings in the "Advanced" section.
- General

- Server URL - Dropdown for selecting the endpoint you wish to configure.
- Security Policies - Select the security policies that will be available for OPC UA clients to use when connecting to DataHub - by default, all supported options are enabled including (in order from most to least secure): Basic256Sha256, Basic256, Basic128Rsa15, None.
- User Token Policies - Select the user authentication options that will be available for OPC UA clients to use when connecting to DataHub - by default, all supported options are enabled including Certificate, UserName and Anonymous.
- Automatically accept untrusted certificates - Disabled by default, this setting allows DataHub to automatically trust certificates from OPC UA clients attempting to connect to DataHub (for greatest security, it is recommended to leave this disabled - this option is provided as a convenience for testing purposes).
- Continue to accept client certificates when they expire - Enabled by default, this setting allows DataHub to maintain connections with OPC UA clients even after the client's security certificate has expired (this is not recommended for production systems, for security purposes, and is enabled only for ease of initial testing).
- Advanced

- Enable UA Server diagnostics - Enabled by default, this allows OPC UA server specific messages, warnings or errors to be logged to the main DataHub Event Log for easier troubleshooting - it is recommended to keep this enabled.
- Allow connections when the client and server clocks do not match - Enabled by default, this setting ensures that there are no issues with OPC UA clients connecting from machines where there may be a difference in system clock time (this eliminates the need to synchronize the system clocks of the two systems).
- Automatically create unknown items requested by client - Enabled by default, this allows DataHub to dynamically add any node/point requested by an OPC UA client that doesn't already exist in DataHub - for full OPC compliance, this setting should be disabled, which will result in an error being returned to any OPC UA client requesting nodes that don't already exist.
- Automatically register with the Local Discovery Server - If a Local Discovery Server is available, enabling this option, when combined with a valid "Discovery Server URL" for that LDS will result in DataHub registering with that LDS and being browsable by OPC UA clients accessing that LDS.
- Discovery Server URL - The OPC UA endpoint URL of an available Local Discovery Server service (either on the same machine as DataHub or on a different machine) where DataHub can register to be browsable by OPC UA client applications.
- General
- Manage Certificates - Clicking this button brings up the dialog for managing security certificates in the various available certificates stores for DataHub's OPC UA server interface. Selecting the certificate store from the dropdown will display any certificates in that store.
For all stores, you can Import certificates manually, View the details of a highlighted certificate, Delete a highlighted certificate, Reject a highlighted certificated, Accept a highlighted certificate (adds it to the private store) or Global Accept a highlighted certificate (adds it to the Windows store.
Additionally, you can use the filters under the selected certificate store to easily find a specific certificate you're looking for by filtering on Name, Domain, Issuer Name, Certificate Type and whether it has a private key or not.
- Rejected Certificates - where any OPC UA client certificates will be listed that have attempted to connect but have not been trusted or that you have explicitly rejected by using the "Reject" button in any other certificate store (or certificates that you have manually imported using the Import button in the "Rejected Certificates" store.
- OPC UA Private Certificates - where OPC UA certificates that have been trusted in the private (non-Windows) certificate store will be listed.
- OPC UA Global Certificates - where OPC UA certificates that have been trusted in the global (Windows) certificate store will be listed.
- Certificate Authorities - a listing of supported certificate authorities that issue third-party encryption certificates such as DigiCert, VeriSign, GlobalSign, Symantec and more.
- Temporary Certificates - a listing of certificates that have been trusted just for this session only - such as client certificates where the certificate was accepted by DataHub even though it was invalid for some reason due to one of the previously covered settings being enabled. Such certificates, unless they're Accepted, will be removed when DataHub is restarted and the UA client will have exchange certificates again.
- Application Certificate - clicking this button will display the properties of the currently assigned DataHub certificate (a self-signed certificate is generated by DataHub upon install).

Additionally, you have options here to Export this certificate (in the event you need to manually exchange certificates and need to import DataHub's certificate into your OPC UA client application (consult your client's documentation for managing certificates). You can also Assign a different certificate such as one from a third-party certificate authority for DataHub. Or you can Regenerate the self-signed DataHub certificate, which is useful if there is a chance the certificate has been compromised, if the computer name changes or if the current certificate has expired.
- Act as an OPC UA Server - When unchecked, DataHub's OPC UA server interface will not be available for OPC UA clients to connect to - it should be checked if you plan to connect other OPC UA clients to DataHub.
You will also notice a Status bar, which provides a high-level overview of whether or not the DataHub UA server is currently running or not, how many sessions from UA clients currently exist and how many current subscriptions are active.
Clicking the "Status" button provides a more detailed view including specifics of connected UA clients including the IP Address, user authentication details and more. You can even use the "Kill Selected Session" to discontinue the session of a connected UA client by highlighting it and clicking the button.

And another convenient features for managing OPC UA client certificates of clients attempting connections to DataHub are the Rejected Certificates and Temporary Certificates counters with their corresponding "Accept All" buttons. While not recommended on a live production system, for testing purposes, these options make it easy to get proof-of-concepts up and running by blanket accepting any and all OPC UA client certificates that have been exchanged but not trusted/accepted yet.

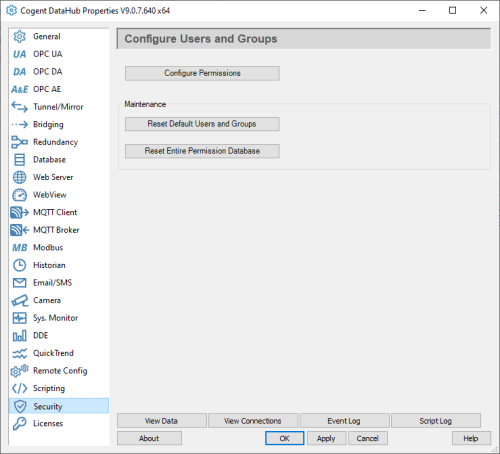
3. DataHub Security
DataHub has built-in authentication and user permissions management in the "Security" - this is where the user an OPC UA client passes for UserName authentication must exist with valid permissions and password for DataHub to accept the connection. Just click the "Configure Permissions" button to get started.
Permissions are defined at the group level so that means the user can belong to any defined group as long as that group allows the user the required access to the nodes/points you need to read and/or write in DataHub. At a minimum, your user should belong to the "Basic Connectivity" group to have the appropriate permissions for connect, read and write.
It's simple to add a new user - just click in the empty space at the bottom of the list in the Users section and enter the UserName and then a corresponding Password. Then check the box of the desired Group Membership (selecting "BasicConnectivity" at a minimum).

Just make note of the UserName and Password you define here since you will need to enter it in your OPC UA client application to successfully connect to DataHub (if you're using username/password authentication).
Connecting Your OPC UA Client to DataHub
Using the information we’ve just discussed, you can get your OPC UA client connected to DataHub You’ll want to step through the following list, as a general rule (or watch our tutorial video on connecting an OPC UA Client to DataHub here):
- In the DataHub OPC UA section:
- Enable "Act as an OPC UA Server"
- Assuming that you'll use the default port number for the opc.tcp endpoint, make note of the port which defaults to Port 51310 for use in your client. (Alternately, change the Port, as required, and make note of that number. )
- By default, DataHub is configured to make OPC UA connections as easy as possible - as such, it shouldn't be necessary to make any changes in the "Advanced" settings, since all security and authentication options are supported by default.
- Export the security instance certificate from your OPC UA client (how to do this varies by client application – please consult the help documentation for your OPC UA client for details on exporting its OPC UA security instance certificate).
- Go into "Manage Certificates" and select either the "OPC UA Private" or "OPC UA Global" certificate store option and click Import and browse to the OPC UA client certificate from the previous step.
- Export DataHub’s security instance certificate by clicking the "Application Certificate" button and clicking the “Export” button.
- Import DataHub’s security instance certificate into your OPC UA client (how to do this varies by client application – please consult the help documentation for your OPC UA client for details on importing server security instance certificates and trusting them).
- Configure a user with the required permissions in the DataHub Security section ensure it belongs to the "BasicConnectivity" group.
- Back in the OPC UA setting, highlight the opc.tcp endpoint and click the "Copy Endpoint to Clipboard" button to copy the fully-qualified endpoint URL (either for pasting directly into your OPC UA client (if installed locally) or for reference.
- Click Apply at the bottom of your DataHub configuration.
- Configure a connection from your OPC UA client using the endpoint address:
-
- You’ll need the URL you just copied from DataHub.
- You’ll need to confirm which of the security options DataHub supports is also supported by your OPC UA client (remember, DataHub supports Basic256Sha256, Basic256, Basic128Rsa15, None).
- You’ll need the username and password that you configured in the DataHub Security section (if applicable – by default, Anonymous login is enabled so if you didn't change that in DataHub, you can leave the username and password blank in your UA client).
- Consult your client’s help documentation on the specific steps required to complete the connection and how to either browse for nodes/tags in DataHub or how to manually add nodes/tags.
-
For a walkthrough of connecting an OPC UA client application to DataHub, watch the detailed how-to video here.
Connecting DataHub to another OPC UA Server
Again using the information we discussed earlier, you can get DataHub connected to your OPC UA server. You’ll want to step through the following list, as a general rule (or watch a tutorial video that covers connecting DataHub to other OPC UA servers here):
- Make sure your other OPC UA server is properly configured to accept OPC UA client connections including enabling the interface (if applicable), having your OPC UA endpoint configured and any username/password authentication setup properly (consult the help documentation for your other OPC UA server for details on preparing for OPC UA clients to connect including how to export the security instance certificate).
- You’ll need the following details from your other OPC UA server in order to configure the DataHub to connect:
- OPC UA endpoint URL (including Port)
- Security policies that are supported and enabled (including whether Sign and/or Sign & Encrypt are required)
- The security instance certificate from that OPC UA server.
- Import the security instance certificate from your other OPC UA server in DataHub by clicking "Manage Certificates" and selecting either the "OPC UA Private" or "OPC UA Global" certificate store and clicking the Import button, then browse to the certificate file.
- Export DataHub’s security instance certificate by clicking the "Application Certificate" button and clicking the “Export” button.
- Import DataHub’s security instance certificate into your OPC UA server (how to do this varies by server application – please consult the help documentation for your OPC UA client for details on importing server security instance certificates and trusting them).
- In the OPC UA section of DataHub, make sure "Act as an OPC UA Client to these servers" is enabled.
- Click the "Add" button to start configuring a new OPC UA client connection.
- Enter a meaningful "Connection Name".
- If the OPC UA server is local, it might be browsable from the "Endpoint URL" dropdown - if not, you can also paste or type in the endpoint URL from your OPC UA server in the "Endpoint URL" field.
- Select a "Security Policy" appropriate for your OPC UA server (remember, DataHub supports Basic256Sha256, Basic256, Basic128Rsa15, None so select one of those options based on what is enabled and supported in your OPC UA server).
- Select the desired "User Token Type" based on what your OPC UA server supports and is enabled (not all OPC UA servers support certificate based authentication or anonymous log-in so confirm what options are required by your server and make sure what you configure here matches - including the UserName and Password fields, if you select UserName for the type).
- Click "Connection Test" to confirm that the above settings are correct (if not and your receive an error, make the appropriate changes based on the warning/error message).
- I would recommend keeping the defaults for the "Data Transfer" section settings, unless you have a specific reason to change them (such as you know your OPC UA server doesn't support a Subscription read method, for instance).
- Click the "Configure Nodes" button and browse your OPC UA server address space and check the box next to the desired nodes/points that you want to access and click OK.
- Enter a meaningful "Data Domain Name" for where your selected nodes/points will be stored.
- Click OK.
- Click Apply at the bottom of the DataHub configuration.
- Once your OPC UA Client settings for your connection to the underlying OPC UA server are complete, you can quickly test your configuration using the View Data button at the bottom of the DataHub configuration window (find your Data Domain and expand it until you find the branch containing the nodes/points you browsed for and selected). You should be able to confirm there is good quality and changing data here.
For a walkthrough of connecting DataHub to another OPC UA server, watch the detailed how-to video here. As always, you can try out everything we've just covered yourself with the free trial of DataHub.
Subscribe to our blog to stay tuned for the rest of this series where we will continue looking at how to specifically secure more OPC UA solutions available from Software Toolbox, which should be useful to our users migrating to OPC UA but uncertain of how to take full advantage of the security benefits.


