In our ongoing Exploring OPC UA blog series, we have shifted the focus from general concepts about how OPC UA certificates and security work to looking at practical usage of OPC UA in specific Software Toolbox solutions. Last time, we focused on configuring TOP Server for OPC UA connectivity.
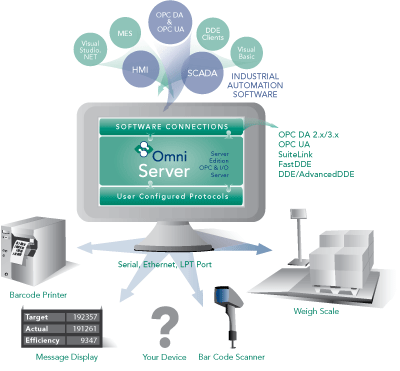
In this fifth post of the series, we will focus on OmniServer, our solution for getting data from non-standard devices into OPC UA and other client applications. We'll step through what the settings are in OmniServer and how to get your OPC UA client applications connected.
So the first thing to know about OmniServer with respect to OPC UA is that both the Server and Professional Editions natively provide an OPC UA server interface for access by OPC UA client applications such as HMI, SCADA, MES, Historians and other applications that need to access process data from non-standard device such as scales, barcode scanners, RFID readers, sensors and more. That OPC UA server interface is available at no additional cost with those editions of OmniServer.
OPC UA Configuration Components in OmniServer
The settings relevant to OmniServer's OPC UA server interface are all located in the OPC UA section of the Clients view in the OmniServer Configuration window.
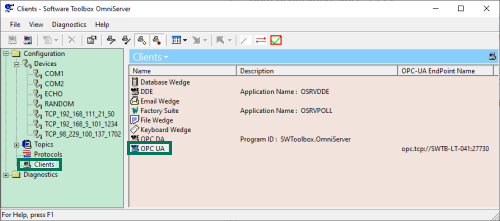
Simply double-click on "OPC UA" to launch the "OPC UA Configuration" which has the following settings with specific purposes for UA connections:
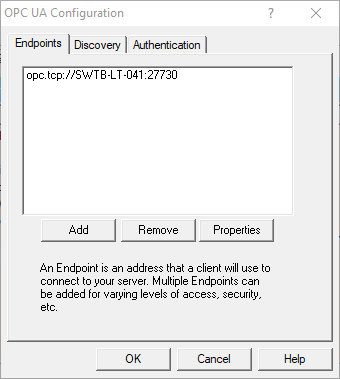
1. OmniServer UA Endpoints
For an OPC UA server, the endpoint is how an OPC UA client specifies a connection. For those familiar with OPC DA, this would be equivalent to the OPC DA Server ProgID at a very basic level. This section is where you configure the server endpoints that you would like to be available to your OPC UA client applications.
In OmniServer, there is an existing default endpoint with a default port of 27730 accessible both remotely and locally for OPC UA clients. You can select that existing endpoint and click "Properties" to make edits or click "Add" to add a new endpoint with different settings (you can add multiple endpoints with their own specific levels of security and access to meet the needs of your project).
You can also "Remove" any existing endpoint that you no longer need (it is recommended to only have configured the endpoints you need and are using).
The OmniServer Endpoint properties consist of the following:
- General Settings:
A server endpoint consists of the URL, which is composed of the starting syntax “opc.tcp://” followed by either the IP address or Hostname of the machine where the OPC UA server is installed, followed by a colon and the Port Number, which is configurable in the endpoint in OmniServer. You can also specify "Local Only" for the "Hostname" field if the connection should only allow local OPC UA clients to connect to it (this results in the URL using the loopback IP address of 127.0.0.1 with the configured port number).
OmniServer uses the OpenSSL store for storing the OPC UA certificates exchanged with OPC UA clients for secure communications. - Certificate Settings:
This is where you manage OmniServer's own OPC server certificate. By default, when you install OmniServer, a self-signed certificate is generated for the OPC UA server interface.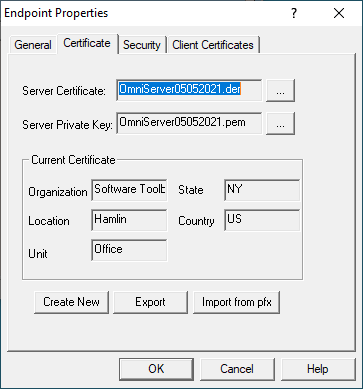
This section lets you manage that certificate, providing the ability to Create New certificates (which is how you re-issue the existing self-signed certificate), Export the certificate (useful for manual import into your OPC UA client) or Import from pfx (which gives you the ability to use a security certificate that you're purchased from a third-party certificate authority such as Verisign, Thawte, etc in the event that you prefer not to use the self-signed certificate)..
Reissuing a certificate (using the "Create New" button) is most important because certificates eventually expire and have to be reissued (this operation also then requires a re-exchanging and trust of those certificates with OPC UA clients that you’ve previously made that exchange with. OmniServer self-signed certificates expire after 3 years from the issue date. As such, be aware that if you’re using OPC UA, you’ll need to reissue and exchange your certificates every 3 years.
Use the "Export" button here to export OmniServer's current certificate file if you prefer to import the certificate to your OPC UA client and trust it first prior to attempting a connection to OmniServer (how to do this varies by client application – please consult the help documentation for your OPC UA client for details on importing server security instance certificates and trusting them). - Security Settings:
This section is where you define the level of secure encryption options that an OPC UA client applications must support and use to make a connection to this endpoint. These options are updated as technology advances – currently, options include: Aes256Sha256RsaPss, Aes128Sha256RsaOaep, Basic256Sha256, and None (ranging from highest level of security to no security at all and not recommended).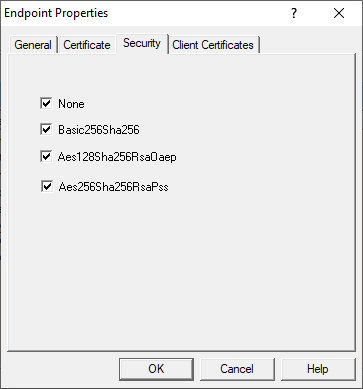
For each option (other than None, of course), both Sign and/or Sign and Encrypt and encrypt are supported (for full details on Sign and Encrypt, have a look at Part 1 of this blog series on OPC UA Certificate Basics). By default, all security options are enabled for an endpoint - after testing, it is typically recommended to disable "None" for production systems for the highest level of security. It is recommended to consult your IT department for network and security best practices specific to your systems. - Client Certificates Settings:
For an OPC UA client to connect to OmniServer, it must first be trusted – this means that the UA client and OmniServer have exchanged security certificates and you, the user, have told OmniServer it is okay for that UA client to connect to it (and, vice versa, you've told your UA client that it's okay to connect to OmniServer).
The first part, telling OmniServer your OPC UA client is okay, is accomplished in this section.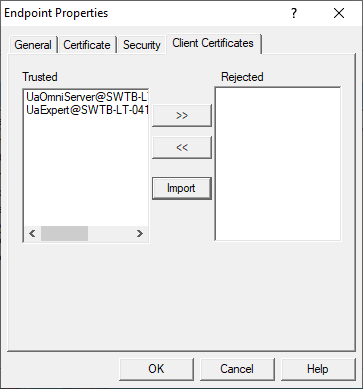
Here you can manually Import the certificate from your OPC UA client (consult your client’s help documentation on how to manage its certificates including where they are stored and how to export them).
You'll notice there are two sections listed here: Trusted and Rejected.
The Trusted section is where OPC UA clients will appear if you've trusted their certificates. If an OPC UA client attempts to connect and has not yet been trusted, it will appear in the Rejected section.
You can use the ">>" arrow button to untrust a formerly trusted UA client and the "<<" arrow button to trust a formerly untrusted UA client that has attempted to connect to OmniServer.
2. OmniServer UA Discovery Settings
While OmniServer (like most OPC UA solutions) doesn’t install with one, the Discovery section of the OPC UA Configuration is available to define any Local Discovery Server (LDS) services that you may have installed either on the same machine as OmniServer or on another machine that is network accessible by OmniServer. This includes the Local Discovery Server available from the OPC Foundation (available to registered users).
A discovery server for OPC UA is a dedicated service with which an OPC UA server can register, allowing OPC UA clients to then look at the LDS to “browse” for available OPC UA servers they can connect to. Again, for those familiar with OPC DA Classic, this is similar to what you might be used to with OPCEnum for browsing available OPC DA servers.
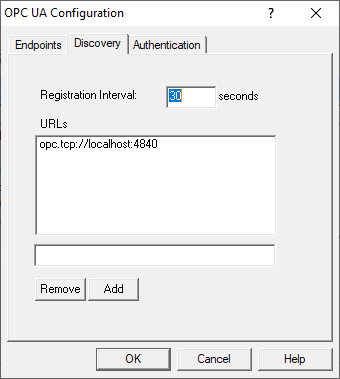
Basically, you will need the endpoint URL for the LDS and you’ll enter that URL in the field under the URLs list and click the Add button. The configurable "Registration Interval" defaults to 30 seconds and defines how frequently OmniServer will attempt to register with the URLs you've added below. You can easily Remove an LDS later by highlighting it in the URLs list and clicking "Remove".
3. OmniServer UA Authentication Settings
By default, OmniServer doesn't require an OPC UA client to provide a username and password when connecting.
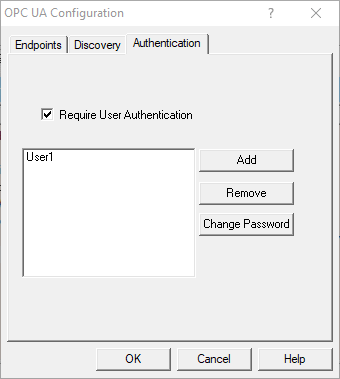
In the "Authentication" section, you can enable this requirement by checking the "Require User Authentication" setting. Once enabled, you'll be able to use the provided buttons to:
- Add - Add a username and associated password that a user can specify from a trusted OPC UA client to connect to OmniServer.
- Remove - Deletes the currently highlighted user from the list of existing users.
- Change Password - Allows you to change the password of the currently highlighted user from the list of existing users.
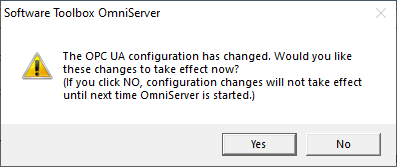
After making any and all changes to any of the sections in the OmniServer OPC UA Configuration, click the "OK" button to apply the settings. You will receive the following prompt - clicking "Yes" will apply your OPC UA setting changes immediately. If you click "No", your settings won't apply until the next time the OmniServer runtime is restarted.
Connecting Your OPC UA Client to OmniServer
Using the information we’ve just discussed, you can get your OPC UA client connected to OmniServer. You’ll want to step through the following list, as a general rule (or watch our tutorial video on connecting an OPC UA Client to OmniServer here):
- Configure an endpoint in the OmniServer OPC UA Configuration:
- Specify the desired port number.
- Specify the desired encryption settings (keep in mind what your OPC UA client supports – not all OPC UA clients/servers will always support the same levels of encryption so it’s important to select an options that both the client and server support).
- Export the security instance certificate from your OPC UA client (how to do this varies by client application – please consult the help documentation for your OPC UA client for details on exporting its OPC UA security instance certificate).
- Alternately, it's common to simply attempt a connection from your OPC UA client (which will result in your client's certificate being listed in the "Rejected" section of the "Client Certificates" section of the Endpoint properties in OmniServer where you can then click the button to move it to the "Trusted" section.
- If you chose to export your client's certificate, import the security instance certificate from your OPC UA client in the OmniServer OPC UA Configuration in the Endpoint properties under “Client Certificates” by clicking the “Import” button and browsing to the certificate file from Step 2 above.
- Export OmniServer’s security instance certificate in the OmniServer OPC UA Configuration under “Certificate” in the endpoint you plan to connect to by clicking the “Export” button. (This isn't necessary for some client applications - some clients trust certificates by default - we recommend attempting to connect again to confirm if the connection is now successful - if not, you'll need to proceed to Step 5).
- Import OmniServer’s security instance certificate into your OPC UA client (how to do this varies by client application – please consult the help documentation for your OPC UA client for details on importing server security instance certificates and trusting them).
- Configure a user and password in the OmniServer OPC UA Configuration under "Authentication".
- Configure a connection from your OPC UA client using the endpoint address:
- You’ll need the URL from the endpoint that you configured in OmniServer (as displayed in the General section of the Endpoint Properties).
- You’ll need to know which security policies you enabled in the OmniServer endpoint you'll be connecting to so you can select the appropriate option in your OPC UA client.
- You’ll need the username and password that you configured in the Authentication section of the OmniServer OPC UA Configuration (if applicable – if you didn't enable "Require User Authentication" in OmniServer, you will leave the username and password blank in your UA client).
- Consult your client’s help documentation on the specific steps required to complete the connection and how to either browse for static nodes/tags in OmniServer (if you have them configured) or how to manually add nodes/tags.
For a walkthrough of connecting an OPC UA client application to OmniServer, watch the detailed how-to video here.
Subscribe to our blog to stay tuned for the rest of this series where we will continue looking at how to specifically secure more OPC UA solutions available from Software Toolbox, which should be useful to our users migrating to OPC UA but uncertain of how to take full advantage of the security benefits.


