Continuing our Exploring OPC UA blog series, we're still going into the specifics of OPC UA security configuration in key Software Toolbox solutions that are OPC UA capable.
In this ninth post of the series, we will focus on OPC Router, focusing on stepping through what the settings are in OPC Router and how to get connected both for your OPC UA clients and servers.
In keeping with the many various functions available in OPC Router, it can act as both an OPC UA client and an OPC UA server. This, in conjunction with OPC Router's other modules and workflow capabilities, allows conversion to and from OPC UA for a variety of different systems that don't natively support OPC UA.
 OPC UA Configuration Components in OPC Router
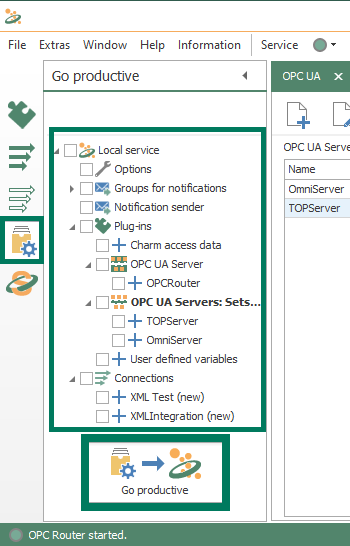
The settings relevant to OPC UA in the OPC Router are located in the OPC UA plug-in settings for connecting to OPC UA servers and in the OPC UA Server plug-in settings for connections from other OPC UA clients. Both plug-ins are located under the "Shopfloor" branch of the "Plug-Ins" section as seen below.

1. OPC Router OPC UA Plug-in Settings
The settings for connecting OPC Router to other OPC UA servers are configured via instances of the OPC UA plug-in.
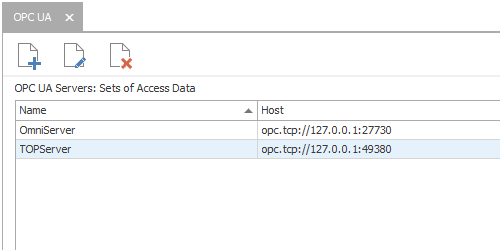
Each instance represents a connection to an OPC UA server with its own settings for security parameters. Clicking "New" or "Edit" buttons presents the following available settings (this example is a local OPC UA connection to OmniServer):
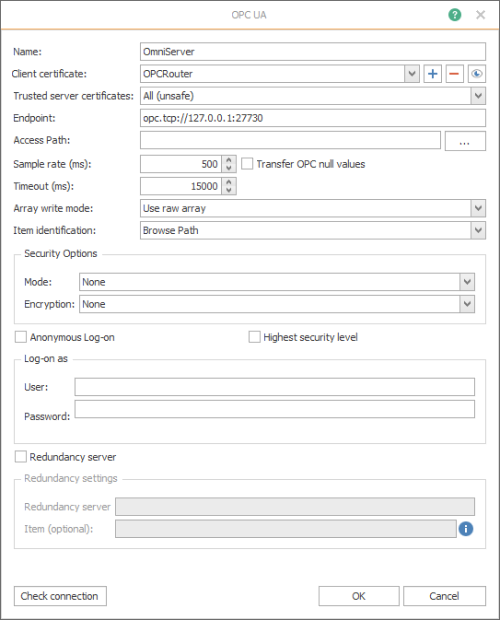
Here are specific details on the key settings pertaining to security you will need to configure (the other settings shown above either don't pertain to security or can generally be left at the defaults):
-
Name - user-defined friendly name used by OPC Router to identify this connection.
-
Client certificate - Defines which of OPC Router's available security certificates to use for encryption for this specific connection. OPC Router's security certificates are managed through the Extras > Settings menu under Certificate Management (which will be covered in more detail shortly) .
Alternately, you can:-
Click the "+" button to define a new self-signed security certificate for use with this connection
-
Click the "-" button to delete the selected security certificate.
-
Click the "eye" button to view the details of the selected security certificate.
-
- Trusted server certificate - Selects which OPC UA server security certificates to accept/trust. The default setting is "All" which will result in the certificate of the OPC UA server being connected to getting trusted automatically. Other options include:
- Router - if the certificate has not already been imported and trusted through certificate management, you will be prompted to either trust or reject the OPC UA server's certificate when attempting to connect.
- Windows - use this option if you've imported your OPC UA server's certificate to the "Third-Party Root Certification" section in the Local Machine Certificate Manager in Windows (Just search for "certificates" in Windows and select the options for "Manage computer certificates").
- Router - if the certificate has not already been imported and trusted through certificate management, you will be prompted to either trust or reject the OPC UA server's certificate when attempting to connect.
-
Endpoint - For an OPC UA server, the endpoint is how an OPC UA client specifies a connection. For those familiar with OPC DA, this would be equivalent to the OPC DA Server ProgID at a very basic level. This setting is the URL for the OPC UA server you want to connect to - just manually enter the correct URL as determined in the configuration of your OPC UA server.
A server endpoint most commonly consists of the syntax “opc.tcp://” followed by either the IP address or Hostname of the machine where the OPC UA server is installed, followed by a colon and then the Port Number, which may or may not be configurable in the endpoint of the OPC UA server you're connecting to (consult the help documentation for your specific OPC UA server for details). Other possible valid prefixes in an endpoint URL are http:// or https://.
Additionally, the endpoint is where the level of secure encryption options that the OPC UA client applications must support and use to make a connection to that endpoint. You'll need to confirm what sign and encrypt options are supported for your OPC UA server.
NOTE: If encryption is used for the connection, the Endpoint URL must be entered here exactly as it is specified in the server's certificate. For example, if the certificate contains “Server.domain.local” (i.e. a DNS name), the endpoint must also be addressed in this way, as opposed to using the IP address instead. Otherwise, the certificate will be rejected.
Generally, for each supported encryption option (other than None, of course), you can also select whether the endpoint requires Sign and/or Sign and Encrypt (for full details on Sign and Encrypt, have a look at Part 1 of this blog series on OPC UA Certificate Basics). - Security Options - The following settings define which signing and encryption options will be used for this connection:
- Highest security level - Enabled by default, this option will force the connection to use the most secure Mode and Encryption options supported by your OPC UA server for the connection. (Mode and Encryption settings are not available while this is enabled)
- NOTE: If connection problems occur with this setting enabled, it is recommended to disable and set security options manually based on known supported settings for your OPC UA server endpoint.
- Mode - Specifies whether the connection should use Sign, Sign and Encrypt or None (only available if "Highest security level" is disabled).
- Encryption - Specifies which encryption algorithm to use for the connection - OPC Router currently support the following option in order from most to least secure: Basic256Sha256, Https, Basic 256, Basic128Rsa15, or None.
- Highest security level - Enabled by default, this option will force the connection to use the most secure Mode and Encryption options supported by your OPC UA server for the connection. (Mode and Encryption settings are not available while this is enabled)
- Anonymous Log-on - This setting (enabled by default) specifies that the OPC UA server doesn't require (or possibly support) user authentication via username and password. If your OPC UA server supports and requires user authentication, you will need to disable this setting, which will make the "Log-on as" authentication fields below it accessible.
- Log-on as - The following fields are only available if "Anonymous Log-on" has been disabled:
- User - Enter a username configured in your OPC UA server that is authorized to access the server via OPC UA.
- NOTE: For details on user management and authentication in your OPC UA server, please consult the server documentation.
- Password - Enter the password associated with the username you specified above.
- User - Enter a username configured in your OPC UA server that is authorized to access the server via OPC UA.
- Check connection - Once you've configured the settings for your OPC UA server, you can click this button to initiate a test connection to the OPC UA server to confirm those settings are correct (if there are any issues, a meaningful message indicating what the problem was will appear in the Message section of the dialog).
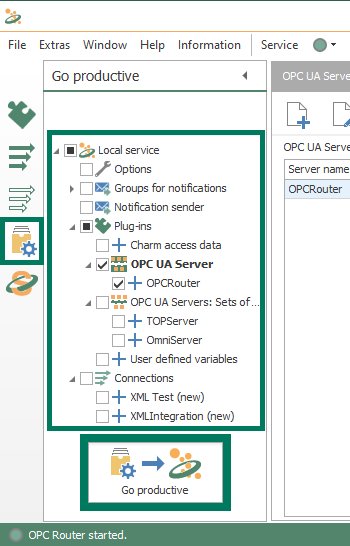
Once you've edited the OPC UA settings for connecting to an OPC UA server, just click "OK" to save and exit the dialog. And, as with any other changes in OPC Router, make sure to go to the "Go Productive" section of the configuration and select the elements being used in your project and click the "Go productive" button to publish the changes.
2. OPC Router OPC UA Server Plug-in Settings
The settings for connecting OPC UA clients to OPC Router are configured via instances of the OPC UA Server plug-in.
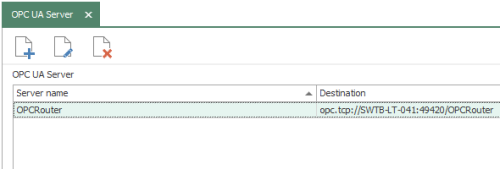
Each instance is a separate OPC UA server endpoint with its own specific port and security options (configuring the Address space, which defines data variables and objects that will be available to OPC UA client, is beyond the scope of this post. Clicking "New" or "Edit" buttons presents the following available settings:
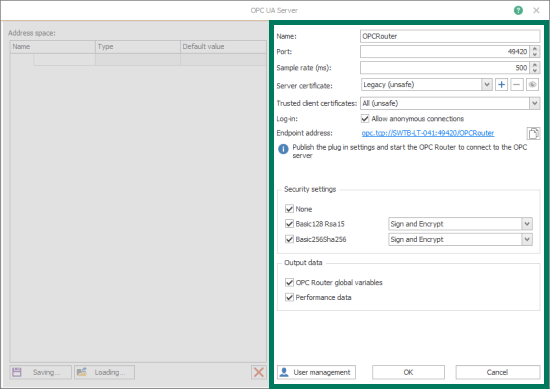
Here are some details on the key settings pertaining to security you will need to configure for the OPC UA server endpoint (the other settings shown above either don't pertain to security or can generally be left at the defaults):
- Name - user-defined friendly name used by OPC Router to identify this OPC UA server endpoint.
- Port - the TCP port associated with this OPC UA server endpoint for OPC Router - this will be appended to the end of the endpoint URL.
- Server certificate - this dropdown allows you to select an certificate (either a self-signed certificate that you've already create in OPC Router or a third-party certificate you've imported in Certificate Management (see Section 3. OPC Router Certificate Management below).
Alternately, you can:
-
Click the "+" button to define a new self-signed security certificate for use with this endpoint.
-
Click the "-" button to delete the selected security certificate.
-
Click the "eye" button to view the details of the selected security certificate.
-
- Trusted client certificates - selects which OPC UA client security certificates to accept/trust for this endpoint. The default setting is "All" which will result in the certificate of any OPC UA client attempting a connection to this endpoint getting trusted automatically. Other options include:
- Router - if the certificate has not already been imported and trusted through certificate management, you will be prompted to either trust or reject the OPC UA client's certificate when attempting to connect.
- Windows - use this option if you've imported your OPC UA client's certificate to the "Third-Party Root Certification" section in the Local Machine Certificate Manager in Windows (Just search for "certificates" in Windows and select the options for "Manage computer certificates").
- Router - if the certificate has not already been imported and trusted through certificate management, you will be prompted to either trust or reject the OPC UA client's certificate when attempting to connect.
- Log-in: Allow anonymous connections - enabled by default, this checkbox being enabled allows OPC UA clients to connect to this OPC Router endpoint without providing a username and password for authentication.
When disabled (recommended for the highest security), any OPC UA client connecting to this endpoint will need to provide a valid username and password as defined in the "User management" configuration for this endpoint. - Endpoint address - this is the actual endpoint you will need to specify in your OPC UA client for connecting to this endpoint and is based on the previous settings. Click the "Copy" button to the right of the endpoint to copy it, making it easy to paste right into your OPC UA client (consult the documentation for your OPC UA client for how to specify the OPC UA server endpoint to connect to).
- Security settings - these settings define which encryption and signing options will be available for connections to this specific OPC Router UA server endpoint from OPC UA clients. All options are enabled by default (NOTE: for highest security, disabling "None" is recommended).
- None - least secure, no encryption will be used for UA connections using this option.
- Basic128Rsa15 - available signing options include Sign and Encrypt (default and most secure), Sign or both can be available.
- Basic256Sha256 - most secure. Available signing options include Sign and Encrypt (default and most secure), Sign or both can be available.
- User management - clicking this button launches the OPC UA User management window which allows you to Add New, Edit or Delete users for this OPC UA endpoint for OPC Router.
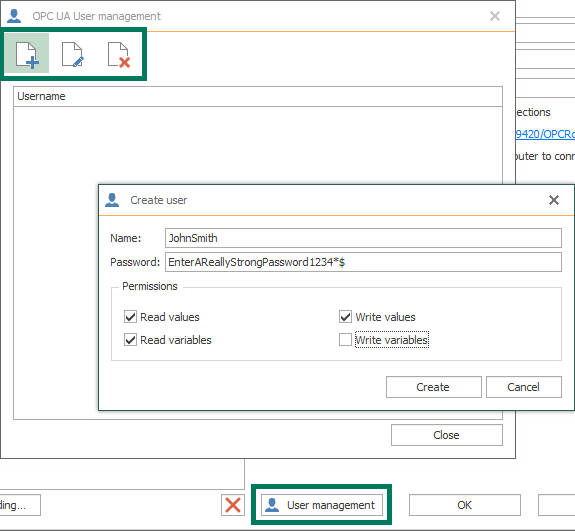
- Name - the username that will need to be specified in your OPC UA client.
- Password - the password that will need to be specified in your OPC UA client (a longer password with a combination of mixed-case letters, numbers and special characters is recommended for the greatest security).
- Permissions - the capabilities an OPC UA client using this username/password will be entitled to. By default, the user is allows to read values and variables and write values but you can use this to easily limit what an OPC UA client can and cannot do - for instance, you can allow read-only access.
Once you've edited the OPC UA Server settings for connections from an OPC UA client, just click "OK" to save and exit the dialog. And, as with any other changes in OPC Router, make sure to go to the "Go Productive" section of the configuration and select the elements being used in your project and click the "Go productive" button to publish the changes.
3. OPC Router Certificate Management
There is centralized certificate management for both OPC UA client and server interfaces for OPC Router via the Extras > Settings menu under the "Certificate management" section.

The "Client certificates" tab lists the certificates available for use by OPC Router for both OPC UA client connections to other OPC UA servers and for OPC Router's OPC UA server interface. These are the certificates that will be available from the dropdowns when configuring OPC UA plug-in instances and OPC UA Server plug-in instances.
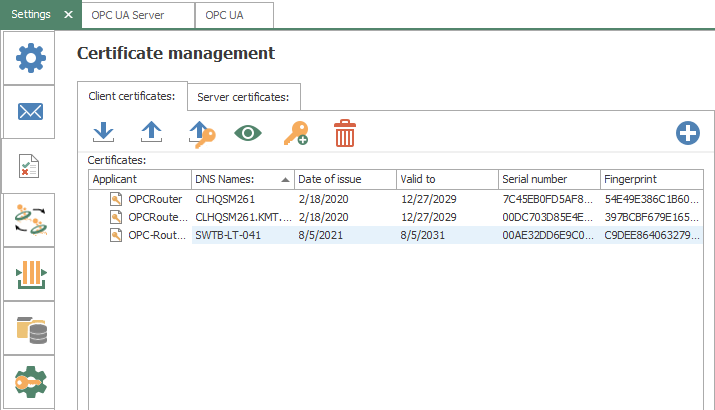
The following options are available:
- Import - allows you to import a certificate from a third-party certificate authority such as Verisign or Thawte, etc for use by OPC Router.
- Export - allows you to export the selected certificate (for use in importing into OPC UA clients or servers that will be connecting to OPC Router). Saves as a .crt file or .cer file.
- Export with Private Key - allows you to export the selected certificate with it's private key. Saves as a .pfx file - you will be prompted to assign a password to the file. The private key for a certificate is used for signing purposes.
- View - allows you to view the properties of the selected certificate.
- Add Private Key - for certificates that do not have an existing private key, this option will allow you to add one. For certificates with an existing private key, you will be prompted to overwrite the existing private key.
- Delete - allows you to delete the selected certificate.
- Add New - allows you to create a new self-signed certificate that will be available for use by OPC Router for OPC UA client and server connections.
The "Server certificates" tab manages certificates for external OPC UA clients and servers.
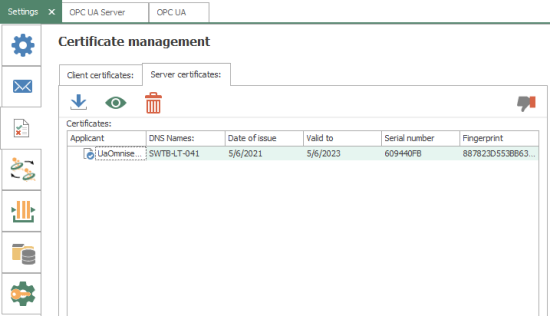
The following options are available:
- Import - allows you to import the certificate from external OPC UA client and servers (for details on exporting the certificate from your OPC UA client or server, please consult its technical documentation). You can import .pfx, .der, .cer or .crt format certificate files.
- View - allows you to view the properties of the selected certificate.
- Delete - allows you to delete the selected certificate.
- Trust/Reject - allows you to trust a selected imported certificate that is currently not trusted (displayed with a red "X"). For currently trusted certificates (displayed with a blue "check"), this button allows you to reject the certificate such that it is no longer trusted.
Connecting Your OPC UA Client to OPC Router
Using the information we’ve just discussed, you can get your OPC UA client connected to OPC Router. And I encourage you to watch our tutorial video on connecting an OPC UA Client to OPC Router here.
Connecting OPC Router to another OPC UA Server
Again using the information we discussed earlier, you can get OPC Router connected to your OPC UA server. To that end, I recommend that you watch this tutorial video that covers connecting OPC Router to other OPC UA servers here.
Subscribe to our blog to stay in the know on other useful topics like this series and for updates on new technology, product updates, how-to's, videos and much more. If you'd like to try out the OPC Router with your own OPC UA clients and/or servers, I encourage you to download the free trial.


