It's pretty common these days for companies to use Microsoft Teams™ for internal communications within and between departments and maybe even between IT and OT segments in an organization. This has become more and more important with increasing remote office scenarios, enabling vital collaboration between key members of an organization.
But what if you could also have real-time updates from your process and other systems in the same fashion? Rather than a colleague messaging you about an urgent matter, what if your actual processes and even business systems could message you via Teams with actionable information (possibly a line is down, or a tank level is approaching maximum level)?
In this blog post, we'll cover the steps necessary to use OPC Router to integrate your variety of systems with Teams so that you can have real-time updates and make important decisions about your business more quickly.
If you're still reading, you're likely using or planning to use Microsoft Teams™ for digital collaboration in your organization and are curious how industrial/process data can be integrated for notifications in the Teams platform. OPC Router makes this relatively easy using its REST plug-in to access the REST API interface available in Microsoft Teams.
Integrating IT and OT data with Microsoft Teams
If you're not familiar with OPC Router, it is a highly flexible software tool facilitating integration of a host of different industrial, business, and IoT data sources. And OPC Router does this via intuitive drag-and-drop visual workflows designed to reduce engineering time and risk for Industry 4.0, IIoT, and Digital Transformation applications.
Since MS Teams provides a flexible REST API interface, the REST plug-in of OPC Router allows chat messages to be sent directly to Teams based on configurable conditions and with configurable, variable content. This includes sending alarms and status messages to be completely integrated into the Teams platform and sent to a configurable defined list of recipients who can then take action. Not limited only to plain text messages, web links can also be sent, allowing the recipients to immediately jump to the right place in the production system or even make acknowledgements.
Since you can even utilize this functionality via the Teams mobile app, messages can be received anywhere and anytime. And the mobile app’s “idle time” setting even allows shift-appropriate notifications to the appropriate people (i.e. you don't have to broadcast to the world for personnel who are only available during certain shifts).
And what data you send to Teams is fully configurable. All available plug-ins for the wide variety of systems and interfaces that OPC Router supports can be used as sources for this. So sending data from OPC UA and DA sources, from SAP, from databases, from label printers and more are all possible.
The following step-by-step tutorial will help you get started - for the purposes of this tutorial, we're already accessing a PLC via TOP Server using OPC UA as the data source for a simple example of sending an a process alert about a temperature exceeding a defined limit via Teams - for tutorials on configuring specific data sources in OPC Router, click here.
Configuring a Channel and Webhook in Microsoft Teams
To provide access to OPC Router for sending messages in Microsoft Teams, there is some configuration necessary on the Microsoft Teams side of things prior to moving on to OPC Router configuration.
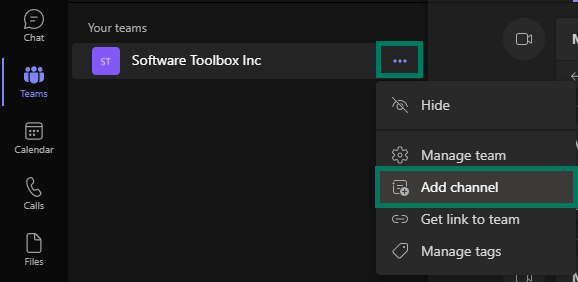
- First, in the Microsoft Teams app, go to the Teams section and click the (...) Elipses button to the right of the team you wish to use and select "Add channel".
- For the new channel define:
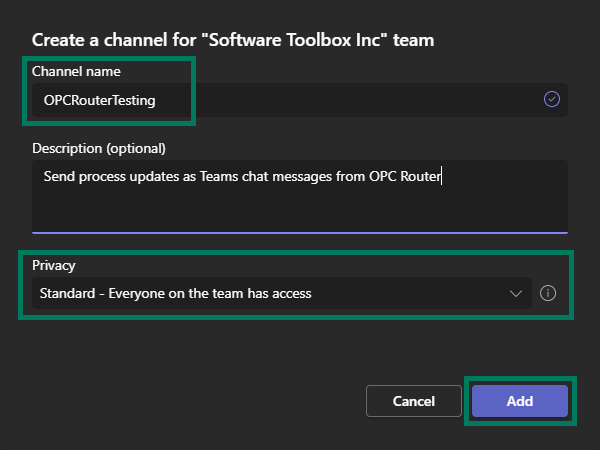
- Channel Name - you'll likely want to make this representative of either the purpose of this channel or the information that will be shared from OPC Router with this channel) - for our purposes, we're using OPCRouterTesting.
- Description - this is an optional meaningful description.
- Privacy - you can leave this at Standard if everyone belonging to the chosen team should receive messages or set it to Private, which allows you to define a subset of team members to receive messages.
- And click Add to complete the channel.
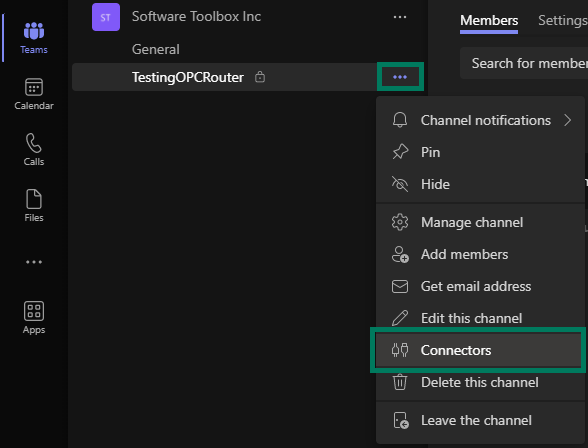
- Click the (...) Elipses button to the right of the new channel and choose the menu entry “Connectors”. NOTE: Be patient - it can take awhile for the Connectors list to load and appear like it's blank and not doing anything.
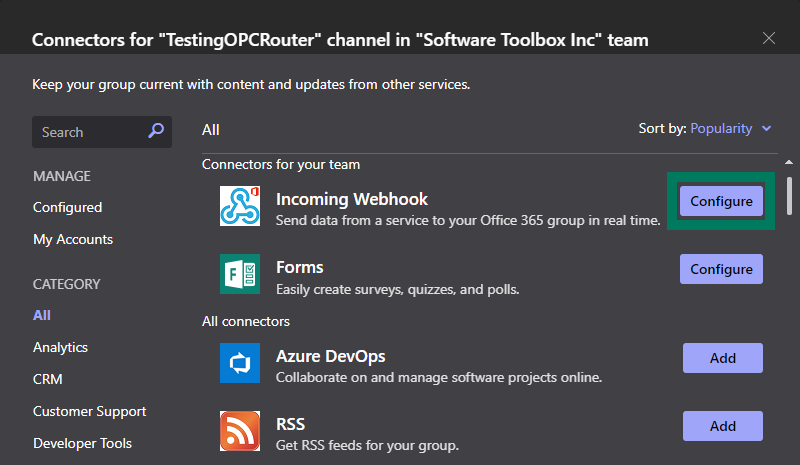
- We need to configure the connector option "Incoming Webhook" - if this option is available, click the "Configure" button to the right. If this option is not available, find "Incoming Webhook" in the list of "All Connectors" and click the "Add" button, then you'll be able to come back and configure a new webhook.
- For the new webhook, we just need to define a name for which we'll use "OPC Router Data" (you can optionally change the default logo, if you prefer to upload, for example, the OPC Router logo to better visually represent the data coming from this webhook). Then click the "Create" button.
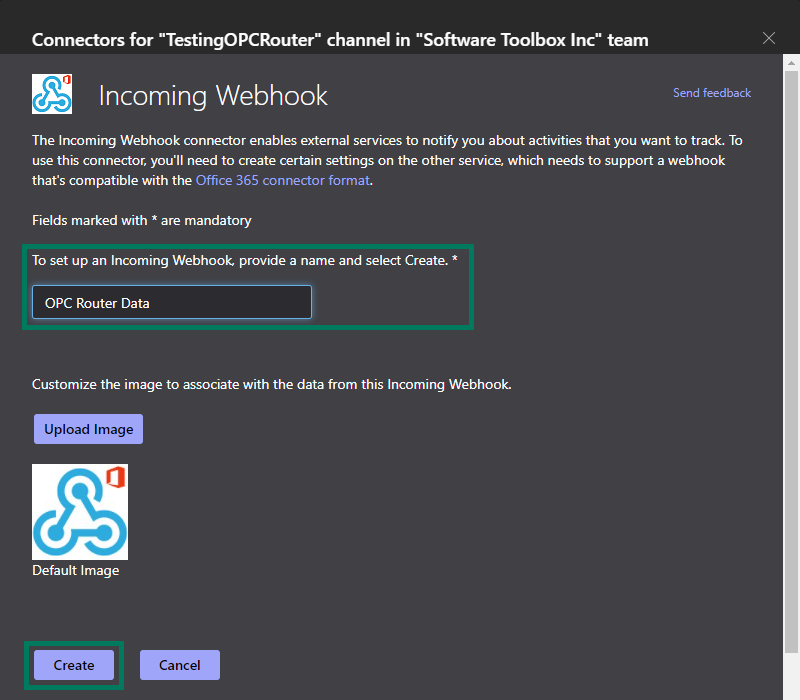
- Once created, the dialog will refresh and display the URL associated with this webhook, which we need for the REST API configuration in OPC Router. So we just need to click the Copy button to the right of the URL and click Done to exit and then close out of the Connectors section.

This completes the configuration on the MS Teams side.
Creating a new REST API Plug-in in OPC Router
The next step is creating a new REST Plug-in configuration in OPC Router that corresponds to the settings we just configured in MS Teams.
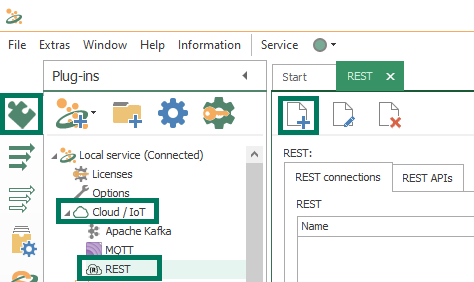
- In the OPC Router Management interface under the Plug-ins section, we need to expand Cloud / IoT and double-click on REST, then add a new REST connection in the REST connections tab.
- The new REST connection requires the following settings:
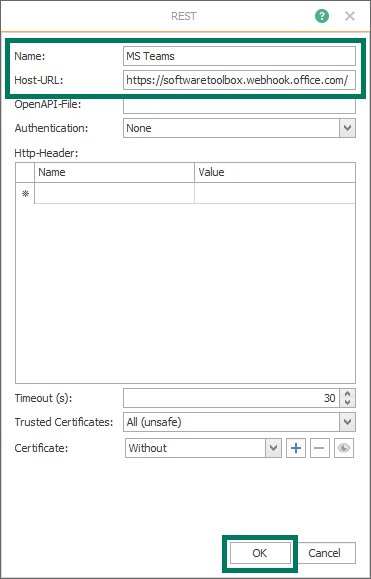
- Name - A descriptive label for the REST connection and how the connection will be displayed when selecting it for use later in a workflow. We've called our connection "MS Teams" to represent the target of the data for this connection.
- Host-URL - This will be part of the URL that we copied earlier from MS Teams - however, not the entire string. You only want to paste into this field the first part of the URL just up to the ".com" part - so you'll have something similar to: https://{companyname}.webhook.office.com/
- Click OK to apply the settings.
Adding a new REST Connection in OPC Router for MS Teams
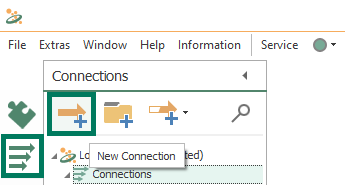
The next step is creating a new Connection in OPC Router using the REST connection we just created in the REST plug-in.
- Under the Connections sections, we'll click to add a new visual workflow Connection, giving it a meaningful name of "OPC Router to MS Teams".
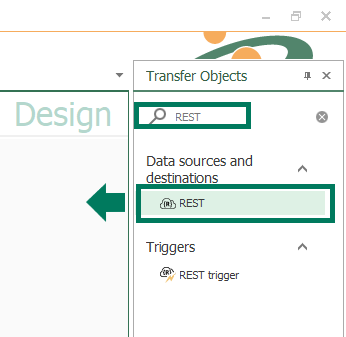
- Now we need to add our first Transfer Object from the list on the far right, using the REST object under the Data sources and destinations section (you can even type in "REST" in the search to quickly find the object). Simply drag-and-drop the REST object to the Design panel.
- Then double-click on the REST object to edit the object and configure the following properties:
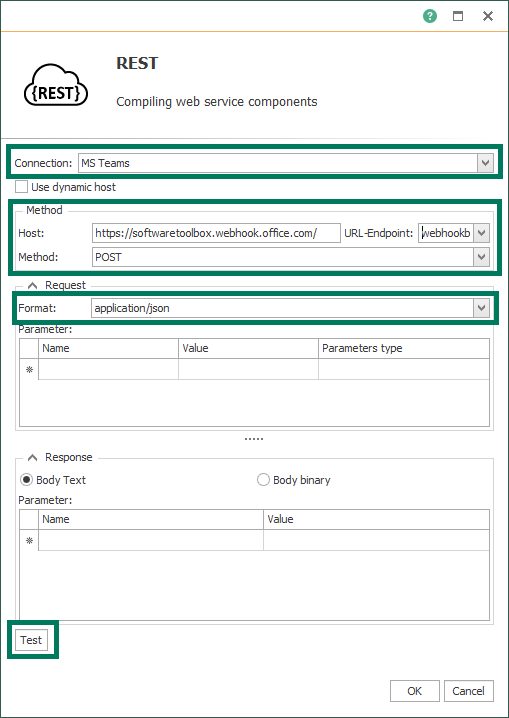
- Connection - select the MS Teams REST connection that was just configured.
- Host - this will be automatically populated based on the selected Connection and is identical to the URL specified previously.
- Method - Needs to be set to POST (the default is GET) since our use case is pushing updates to MS Teams and not requesting data.
- URL-Endpoint - this needs to be the remaining portion of the URL we copied from MS Teams that was NOT used for the Host URL - basically everything coming after ".com/" - looking similar to:
webhookb2/4bd804db-6246-40f6-b733-422d013a72a4@5a0d7a13-c30a-498b-a66a-cc3911d9fe79/IncomingWebhook/615ddb866df044ed961a0e9b346113f7/f303e431-bf04-4951-9930-9a625f3e8d6d - Format - Should be set to application/json as this is the format required by the REST API of MS Teams.
- Test - This function can be used to send a test JSON payload using the defined connection to make sure all of the previously configured settings are correct. For this purpose, you can use this example JSON payload (screenshot below):
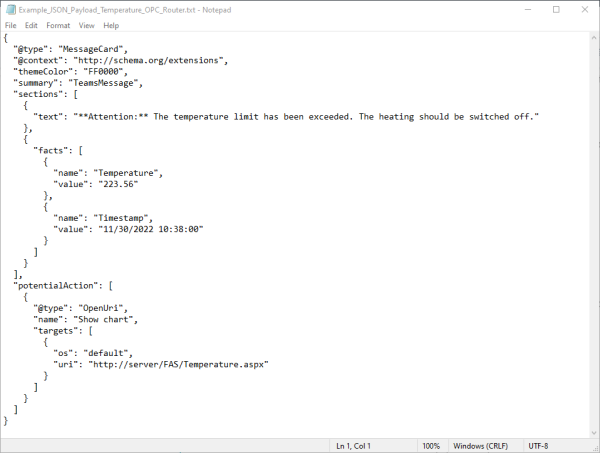
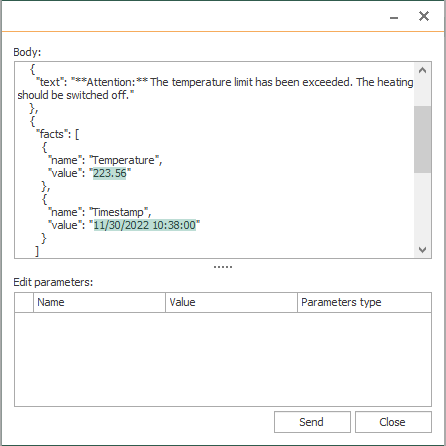
- Simply paste the entire contents of the payload into the Body field (you can modify the "value" field for the "Temperature" and "Timestamp" variables, if desired, as highlight in the below screenshot) and click "Send".
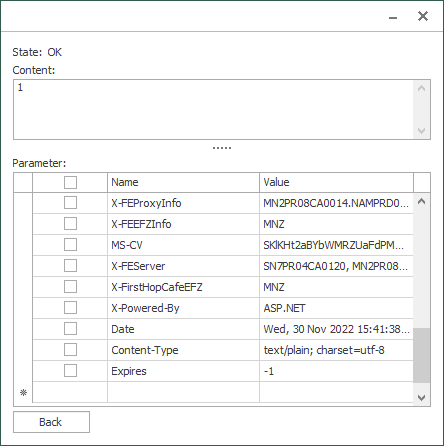
- If all of your settings were configured correctly, this will result in the following success dialog (note the "OK" State) which also includes a list of parameters returned in the response (which we don't actually need for this example).
- You should also have received a corresponding message in your Teams channel similar to the following:

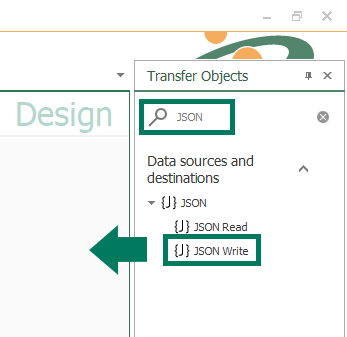
- Next, since we want to be able to define variable parameters for these messages that can be tied to an OPC value updating, we need to use a JSON Write transfer object - in the same fashion, simply search for JSON in the Transfer Objects and drag-and-drop the JSON Write object to the Design panel.
- Double-click to edit the new JSON Write object.
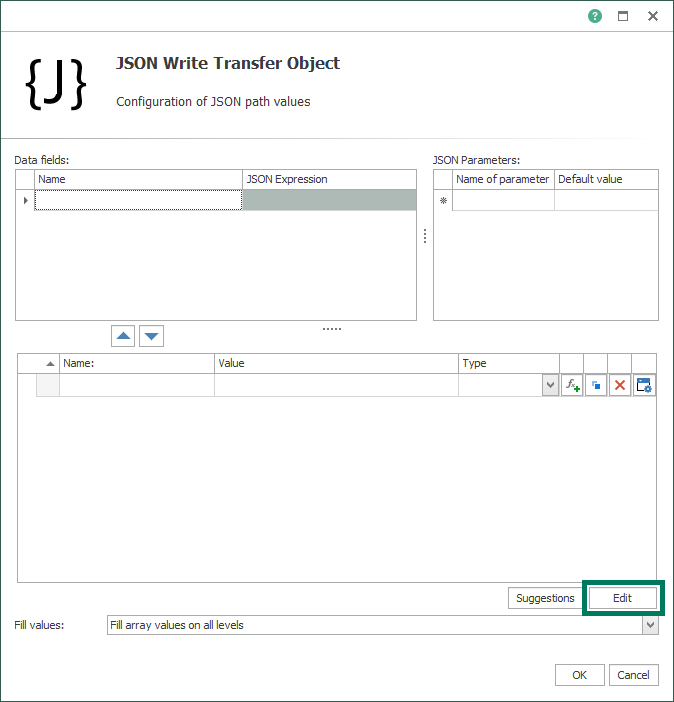
- Here we're again going to rely on the same JSON payload example that we used with the Test function earlier as a sort of template for configuring this object. To do so, we first click the Edit button.
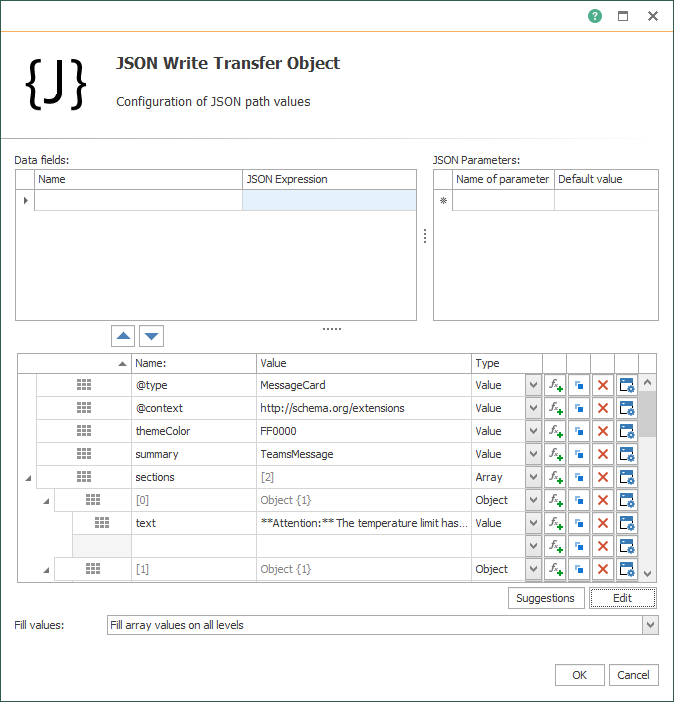
- Then paste the full JSON example payload into the entry space at the bottom (replace the existing {} with the full payload similar to the below screenshot).
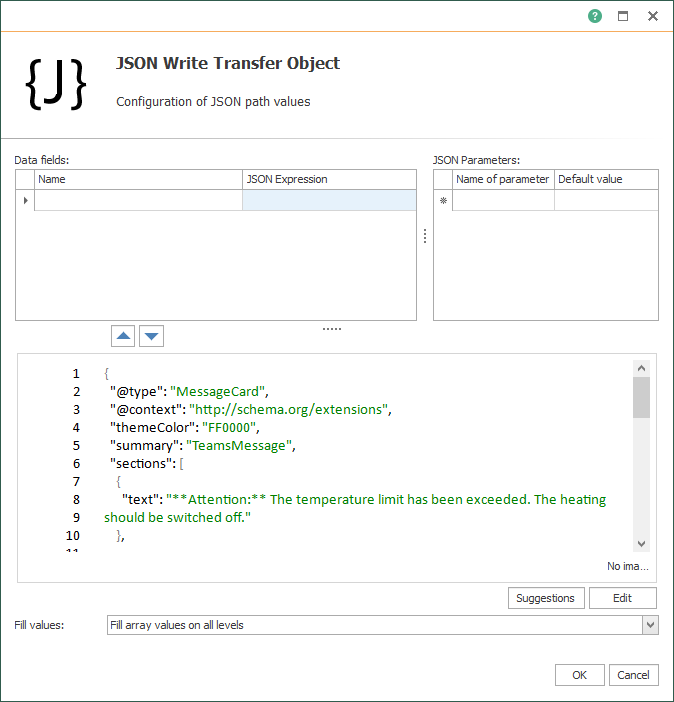
- Then click the Edit button again and you'll see the payload broken down into sections (NOTE: the warning/message displayed along with the actual values in the MS Teams message can be modified by changing the value of the "text" variable in the payload, also).
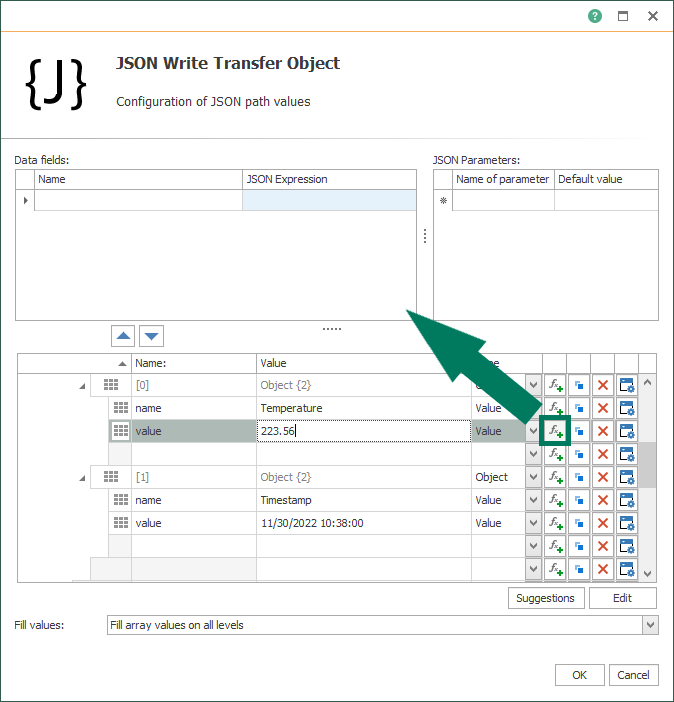
- We're interested in adding Data Fields at the top for the Temperature.value and Timestamp.value parameters (scrolling down, they're under Sections.[1].facts in the hierarchy) - there's an easy way to add these using the Add Function button to the right of each parameter as shown below.
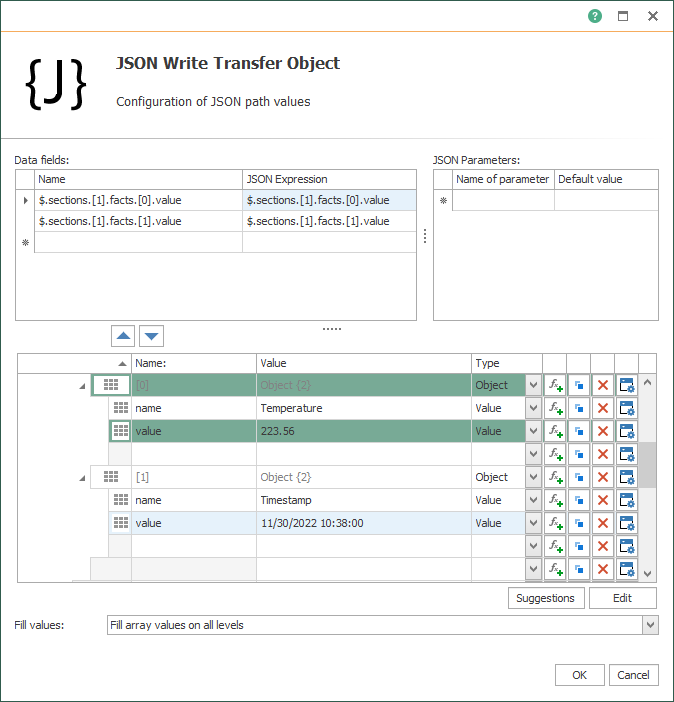
- Just do this for each of the parameters and you'll see them added as shown below - then just click OK to complete the configuration of this object.
- Here we're again going to rely on the same JSON payload example that we used with the Test function earlier as a sort of template for configuring this object. To do so, we first click the Edit button.
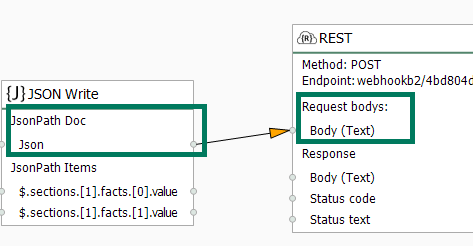
- Next, we can drag the connector (just click on the circle and drag to the target circle) from the JSON Write object for the "JsonPath Doc" point to the "Body (Text)" connector on the REST object we created (this composes the body of the REST POST call from the data in the JSON Write object).
- Now, as I mentioned before, we already have an OPC UA plug-in connection setup to a PLC in our TOP Server OPC UA server that is accessing a floating point temperature value. So in this workflow we also need an OPC Data Access transfer object (drag-and-drop from the Data sources and destinations again), which will allow us to use the value and timestamp of that temperature item in place of the static values in the JSON payload. (The specific item/items can be selected by browsing).
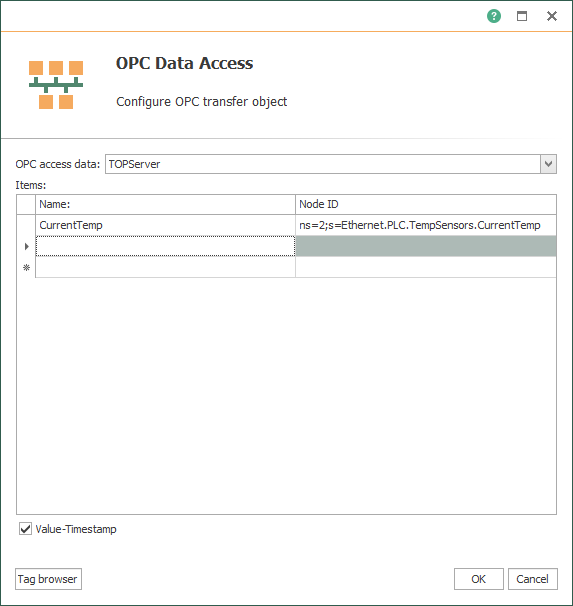
- Then, we can drag the properties from the OPC Data Access object to the JSON Write object as follows (this allows OPC Router to use the value and timestamp for the actual PLC variable instead of the fixed placeholders when sending the message to MS Teams):
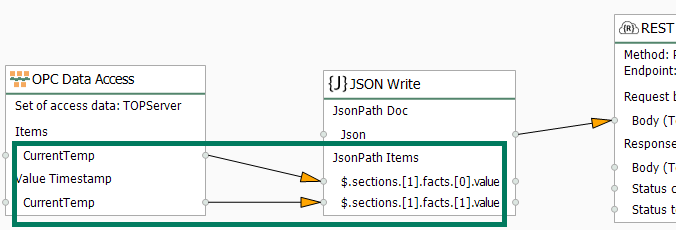
- Under "Items", CurrentTemp -> $.sections.[1].facts.[0].value
- Under "Value Timestamp" -> $.sections.[1].facts.[1].value
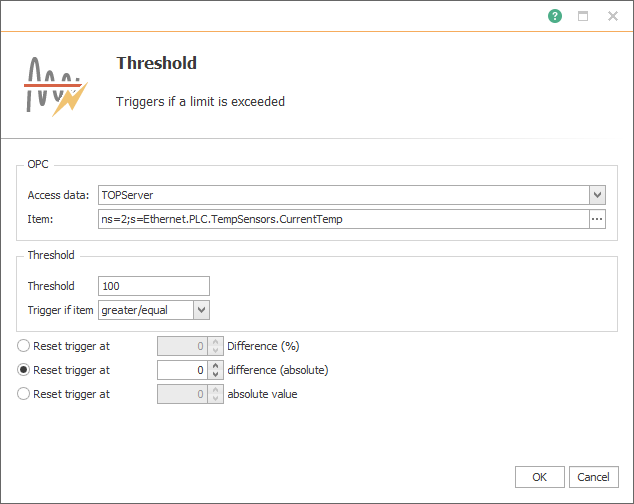
- Last but not least, we need to tell OPC Router WHEN to send the message to MS Teams. Since we'd like to alert users to an abnormal temperature so they can take action (for this example, if the temperature exceeds 100 degrees C), we can drag an OPC Threshold Trigger to the Design, configured as follows (this tells OPC Router than, for the same temperature item we're monitoring, if the value exceeds 100, trigger the send to MS Teams) - (NOTE: The trigger will reset once the value drops below the threshold again - this prevents multiple messages from being sent after the first alert):
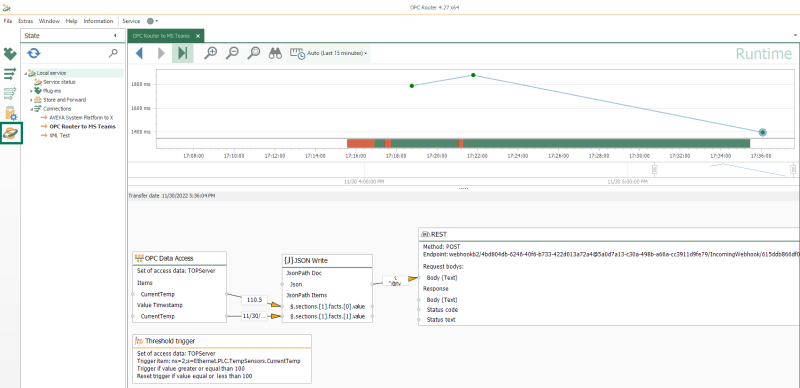
- So we end up with a completed workflow Design like this:

Testing OPC Router Communication to MS Teams
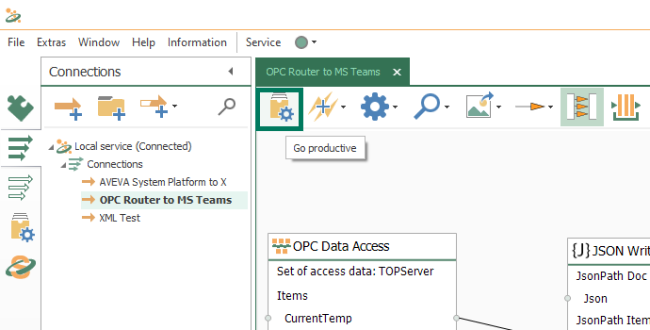
Now we can test that all of the connections are working as expected. To do this, we need to "Go Productive" by clicking the button at the top of our "OPC Router to MS Teams" connection, as shown here:
Then, going to the State section of the OPC Router configuration, we can see the workflow operating as expected, with points in the timeline where a trigger occurred.
And if we go to MS Teams, we can see the temperature value alerts corresponding to the triggers came through as message cards for the channel we created!
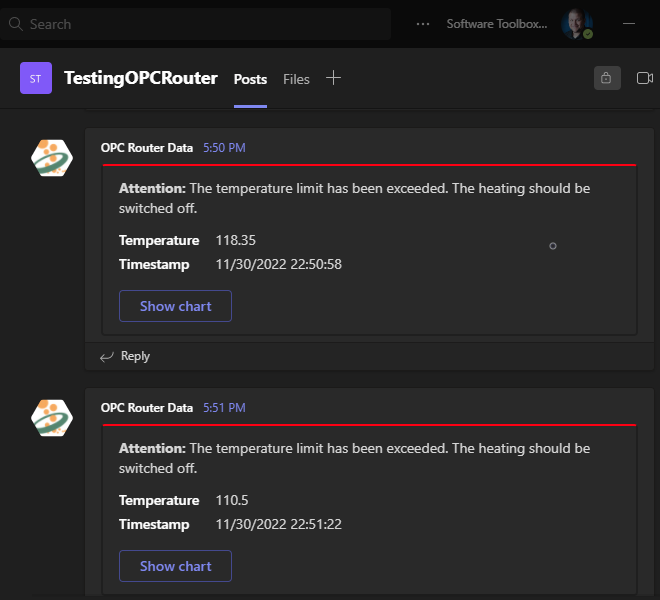
So, this was a basic example but you can see how powerful and flexible this functionality can be to give key decision makers knowledge about your systems in real-time so action can be taken as soon as possible. With the variety of interfaces and visual drag-and-drop workflow, it's easy to expand this example to any system OPC Router can connect to for virtually any data, even including links to web dashboards or reports where the user can drilldown to find out even more about what has caused an alert to be sent. If you haven't already tried the OPC Router, the free trial version is available here.
And don't forget to subscribe to our blog to find out about more relevant technical topics applying to industrial process automation and solving related challenges. Want to try integrating your own process and/or business systems data with MS Teams using the OPC Router?


