AVEVA™ users already have a wide range of connectivity options for interfacing with different systems. For many years, OmniServer has been expanding that connectivity to include non-standard, non-PLC type devices that don't have an existing off-the-shelf communications driver. Users of AVEVA System Platform have traditionally connected to OmniServer via either the native SuiteLink interface or OPC DA Classic. AVEVA's OI Gateway provides those users the additional option of connecting to OPC UA data sources, for easier and more secure remote connections to such data sources.
In this blog post, we will cover the basic steps to connect AVEVA System Platform to OmniServer via OPC UA, expanding non-standard device connectivity options for AVEVA users.
While AVEVA™ users certainly have their own options for connectivity, there are often devices that don't have an existing off-the-shelf driver that need to be connected. AVEVA users have been using OmniServer for connecting those non-PLC, non-standard devices for many years as an alternative to custom code or other less than ideal options. While System Platform can certainly still connect directly to OmniServer via its native SuiteLink and OPC DA Classic interfaces, if your system architecture requires that System Platform and OmniServer reside on different remote machines, OPC UA is an easier to configure option that provides greater security, as well.
To that end, OmniServer also has a native OPC UA server interface. And System Platform can access OPC UA server data sources through the OI Gateway acting as an OPC UA client.
There are five basic steps AVEVA users will need to follow to get System Platform connected to OmniServer using OPC UA.
1. Configuring Non-Standard Device Communications in OmniServer
With OmniServer, there are three main configuration components that work together for connecting a non-standard device:
The protocol is what the user configures (using OmniServer's easy-to-use visual protocol editor including drag-and-drop support) based on protocol documentation (or other information) that details the byte pattern of the sends and/or receives required to communicate with a device. The protocol is how OmniServer know what to send to a device or how to interpret what a device sends to it. OmniServer installs with a selection of sample protocols ranging from barcode scanners to weigh scales, which are good examples if you're connecting to a similar device type.
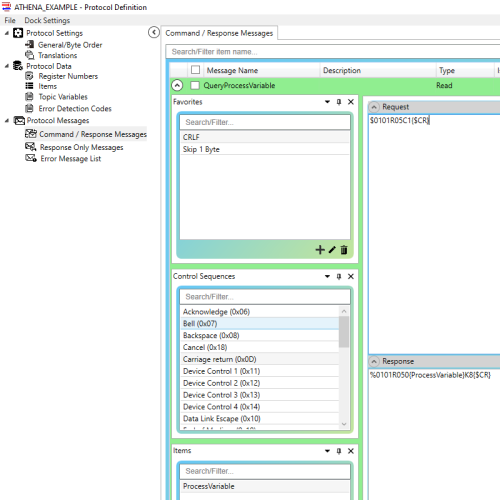
While this post isn't intended to focus on how to create a protocol from scratch, that is the first step in connecting a non-standard device and we have some other useful resources below to help you get started, including a complimentary review of your device's protocol documentation that includes recommendations on how implementing the protocol (we also offer paid protocol consulting services for users with a lot on their plate that need assistance).
- OmniServer Protocol Implementation Guide
- OmniServer How-To Video Resources
- Request a Complimentary Protocol Review
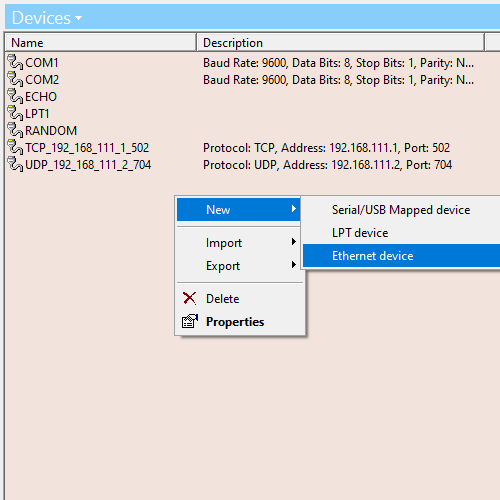
After the protocol, the Device defines how to physically connect OmniServer to your non-standard device such as the IP Address and Port (for Ethernet) or the Baud Rate, Parity and other serial parameters for serial connections. This also includes serial devices connected via serial-to-Ethernet device server (just use an Ethernet device for these) and USB devices that map to a virtual COM port (just use a Serial device for these).
Then, once you have a Protocol and Device, you configure the Topic which gives client applications like AVEVA System Platform a way to connect to the device using the configured protocol.
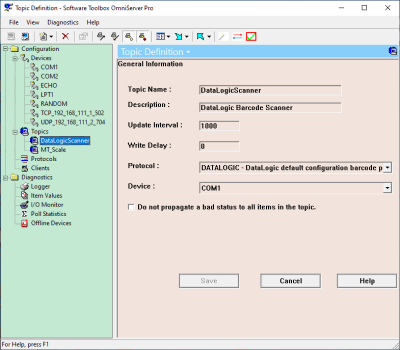
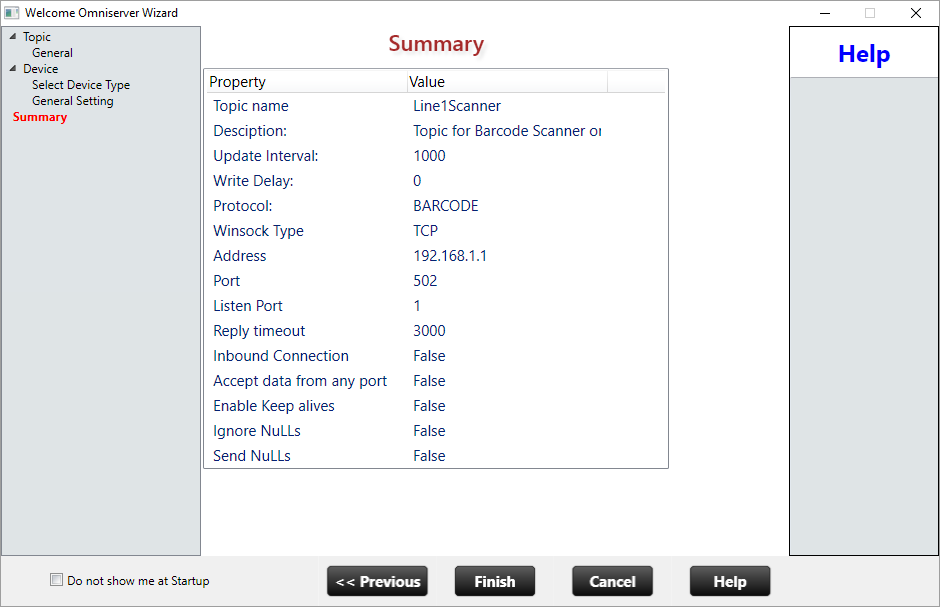
The Topic name is used during configuration of your items/tags in System Platform later. You can either manually configure the topic (Right click in the Topics section of the OmniServer Configuration and click "New") or use the Topic Wizard (launches by default or from File -> Build by Wizard menu option), which steps you through the configuration - a video tutorial using the Topic Wizard is available here.
2. Configuring OmniServer OPC UA Server Interface
The settings relevant to OmniServer's OPC UA server interface are all located in the OPC UA section of the Clients view in the OmniServer Configuration window.
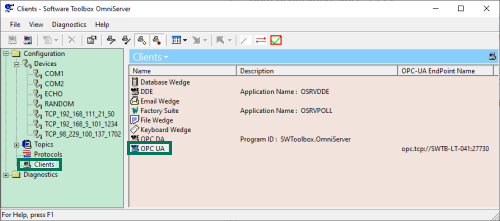
Simply double-click on "OPC UA" to launch the "OPC UA Configuration" settings.
For a fully detailed walkthrough of the OPC UA server interface in OmniServer, click here.
OmniServer installs with a default endpoint configured that follows the format:
opc.tcp://{machine name}:27730 (Port is configurable and you'll need to make sure any firewall exceptions for that port have been made on the client and server machines.)
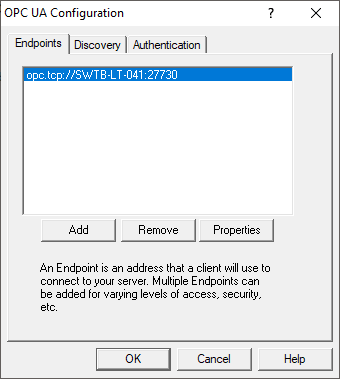
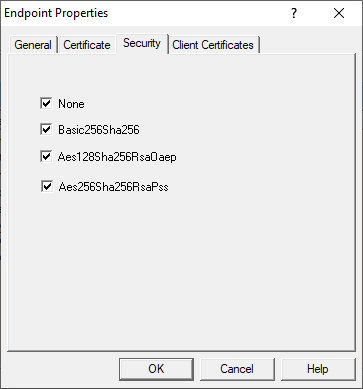
It already has a self-signed, self-issued security certificate associated with it and all Security methods are enabled by default (options in order of highest to lowest security include AES256 SHA256 RSA PSS, AES128 SHA256 RSA OAEP, Basic256 SHA256, and None). So as long as the default endpoint hasn't been disabled, there shouldn't be any changes or configuration needed at this point for the endpoint in OmniServer.
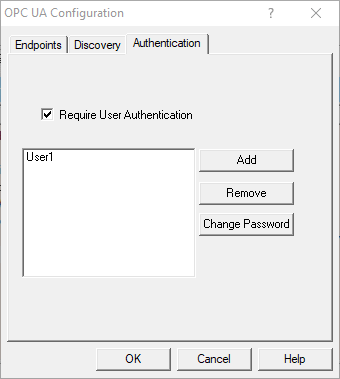
This post focuses on making an anonymous connection (no username/password) but the OmniServer OPC UA Configuration "Authentication" tab does allow you to configure users and restrict OmniServer to only accept connections that provide a valid username/password (which is generally recommended for the highest level of security but is disabled/optional by default).
It will be necessary to return to OmniServer again later during the OI Gateway configuration for the certificate exchange process (you'll return to the OmniServer OPC UA Configuration and access the Client Certificates section of the endpoint's settings).
But, for now, you can "Cancel" out of the OPC UA Configuration (as long as you didn't make any changes - if you did make any changes to the Port Number, etc, you'll want to click "OK" instead). OmniServer is ready to be connected.
3. Configuring AVEVA OI Gateway as an OPC UA Client to OmniServer
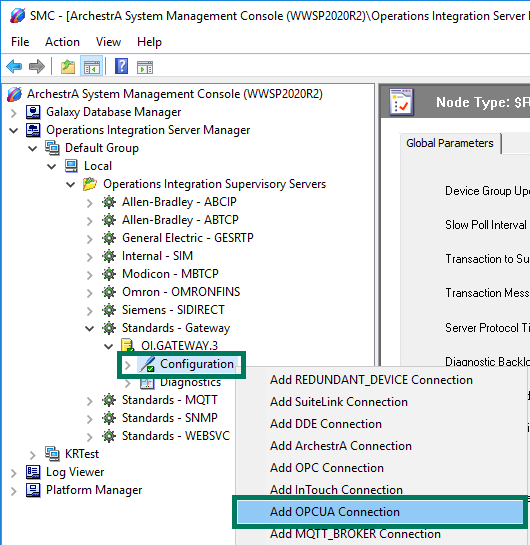
Next, you need to configure OI Gateway as an OPC UA client and connect it to OmniServer. In the AVEVA System Platform Management Console (SMC), you'll expand "Operations Integration Server Manager" in the tree view, the Node group, the desired Node, then the Operations Integration Supervisory Servers group, then the OI Gateway OPC DA ProgID ("OI.GATEWAY.3").
Click on "Configuration", then right-click and select "Add OPCUA Connection" and give the connection a meaningful name such as "OmniServer".
For the "OPCUA Server Details", if OmniServer is on the same machine as OI Gateway, you can leave the "Server Node" as "localhost". If they are on separate machines, the "Server Node" will need to be the IP Address or Hostname of the OmniServer machine. And the "OPCUA Server" field should be the endpoint from the OmniServer OPC UA Configuration settings.
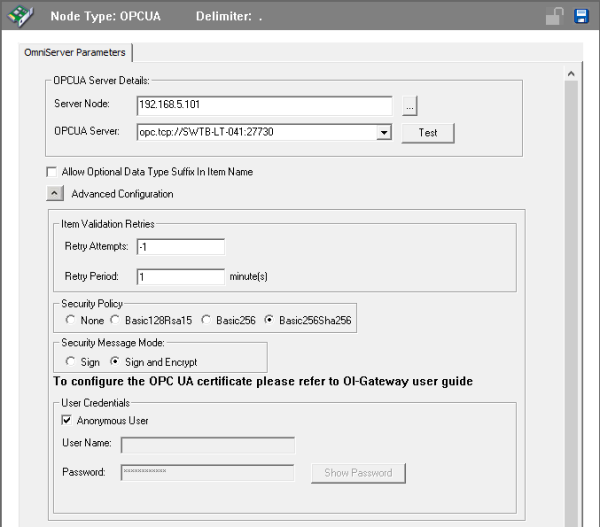
By default, OI Gateway uses the most secure options for "Security Policy" and "Security Message Mode" - valid Security Policies that will work with OmniServer are "Basic256Sha256" (default) or "None" (not recommended due to lack of security). The other available options here are no longer supported by OmniServer (they are older policies that have been deprecated due to newer policies with higher levels of encryption).
For Anonymous authentication, the "Anonymous User" setting needs to be enabled in OI Gateway under "User Credentials".
At this point, you can click the "Test" button to the right of where you entered the "OPCUA Server" endpoint. You'll get the following message indicating the connection failed.
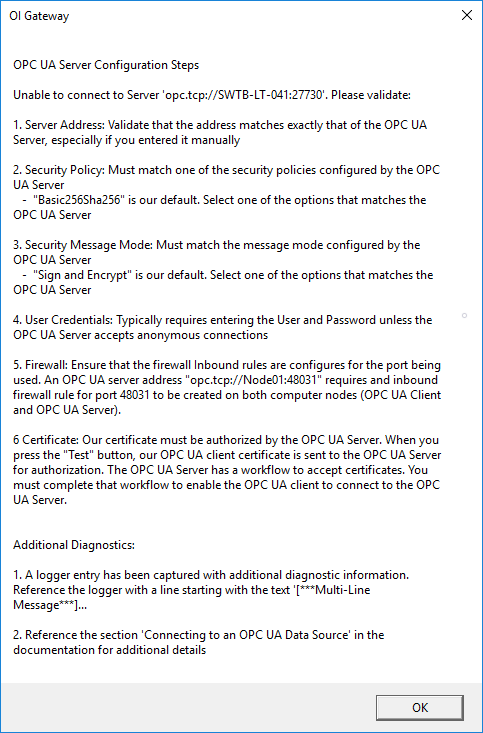
Assuming the following are true (which are actually conveniently detailed in the error message itself), this is due to the fact that OmniServer doesn't currently trust OI Gateway's security certificate:
- The "Server Node" and "OPCUA Server" endpoint fields are correct
- The selected Security Policy, Security Message Mode and User Credentials match what is configured in OmniServer
- Where applicable, an exception has been added to any firewalls for the port used by OmniServer (default is 27730).
So, to allow the Test functionality to work, you need to go back into OmniServer. Back in the OPC UA Configuration settings, if you open the properties for the OPC UA endpoint and go to the "Client Certificates" tab, you should now notice the "Rejected" section has an entry for OI Gateway from the attempted test.
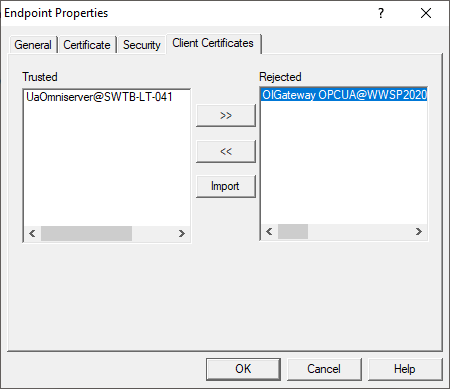
You can simply highlight that certificate and click the "<<" directional button to move the certificate to the "Trusted" section, thereby telling OmniServer to trust OI Gateway connections.
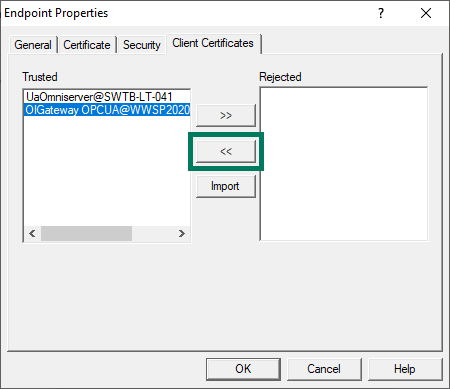
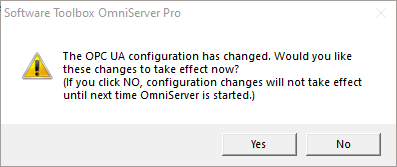
Click "OK" to save the endpoint changes and make sure to click "OK" at the bottom of the main OPC UA Configuration to accept all changes. You'll be prompted to either apply the changes now (click "Yes") or wait until the runtime is restarted (click "No) - unless you're making these changes on an active production server, you can go ahead and click "Yes" to apply the changes now.
You can now go back to OI Gateway and the "Test" button will result in a successful test connection (OI Gateway doesn't have any certificate management interface and trusts certificates by default - there is a folder structure under C:\ProgramData\Wonderware\OI-Server\$Operations Integration Supervisory Servers$\OI.GATEWAY\CertificateStores .
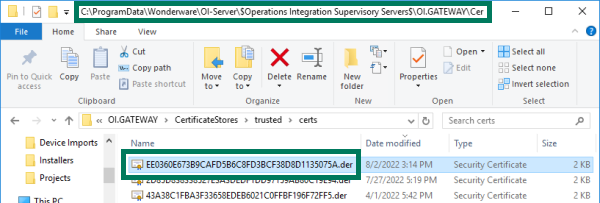
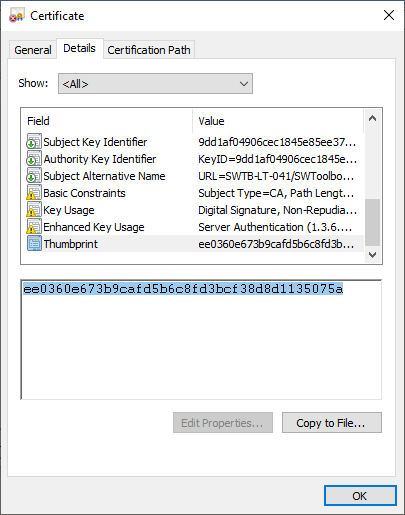
The "trusted" folder contains OPC UA server certificates that have previously been trusted (the filename of the certificate is the thumbprint of that certificate - not particularly user-friendly but you can compare these filenames to the Thumbprint field of OmniServer's certificate (accessible in the C:\ProgramData\Software Toolbox\OmniServer\PKI\CA\certs directory).
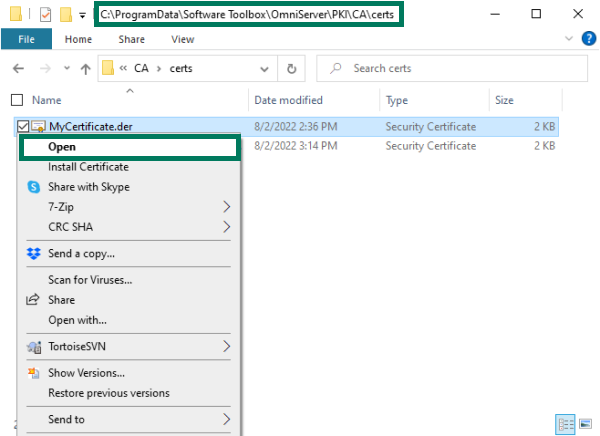
You can open OmniServer's certificate (the default certificate will be called just "MyCertificate" but if you've chose to create a new certificate in OmniServer, the name will match what was specified) then go to the "Details" section. The "Thumbprint" field all the way at the bottom of the Details should match the file name that OI Gateway has trusted.
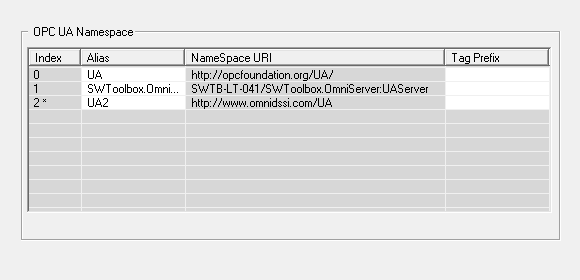
Because OmniServer's certificate is in the Trusted folder for OI Gateway and we've trusted OI Gateway's certificate in OmniServer, this allows OI Gateway to securely connect because the client and server trust each other now. You can confirm the Test now works (no, unfortunately, there isn't a message that explicitly confirms the test was successful), you'll notice the OPC UA Namespace at the bottom of the configuration in OI Gateway is now populated for OmniServer.
So we can go ahead and Save our settings by clicking the Save button in the upper right corner of the configuration.
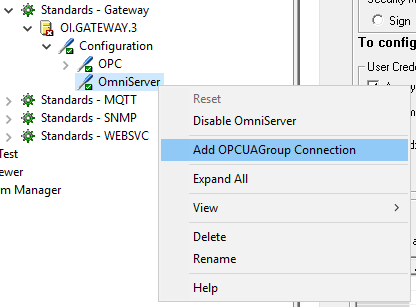
The next step is adding some nodes/tags/items from OmniServer that you want to access with System Platform (or other OPC DA or SuiteLink clients that connect to OI Gateway). So you need to right-click on the OPC UA server under the Configuration branch in the tree view and select "Add OPCUAGroup Connection" - you'll want to enter a meaningful name.
The "Browse OPCUA Server" button will allow you to browse the OmniServer address space.
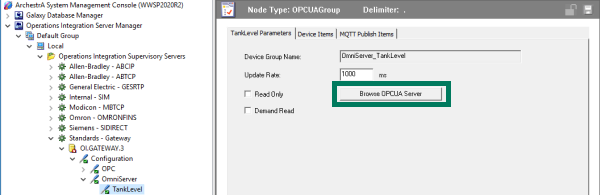
You can then select the desired data points that you wish to access in the OPCUA Tag Browser window that appears (be patient - it can sometimes take a few seconds and appear that nothing happened when you click the button). The "Add to list" button then adds the selected items.
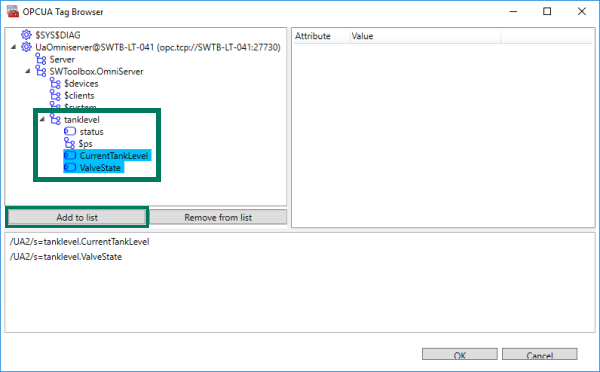
Click "OK" once all of the desired points have been added - for our purposes, there is a "tanklevel" topic with several data points in this OmniServer that will provide changing data.
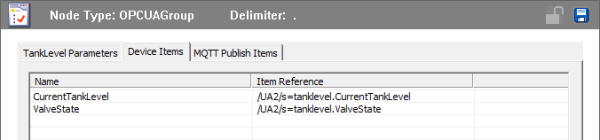
Back in the main configuration, you can then go to the "Device Items" tab and confirm that your points have been added to the item list here. Optionally, you may also choose to rename the items here with a more user-friendly name - this is helpful since the "Name" defined here will be used in the SuiteLink Topic attributes as the Item Reference in System Platform . Clicking the Save button at the top-right corner applies the additions.
Now, if your OI Gateway has been deactivated, you'll need to right-click on the top level "OI.GATEWAY.3" in the tree view and select "Activate". Otherwise, you'll need to deactivate then activate to apply the changes to the runtime. Now that OI Gateway is configured, it is typically a good idea to confirm that your configuration is working as expected prior to moving on to the next step.
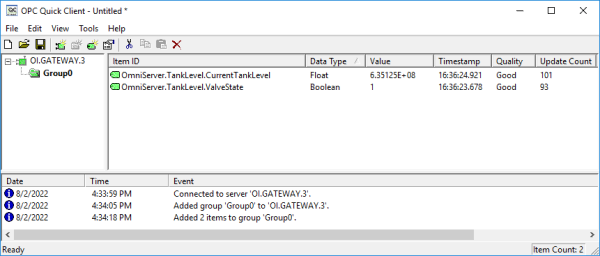
To that end, you can connect to OI Gateway using a SuiteLink or OPC DA test client (the OPC Quick Client that installs with TOP Server, as shown below which was already installed on the AVEVA System Platform machine, or the Software Toolbox OPC Test Client is available as a standalone installation you can request here and also installs with OmniServer). As you can see from the image below, the test client successfully connects to the OPC DA ProgID "OI.GATEWAY.3" and is receiving good quality and values from the OmniServer points configured for the OPC UA connection.
The next step is accessing OI Gateway from System Platform.
4. Configuring AVEVA System Platform DI Objects
The first step is creating/adding an instance of the OPC or SuiteLink Device Integration (DI) object in the desired System Platform (ArchestrA) galaxy, since OI Gateway supports either interface for client connectivity. The following assumes that you already have a WinPlatform, AppEngine and Area created where either of the DI objects can be assigned. For our purposes, we'll use a SuiteLink DI Object below.
Adding a SuiteLink Device Integration Object
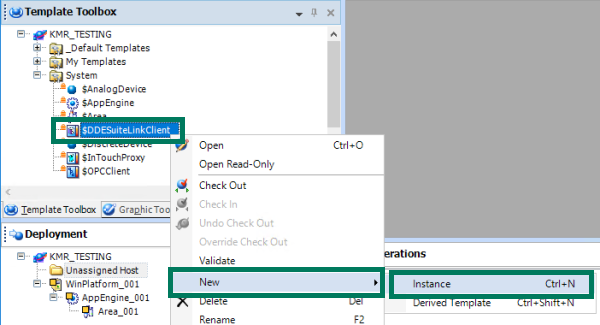
In the ArchestrA IDE for the galaxy you want to connect to OmniServer, go to the Template Toolbox under System objects and find the $DDESuiteLinkClient DI object template. Right-click and select New -> Instance which will create a new instance in the "Unassigned Host" folder in the Deployment view which you can rename to something meaningful such as "OIGW_OmniServer".
You can drag-and-drop the new instance to the desired AppEngine. Then you can double-click on the new instance to open the properties.
The SuiteLink DI object involves configuring the following:
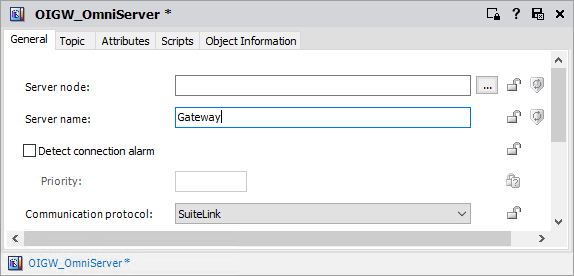
- Defining the "Server node" or IP / DNS name of the machine where OI Gateway is installed on your network (if OI Gateway is installed on the same machine as System Platform (which is most likely), the Server node gets left blank).
- Entering the "Server name" for OI Gateway (the SuiteLink service name for OI Gateway is just "Gateway").
- The "Communication protocol" should remain at the default of "SuiteLink".
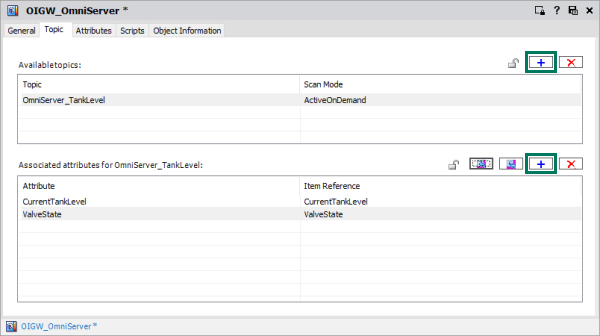
- Creating a Topic under the "Topic" section (this needs to match the Device Group Name from the OPC UA group defined in OI Gateway from earlier - you can go back to OI Gateway and copy/paste the name from there, if needed.

- Adding Attributes to that Topic - you basically need to define an Attribute here for each Item that you want to access from OI Gateway using the "+" button above the "Associated attributes" section. For the "Item Reference" you'll use the "Name" for the item from your "Device Items" section in OI Gateway (the "Attribute" name itself can be the same or different - below you see the same name for simplicity). You can also use CSV import/export to populate this list, if you have a lot of attributes to add.
- Once finished, just click the Save button at the top right of the DI object properties and check the object back in.
These are the high level settings that get System Platform connected to OI Gateway via the SuiteLink DI Object.
5. Adding AnalogDevice or DiscreteDevice Objects for Attributes
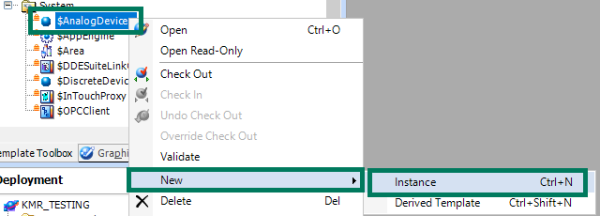
Once the SuiteLink DI object is configured and checked back in, it will be necessary to define an instance of the $AnalogDevice object to represent analog values such as integers and floats (for discrete/boolean values, an instance of the $Discrete Device object would be required and is basically the same process).
So back in the Template Toolbox under System, you need to right-click on $AnalogDevice and select New -> Instance which will add the instance to the "Unassigned Host" folder where you can give it a meaningful name to represent the data points it will be linked to. You can drag-and-drop the instance to the desired Area to assign it.
Double-clicking on the object will open its properties where you need to go to the "Attributes" tab.
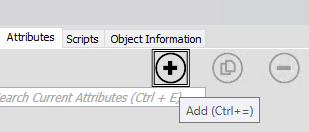
Here you need to click the "+" button at the top center of the tab to add an attribute.
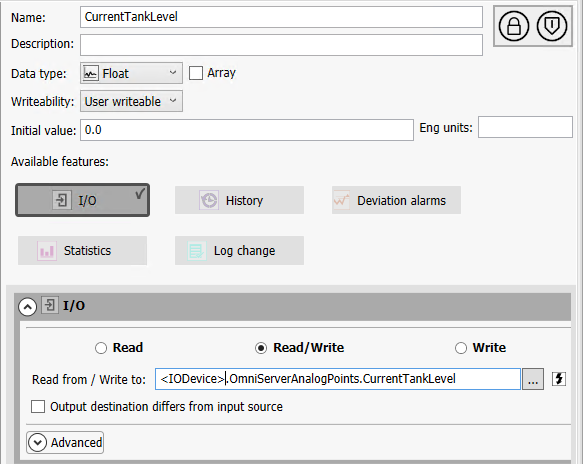
Then configure the following:
- Name - this should be a meaningful to represent the specific item you want this object to access from OI Gateway - for simplicity, we're using the same name as the attribute in the Topic that was just configured.
- Data Type - this should match the corresponding data type of the item you're accessing from OmniServer.
- Available Features - Enable "I/O" here which allows you to select the input source.
- Read from / Write to - this is where you map to the item in OI Gateway that corresponds to the OmniServer point/item you want this object to represent.
- You can click the "..." ellipses button to browse available attributes (which will allow you to select from the list of attributes you defined earlier in the SuiteLink DI Object Topic).
- This brings up the Galaxy Browser, where you can select the instance of the SuiteLink DI object you just configured and you'll find the associated attributes listed to the right - select the desired attribute and click "OK".
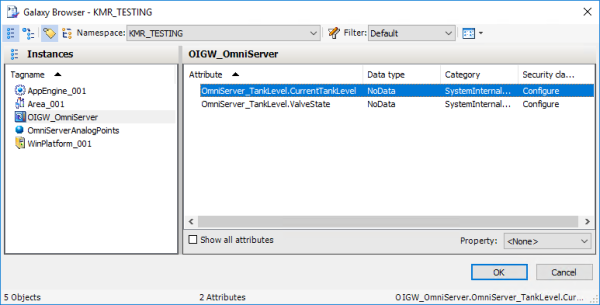
- This brings up the Galaxy Browser, where you can select the instance of the SuiteLink DI object you just configured and you'll find the associated attributes listed to the right - select the desired attribute and click "OK".
- Alternately, you can manually enter the path to the item - either of the following syntax is valid:
- <SuiteLinkDIObjectName>.<TopicName>.<DeviceItemName> (for directly accessing items from OI Gateway)
- <SuiteLinkDIObjectName>.<TopicName>.<AttributeName> (for accessing the attribute name defined in the Topic in the SuiteLink DI Object)
- Honestly, with the attributes already defined in the SuiteLink DI Object, browsing and selecting is the easiest method here.
- You can click the "..." ellipses button to browse available attributes (which will allow you to select from the list of attributes you defined earlier in the SuiteLink DI Object Topic).
- You'll need to do the same thing to add each of the additional attributes that you defined earlier in the Topic of your SuiteLink DI Object.
- Then all that remains is clicking the Save button at the top right, accept any warnings and check the object back in.
- Read from / Write to - this is where you map to the item in OI Gateway that corresponds to the OmniServer point/item you want this object to represent.
7. Deploying the Device Integration Object in System Platform
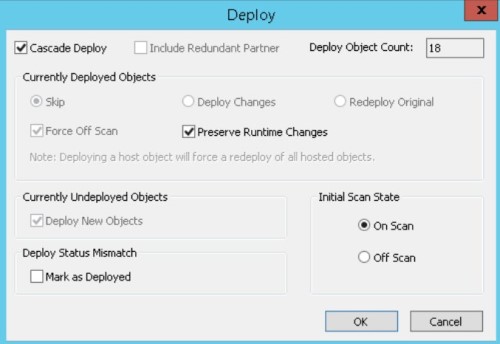
And last, but not least, once the SuiteLink DI object is configured with the desired items/tags and assigned appropriately depending on your galaxy architecture, it's necessary to deploy the SuiteLink DI object and related Application Objects for the associated tags. This deployment is accomplished the same way as for deploying any other objects and changes in System Platform - by right-clicking on the Galaxy object in System Platform (in the Deployment view) and selecting the "Deploy" option.
And the System Platform Object Viewer can then be used to confirm you are successfully connected and communicating by right-clicking on the Area and selecting "View in Object Viewer".
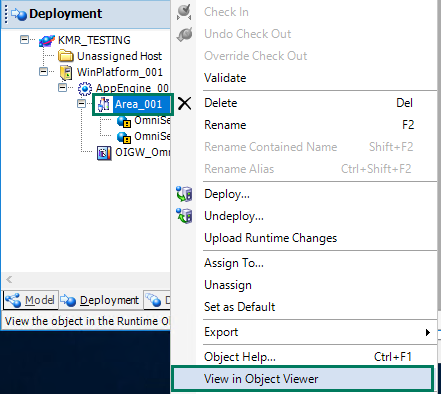
Underneath the Area branch, you can select the AnalogDevice and/or Discrete Device objects then can find the points/attributes that you added and highlight them then "Add to Watch" if you'd like to watch them update in real-time (though you can already see values and good quality). Once the points have initialized, you can watch the selected attributes/items updating per their defined update rate with good values and quality.
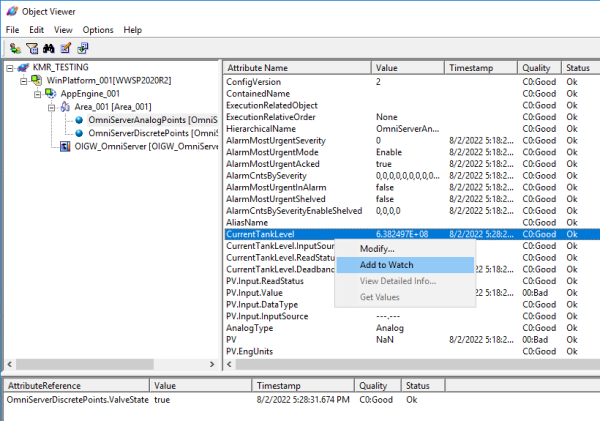 This indicates you're receiving data all the way from OmniServer through the OI Gateway and into System Platform via OPC UA, for easy access to all of your non-standard, non-PLC devices over secure remote OPC UA connections.
Don't forget to subscribe to our blog to not only be notified of future posts on OmniServer and AVEVA applications but to also find out about more relevant technical topics applying to industrial process automation and solving related challenges.
Want to try OmniServer for Integrating Your Own Non-Standard Devices with AVEVA System Platform? Download the free trial.


