If you're a TOP Server user, you're likely accustomed to connecting to a device configured in TOP Server that is sending real-time data through one of its many available drivers. But did you know you can setup devices in a "Simulated" mode for a variety of client testing purposes when a live device isn't available?
Continuing our Tech Support Corner blog series, this post covers how the "Simulated" device property works, why you might implement it into your testing and a brief walkthrough on connecting a variety of client applications to a simulated device in TOP Server.
In the automation industry, as I’m sure you’re probably all to aware, there are many moving parts to establishing connectivity from down at the sensor and I/O level up through the control network to the higher levels of your organization. As part of that process, it’s not uncommon for configuration to be needed on the HMI/SCADA or other client side of communications before there is a real controller or other device downstream to connect to. So having a way to confirm connectivity between the client and the communications server is important.
To that end, if you’re not familiar with all of the options available for such testing with TOP Server, I would highly recommend reviewing the simulated testing options at your disposal here - Test your clients before the devices are available with simulation.
We’re going to be reviewing one of those options here – setting your device configured in TOP Server to “Simulated”.
What is a Simulated Device in TOP Server?
When configuring a device under one of our various Channel drivers in TOP Server, you may have noticed an option to change the “Simulated” property to “Yes” as the Operating Mode.
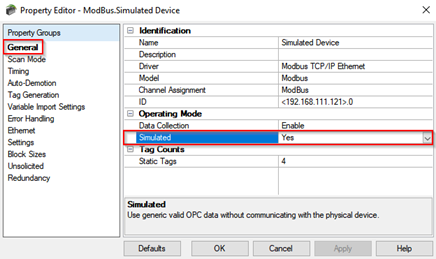
Simulated mode is disabled by default, as TOP Server will attempt to communicate directly with the configured hardware device. However, this configuration is often done proactively by users before the device is completely online and available and, as such, attempts to communicate with an unavailable device would be unsuccessful and result in various errors and bad quality.
This raises the question, “How can I test my client connections if I don’t have access to the live device?”.
Users often come across this common scenario when testing different parts of their systems. Creating a device that runs with the Simulated mode enabled, can provide users a tool to create and monitor tags with valid client communications (by default, this is without simulated changing values, since “Simulated” device will respond to clients with fixed values of 0 and good quality - keep reading for how to test with changing values) without needing a physical device.
In the example I'm referencing in this post, I’m connecting directly to a live PLC using the TOP Server Modbus TCP/IP Ethernet Driver.
If you’re setting up a new simulated device, you would follow the same procedures as you would with the real device that will be available at some point, configuring the settings that device will need once it is available. Refer to our quick start video for a basic walkthrough of channel and device configuration in TOP Server
If you’ll be adding a new device that is similar to an existing device, you can easily make a copy of any existing device and enable “Simulated” in its properties to use the simulated mode to avoid errors and potential disruptions to real-time communications for existing devices.
- Simply right-click the Device under the Channel.
- Select Copy.
- Then right-click on the desired channel (the same or different) and select Paste.
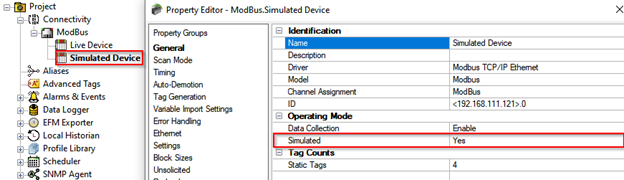
- This creates the duplicate Device with the device properties open, where you can change "Simulated" to "Yes" and click "Apply".
You could also duplicate the entire Channel by selecting "Copy" on the channel you wish to duplicate and pasting it to the "Connectivity" branch of the tree view, which would also copy any configured devices you may have and their settings and any static tags that are defined.
Any client connections to this Simulated device and any configured static tags or dynamic tags would no longer attempt communications to a physical device with this enabled.
How Does Simulated Device Mode in TOP Server Work?
In Simulated mode, the driver does not attempt communications with any physical device, but the TOP Server will continue to return valid OPC data to any connected OPC DA, OPC UA, or SuiteLink Clients. While in Simulation Mode, the server treats all device data as reflective; meaning whatever is written to the Simulated device is read back and each OPC item is treated individually. The data is not saved if the server removes the item (such as when the TOP Server is Reinitialized or the runtime is shutdown).
The item's memory map and buffer is based on the group update rate. This creates a unique connection between each client and the update rate used. This means that two clients that reference the same item with different update rates return different data. So, if you'd like to use a different client to write non-zero values, you'll need to make sure both clients are requesting the same tags at the same update rate. To read more about client interaction when connecting to simulated devices check read our FAQ on Simulated Device Interaction with Multiple Clients and Update Rates.
Now that you know what a Simulated device is and want to test this with your own client application, we’ll follow through the exact same steps you’re accustomed to when connecting TOP Server to both OPC and SuiteLink clients.
How to Implement Simulated Devices with OPC DA Clients
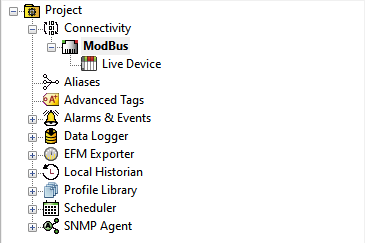
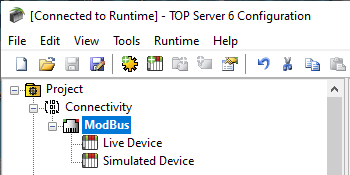
We'll start with OPC DA clients, using the OPC Quick Client that installs with TOP Server as an example. Using the earlier example, I have two devices configured under a single Modbus TCP/IP Channel with identical settings. One is communicating directly to a live Modbus PLC, while the other has Simulated mode turned on.
Using the OPC Quick Client, provides an easy method for monitoring our device tags via an OPC DA connection and the process will be similar for any other OPC DA client (with obvious user experience differences). For full details on using the OPC Quick Client, click here for our user guide
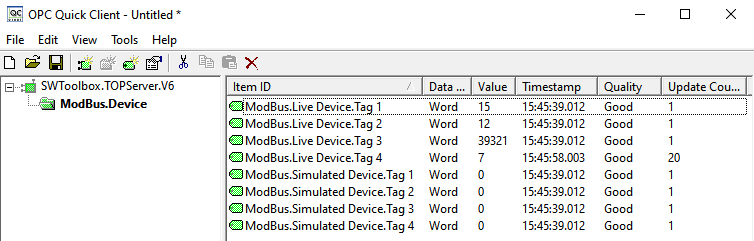
Below, we are accessing 4 tags from each defined Modbus device. You will notice that the Live Device tags populate with values, as we are directly communicating to the PLC. The simulated tags are returning Good quality, but all values default to 0, which is standard behavior with the "Simulated" mode.
For the simulated tags, you could now connect another instance of the OPC Quick Client (or any other client) to the same tags with the same update rate and write values from one client to the simulated tags and the values would update in the other client application. I'll show this after connecting an OPC UA test client below.
How to Implement Simulated Devices with OPC UA Clients
Continuing this example, I’ll connect with UA Expert, a free OPC UA test client provided by Unified Automation, at the same time our OPC Quick Client is open (you could try this with another instance of UA Expert, as well). This post isn't intended as a how-to on OPC UA server interface configuration for TOP Server - for in-depth details on setting up OPC UA client connectivity, refer to our OPC UA tutorial. The same process would apply for any OPC UA client application to connect to TOP Server.
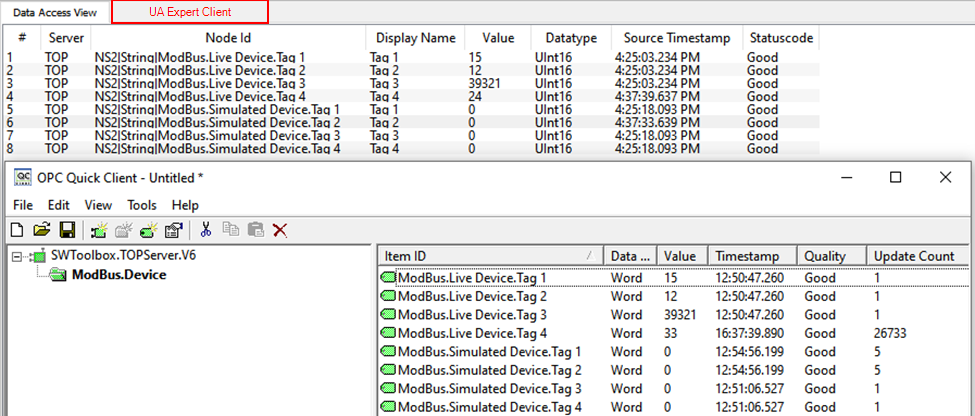
First, we'll demonstrate how different update rates from different clients result in write values only updating the original client. Since the OPC Quick Client I previously connected has a scan rate of 500 ms and UA Expert is configured for 1000 ms, the data written to the tags in our Simulated device will be unique to these client connections (i.e. the values written from the Quick Client will only display in the Quick Client and the values written from the UA Expert will only display in the UA Expert. Note: Beginning in TOP Server V6.13 (Released 01/26/2023), clients are no longer required to have the same Update Rate to see the same data when a device is set to Simulate Mode.
In the example below, I have performed the following three writes:
- ModBus.Live Device.Tag 1 -> Value of 100 from UA Expert
- ModBus.Simulated Device.Tag 1 -> Value of 232 from UA Expert
- ModBus.Simulated Device.Tag 1 -> Value of 123 from OPC Quick Client
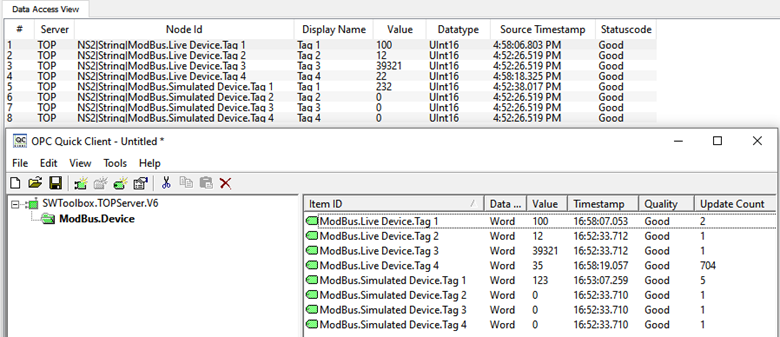
The value written to the tag in the live device will actually be written down to the PLC, updating the value in the PLC such that other clients (OPC Quick Client, in this example) will then get the updated value for the tag from the live PLC with the next read response.
However, the values written to our Simulated device tags will only update based on what was written explicitly from that single client connection, or any other clients that share the same update rate. You’ll see we have two different values with Good quality being reported for ModBus.Simulated Device.Tag 1.
The value written by the OPC Quick Client is displayed as the current value in the OPC Quick Client. And the value written by the UA Expert is displayed as the current value in the UA Expert. To reiterate, this is due to each client requesting the tags at a different update rate.
How to Implement Simulated Devices with SuiteLink Clients
Now TOP Server doesn't only support OPC client connections. Any client that can connect to TOP Server can access the simulated tags in the same fashion as accessing tags from a non-simulated device. Even non-OPC clients, such as SuiteLink clients, can utilize simulated devices for testing.
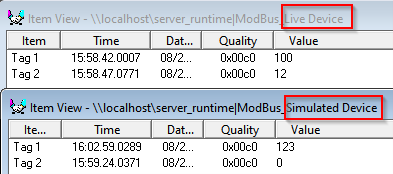
For example, below I’m using the lightweight WWClient test client that AVEVA users are probably familiar with to make a SuiteLink connection to both my Live and Simulated devices that are broadcasting data. For full tutorials on making SuiteLink connections from AVEVA System Platform and InTouch, visit our on-demand video resources (under Client Connectivity).
Because I used the same update rate (500 ms) in WWClient as the OPC Quick Client, you can see that the value for ModBus.Simulated Device.Tag 1 is 123, which corresponds to the value of the same tag in the OPC Quick Client.
 Though beyond the scope of this particular post, there are also ways to setup TOP Server to generate live simulated data using the TOP Server Advanced Tags plug-in, specifically using the "Link Tags" functionality for point-to-point bridging, and the TOP Server Simulator driver, which can generate random simulated data tags values.
Alternately, instead of the Simulator driver, the TOP Server Advanced Simulator driver makes it possible to consume an external CSV, database table or other ODBC-compliant data source to use as simulated live data. This can be useful for users who have logged live value data from live systems that they wish to use for simulated playback.
Either of these more advanced options are possible for more complex simulation of data through the same channels/devices you'll eventually use for live devices once they are in place and available for communications. Contact us if either of those scenarios is of interest and we can provide more details on how to get started
We hope this deeper look into the Simulated device mode for TOP Server has equipped you with new methods for your testing needs. It’s important to note that Simulation mode is for test and simulation purposes only. It should never be used in a production environment. Please feel free to contact our support team with any questions, and don’t forget to subscribe to our blog to find out about the latest updates to TOP Server.