So far in our ongoing Exploring OPC UA blog series, we have primarily taken a general look at OPC UA Certificates and security and how they are used by OPC UA clients and OPC UA servers to keep industrial data secure.
In this fourth post of the series, we take the series down a more specific path by starting to look at the settings and configuration of OPC UA for specific Software Toolbox solutions. This post focuses on TOP Server for AVEVA. We'll step through what the settings are in TOP Server and how to get connected both for your OPC UA client and servers.
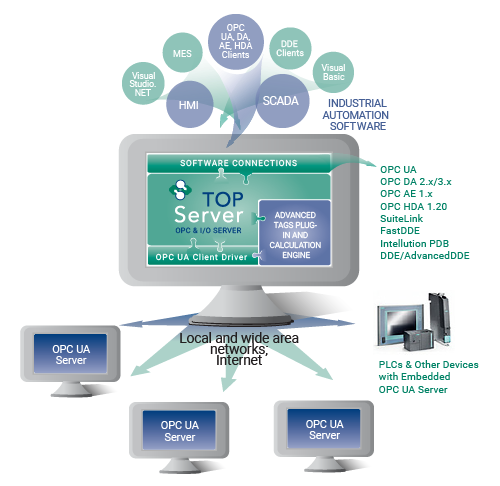
So the first thing to know about TOP Server with respect to OPC UA is that it natively exposes an OPC UA server interface for access by OPC UA client applications such as HMI, SCADA, MES, Historians and other applications that need to access process data from PLCs, RTUs and other automation control devices. That OPC UA server interface is available at no additional cost for any driver or plug-in.
And, with the addition of a licensed OPC Client Suite for TOP Server, the OPC UA Client driver enables TOP Server to also be an OPC UA client to other OPC UA servers (and even other TOP Server installations – an architecture we refer to as OPC UA tunneling). This allows users with client applications that do not currently support OPC UA to still access OPC UA servers (i.e. OPC DA, SuiteLink and DDE applications).
OPC UA Configuration Components in TOP Server
The settings relevant to OPC UA (both client and server) can be found in several different locations:
1. TOP Server OPC UA Configuration Manager
Accessible by right-clicking on the TOP Server Administration icon in the Windows system tray and selecting “OPC UA Configuration” from the menu, this is where the bulk of the connection-specific and security-specific settings for OPC UA are configured. The following sections are available: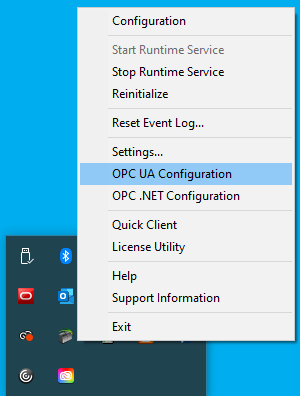
-
-
Server Endpoints
For an OPC UA server, the endpoint is how an OPC UA client specifies a connection. For those familiar with OPC DA, this would be equivalent to the OPC DA Server ProgID at a very basic level. This section is where you configure the server endpoints that you would like to be available to your OPC UA client applications.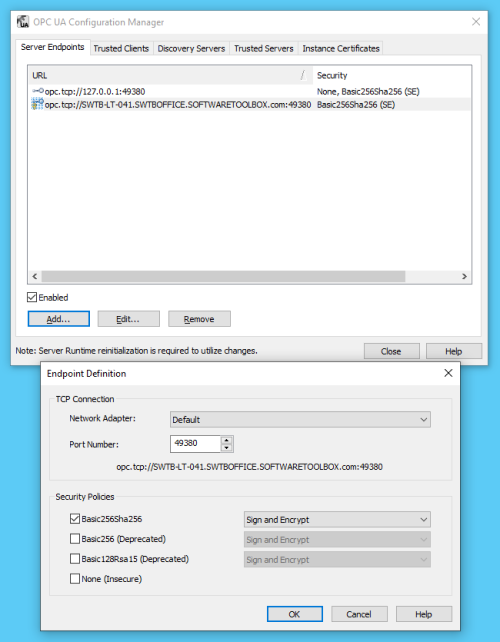
A server endpoint consists of the syntax “opc.tcp://” followed by either the IP address or Hostname of the machine where the OPC UA server is installed, followed by a colon and then the Port Number, which is configurable in the endpoint in TOP Server. You can specify the Network Adapter the endpoint should use (which will determine the IP address or Hostname that is used) or if the connection should only allow local OPC UA clients to connect to it.
Additionally, the endpoint is where you define the level of secure encryption options that an OPC UA client applications must support and use to make a connection to that endpoint. These options are updated as technology advances – currently, options include Basic256Sha256, Basic256, Basic128Rsa15, and None (ranging from highest level of security to no security at all and not recommended).
For each option (other than None, of course), you can also select whether the endpoint requires Sign and/or Sign and Encrypt (for full details on Sign and Encrypt, have a look at Part 1 of this blog series on OPC UA Certificate Basics).
Up to 100 separate endpoints can be configured in TOP Server, so you can provide specific endpoints for specific UA clients with the appropriate level of security and encryption for your application.
It is recommended to only define as many endpoints as you need and to disable any endpoints that you have defined but are not currently using. Disabling an endpoint is as simple as highlighting the desired endpoint and unchecking the “Enabled” setting at the bottom of the tab. - Trusted Clients
In order for an OPC UA client to connect to TOP Server, it must be trusted – this means that the UA client and TOP Server have exchanged security certificates and you, the user, have told TOP Server it is okay for that UA client to connect to it. That is accomplished here, in the Trusted Client section of the OPC UA Configuration Manager.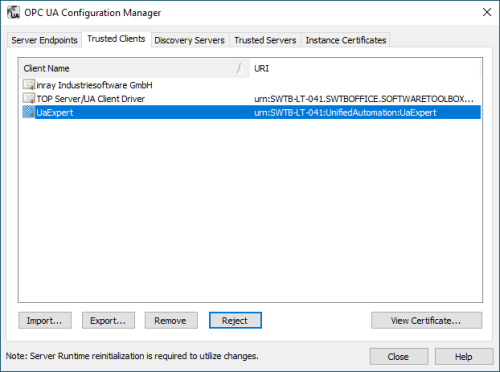
Here you can manually Import the certificate from your OPC UA client (consult your client’s help documentation on how to manage its certificates including where they are stored and how to export them). You can also Export certificates listed here or Remove them completely.
And to the point of trusting a client, here you can choose to Trust a client’s certificate for clients that have attempted to connect without first exchanging certificates or, if you change your mind about that trust later, you can Reject any clients that show up here.
You can even View the certificate information of these UA clients here. - Discovery Servers
And, while TOP Server doesn’t install with one, the Discovery Servers section is available to define any Local Discovery Server (LDS) services that you may have installed either on the same machine as TOP Server or on another machine that is network accessible by TOP Server. This includes the Local Discovery Server available from the OPC Foundation (available to registered users).
A discovery server for OPC UA is a dedicated service with which an OPC UA server can register, allowing OPC UA clients to then look at the LDS to “browse” for available OPC UA servers they can connect to. Again, for those familiar with OPC DA Classic, this is similar to what you might be used to with OPCEnum for browsing OPC DA servers.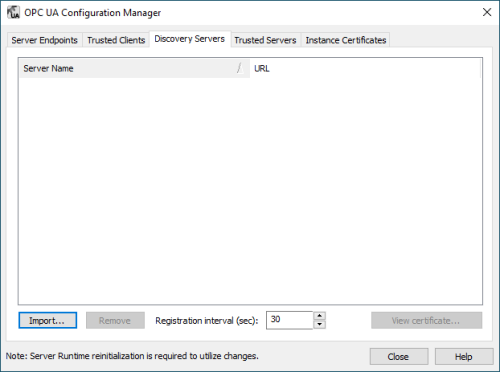
Basically, you will need the security certificate from the LDS (which will include the UA endpoint for the LDS) and you’ll import that in this section. You can easily Remove an LDS later or View its certificate information. And the frequency that TOP Server will re-register with the LDS is configurable (it defaults to every 30 seconds). - Trusted Servers
As we just discussed with the trust relationship required for an OPC UA client to connect to TOP Server, that same relationship is necessary for TOP Server to connect to another OPC UA server using the OPC UA Client driver. This section is where those certificates are managed in similar fashion except that, here, you’re managing and trusting or rejecting certificates from other OPC UA servers instead of OPC UA clients.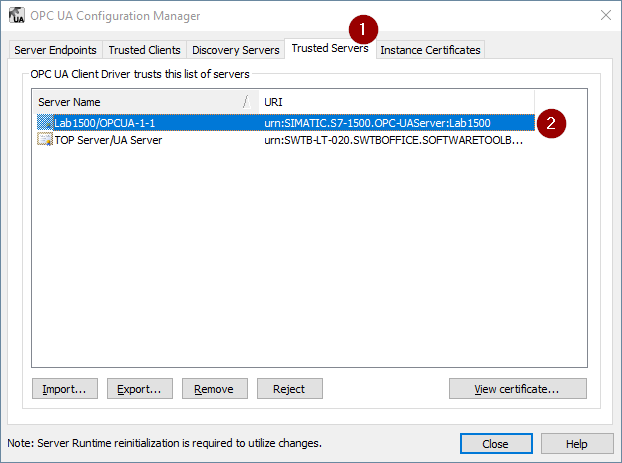
- Instance Certificates
And last but not least, this is where you manage the OPC UA client and server certificates for TOP Server. By default, when you install TOP Server, a self-signed certificate is generated for the OPC UA server interface (and the OPC UA Client driver, if installed).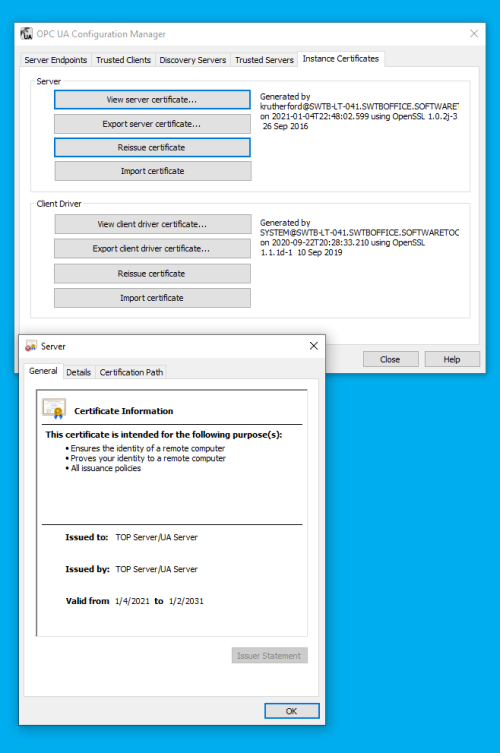
This section lets you manage those certificates, providing the ability to View the information for both certificates, Export both certificates, Import both certificates and, most importantly, Reissue both certificates.
Reissuing a certificate is most important because certificates eventually expire and have to be reissued (this operation also then requires a re-exchanging and trust of those certificates with OPC UA clients and servers that you’ve previously made that exchange with. Starting with TOP Server V6.7, self-signed certificates expire after 3 years from the issue date. As such, be aware that if you’re using OPC UA, you’ll need to reissue and exchange your certificates every 3 years.
Import provides you with the ability to utilize a third-party certificate from a certificate authority such as Verisign, Thawte, etc. in the event that you prefer not to use the self-signed certificates issued by TOP Server.
Export provides you with the ability to manually export your certificates for manual exchange with OPC UA clients and servers to establish the trust relationship we’ve been discussing.
-
2. TOP Server Project Properties
In the TOP Server Configuration, there are also settings related to the OPC UA server interface located in the Project Properties (right-click on “Project” in the tree view and select “Properties”). In the OPC UA section, the majority of these settings can be left at the default values but I want to focus on the 3 most important ones that you’ll need to be aware of here.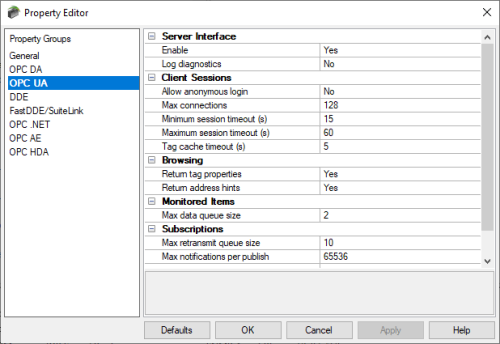
-
- Enable
By default, for the highest level of security out of the box, the TOP Server OPC UA server interface is disabled. As such, in order to actually connect an OPC UA client to TOP Server, you’ll need to change toggle this setting to “Yes”. - Log diagnostics
TOP Server supports a powerful diagnostics tool for viewing and capture OPC transactions – this can be used for OPC UA, OPC DA and OPC AE client connections (accessed under View -> OPC Diagnostics). By default, though, diagnostics for each of those interfaces is disabled. To capture OPC UA diagnostics using this feature, you need to toggle this setting to “Yes”. - Allow anonymous login
By default, TOP Server requires that an OPC UA client authenticate by providing a username and password (defined in the TOP Server User Manager, which we’ll be covering next) that is authorized to access TOP Server. While not recommended for live production operations, it is supported to allow UA clients to connect to TOP Server anonymously by toggling this setting to “Yes”. So if your TOP Server is on a machine that is not accessible from the internet and your IT team is comfortable that your network is secure enough for this, you can allow anonymous access.
- Enable
3. TOP Server User Manager
As we just mentioned briefly, TOP Server has a built-in User Manager that is accessibly from the TOP Server Administration system tray icon (right-click and select “Settings” then “User Manager”). The User Manager provides a number of benefits including auditability in your TOP Server event log and granular assignment of permissions by user (even down to the tag level when using the Security Policies plug-in). For the context of this discussion, users of OPC UA clients will need at least one user defined with permissions to access TOP Server via OPC UA.
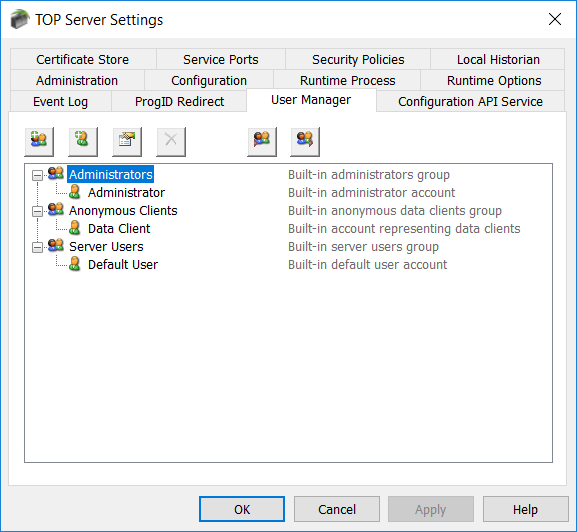
Permissions are defined at the group level in the User Manager, so that means the user can belong to any defined group (Administrators, Server Users, User Defined) as long as that group allows the user the required access to the tags you need to read and/or write in TOP Server. Options include:
- I/O Tag Access (including the ability to use dynamic addressing where static tags are not define in your devices in TOP server)
- System Tag Access (accessing the special properties and statistics tags available at the server, channel and device levels)
- Internal Tag Access (access special internal tags available for certain drivers)
- Browse Project Namespace (for browsing and selecting static tags, including system, statistics and internal tags).
For more details on using the User Manager and the Security Policies plug-in, we recommend reviewing our blog post on the subject here.
Connecting Your OPC UA Client to TOP Server
Using the information we’ve just discussed, you can get your OPC UA client connected to TOP Server. You’ll want to step through the following list, as a general rule (or watch our tutorial video on connecting an OPC UA Client to TOP Server here):
- Enable the following in the TOP Server Project Properties:
- OPC UA server interface
- OPC UA Diagnostics
- Anonymous login (if you prefer not to use user authentication – otherwise, leave this disabled)
- Configure an endpoint in the OPC UA Configuration Manager:
- Specify the desired port number.
- Specify the desired encryption settings (keep in mind what your OPC UA client supports – not all OPC UA clients/servers will always support the same levels of encryption so it’s important to select an options that both the client and server support).
- Export the security instance certificate from your OPC UA client (how to do this varies by client application – please consult the help documentation for your OPC UA client for details on exporting its OPC UA security instance certificate).
- Import the security instance certificate from your OPC UA client in the TOP Server OPC UA Configuration Manager under “Trusted Clients” by clicking the “Import” button and browsing to the certificate file from Step 4 above.
- Export TOP Server’s security instance certificate in the TOP Server OPC UA Configuration Manager under “Instance Certificates” by clicking the “Export server certificate” button.
- Import TOP Server’s security instance certificate into your OPC UA client (how to do this varies by client application – please consult the help documentation for your OPC UA client for details on importing server security instance certificates and trusting them).
- Configure a user with the required permissions in the TOP Server User Manager, ensuring you have Read permissions allowed for I/O Tags at a minimum and Dynamic Addressing if you don’t have static tags defined in your TOP Server project.
- Configure a connection from your OPC UA client using the endpoint address:
- You’ll need the URL from the endpoint that you configured in TOP Server (as displayed under the Port setting in the Endpoint – you can copy/paste from there).
- You’ll need to know which security policy you enabled in the endpoint so you can select the appropriate option in your client.
- You’ll need the username and password that you configured in the TOP Server User Manager (if applicable – if you enabled Anonymous login, you can leave the username and password blank in your UA client).
- Consult your client’s help documentation on the specific steps required to complete the connection and how to either browse for static nodes/tags in TOP Server (if you have them configured) or how to manually add nodes/tags.
For a walkthrough of connecting an OPC UA client application to TOP Server, watch the detailed how-to video here.
Connecting TOP Server to another OPC UA Server
Again using the information we discussed earlier, you can get your OPC UA client connected to TOP Server. You’ll want to step through the following list, as a general rule (or watch our tutorial video on connecting an TOP Server to other OPC UA servers here):
- Make sure your other OPC UA server is properly configured to accept OPC UA client connections in a similar fashion to the steps suggested above for the TOP Server OPC UA server interface including enabling the interface (if applicable) having your OPC UA endpoint configured and any username/password authentication setup properly (consult the help documentation for your other OPC UA server for details on preparing for OPC UA clients to connect including how to export the security instance certificate).
- You’ll need the following details from your other OPC UA server in order to configure the TOP Server OPC UA Client driver to connect:
- OPC UA endpoint URL (including Port)
- Security policies that are supported and enabled (including whether Sign and/or Sign & Encrypt are required)
- The security instance certificate from that OPC UA server.
- Import the security instance certificate from your other OPC UA server in the TOP Server OPC UA Configuration Manager under “Trusted Servers” by clicking the “Import” button and browsing to the certificate file from Step 1 above.
- Export the security instance certificate for the OPC UA Client driver in the TOP Server OPC UA Configuration Manager under “Instance Certificates” by clicking the “Export client driver certificate” button.
- Import the TOP Server OPC UA Client driver security instance certificate into your OPC UA server and trust it (consult the help documentation for your other OPC UA server to determine how to import and trust client certificates).
- Configure a new channel in your TOP Server Configuration (which represents the OPC UA server you’re connecting to):
- Select the “OPC UA Client” from the dropdown for the type of channel. (NOTE: If that option is not available, you’ll need to modify your TOP Server installation and add the OPC UA Client driver – click here for a how-to video).
- Give the channel meaningful name – this will be part of any item references of upstream clients connecting to this TOP Server to access data from your other OPC UA server.
- Keep the defaults in the next section.
- Enter the Endpoint URL from your other OPC UA server (including port)
- Select the Security Policy to be used for the connection.
- Select whether the connection will use Sign or Sign and Encrypt for the connection.
- Keep the defaults in the next section.
- If required, enter the appropriate Username and Password for your OPC UA server endpoint in the other OPC UA server (leave blank if connecting anonymously).
- Review the changes you’ve made in the summary and click Finish if everything looks correct.
- Add a new device to the channel you just created in your TOP Server Configuration:
- Give the device a meaningful name – this will also be part of any item references of upstream clients connecting to this TOP Server to access data from your other OPC UA server.
- Keep the defaults for the next 6 sections until you get to the “Select Import Items” portion of the configuration.
- If your underlying OPC UA server has items/nodes configured and is browsable, you can click the “Select import items” button to browse your server’s address space and select items/nodes to import for access by your upstream client applications.
- If the server does not have items/nodes available or doesn’t support browsing, you can click Next to skip this step and manually add items/nodes after completing the device configuration.
- Review the changes you’ve made in the summary and click Finish if everything looks correct.
- Now that the channel and device are complete, if you weren’t able to browse for items/nodes in your underlying OPC UA server but you need to add static tags, you can do so now by right-clicking on the device you just configured and selecting “New Tag”.
- The Tag Name should be a meaningful name that you want to associate with the item/node from your other OPC UA server.
- For the address, the syntax here will largely depend on your underlying OPC UA server – consult the documentation for that server to determine the correct addressing required from an OPC UA client application.
- In general, the TOP Server UA Client driver uses addressing syntax composed of a Namespace Index, followed by a Type and ending with a Value that depends on the selected Type.
- For instance, a valid address syntax for accessing an item/node in TOP Server via OPC UA would be ns=3;s=ChannelName.DeviceName.TagName
- For more details on possible address syntaxes in the UA Client driver, consult the OPC UA Client driver help file under “Address Descriptions”.
- Your underlying OPC UA server documentation, as I mentioned, should provide an indication of which namespace and type you should use along with the required values.
- It is also possible to skip defining static tags in TOP Server completely and simply define dynamic references in your upstream client application – you will still need to determine the above information about your OPC UA server to know how to configure your dynamic addresses.
- Once your channel, device and items/nodes are complete, you can quickly test your configuration using the OPC Quick Client that installs with TOP Server by launching it from the TOP Server Configuration window toolbar.
For a walkthrough of connecting TOP Server to another OPC UA server, watch the detailed how-to video here. Additionally, our article on additional use cases for the OPC UA Client driver has other useful information. As always, you can try out everything we've just covered yourself with the free trial of TOP Server.
Subscribe to our blog to stay tuned for the rest of this series where we will continue looking at how to specifically secure more OPC UA solutions available from Software Toolbox, which should be useful to our users migrating to OPC UA but uncertain of how to take full advantage of the security benefits.


