In today's business landscape, the exchange and storage of data plays a pivotal role in ensuring efficient and robust operations. Whether operating in sectors like Pharmaceuticals, Manufacturing, Power, or related industries, the exchange of data between services and applications has become standard practice, often an imperative. Consequently, many organizations leverage resources such as databases and historians to archive their invaluable data. However, there are instances where the need for simpler storage methods or direct interchange of data via Webservices is required to maximize application interoperability. Unfortunately, this solution area is often one filled with custom software applications. In this blog, we'll show you how to eliminate custom code and build sustainable solutions.
For decades, one of the approaches to storing and exchanging data was through CSV files, enabling businesses to maintain data in a tabular format. Although CSV remains a viable solution for data storage and exchange, the advent of the Cloud IoT (Internet of Things) era has introduced alternative, more straightforward formats for data storage, such as JSON.
JSON has consistently emerged as a preferred method for data exchange between services. It offers several key advantages over CSV, including support for larger file sizes, handling hierarchical and relational data, seamless integration with APIs, scalability, and optimal performance when dealing with extensive and complex datasets. This is why JSON is rapidly gaining traction as a format for data exchange for industrial control and business integration.
As we said before, most solutions for JSON interchange of data require users to write code and deeply understand JSON expressions and other details. Solutions that don’t use code, provided they are flexible enough, are inherently more sustainable and have a lower cost of ownership.
In this blog, we will demonstrate how OPC Router excels in managing data acquired from controllers via OPC DA or UA, effectively and visually transforming it into JSON files that seamlessly interface with destination systems like InfluxDB, MQTT Brokers/Clients, and REST Webservices, thereby harnessing the benefits of this powerful data format.
If you are unfamiliar with OPC Router, we recommend reading our blog post, OPC Router Configuration Management Overview, Methods & Tips, where we share some basic insights into the architecture of configuration vs runtime instances and show you how to manage your OPC Router projects for backup, moving between machines, and disaster recovery for continuity of business operations.
Prerequisites
The following example illustrates how to push a single item to a JSON file. We acknowledge that this simple demonstration may not be applicable in your specific scenarios. If you require guidance on handling multiple items, please feel free to reach out to us for assistance.
Before we walk through how to utilize the OPC Router JSON Write plugin, we will need to define the OPC UA plugin for the TOP Server input, which is the data source for what will be written into the JSON file. We have written a blog on how to accomplish this in the past; Configuring OPC Router OPC UA Client & Server. If following along, please complete this step before moving forward.
Creating the Connection Workspace in OPC Router
In this step we will build our data workflow in OPC Router. OPC Router has a very easy-to-use workspace with a drag-and-drop style configuration. We will utilize the Transfer Object components to connect our OPC Router OPC UA Plugin that sources data from a TOP Server OPC UA Server, to the OPC Router JSON Write transfer object.
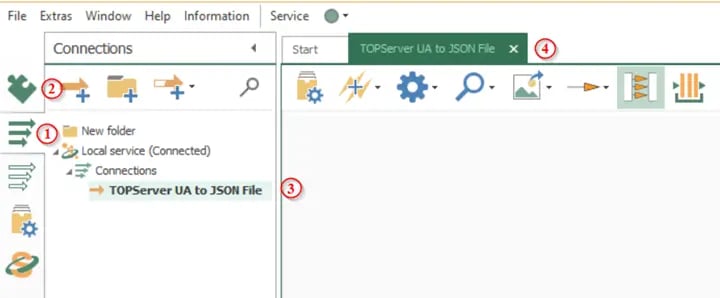
- Open the Connections section (1) and use the New Connection button (2) to create a new connection.
- Give the connection a descriptive name (3), and double click the connection to open it for configuration (4)
Now that we have our blank data flow canvas, we need to tell OPC Router where our data is coming from and where we want it to go. We will call these source and destination definitions. Our source definition will be a Data Change trigger. Our destination definition will be saving the JSON file to a local file path. For this we will be utilizing the File Write Transfer object.
Configuring Source and Destination Definitions
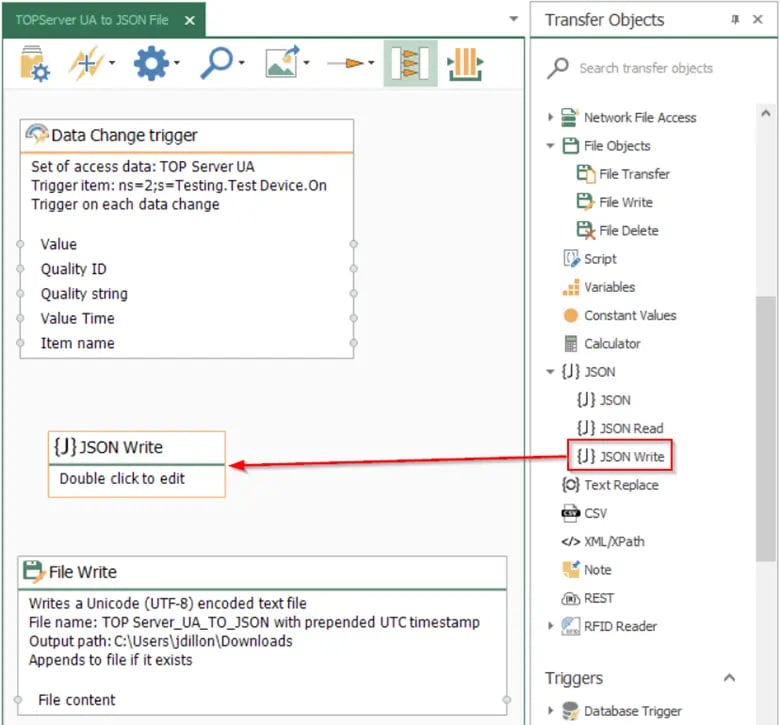
- Click and drag the Data Change Trigger (source definition) and File Write (destination definition) from the Transfer Object list to the Connection workspace.
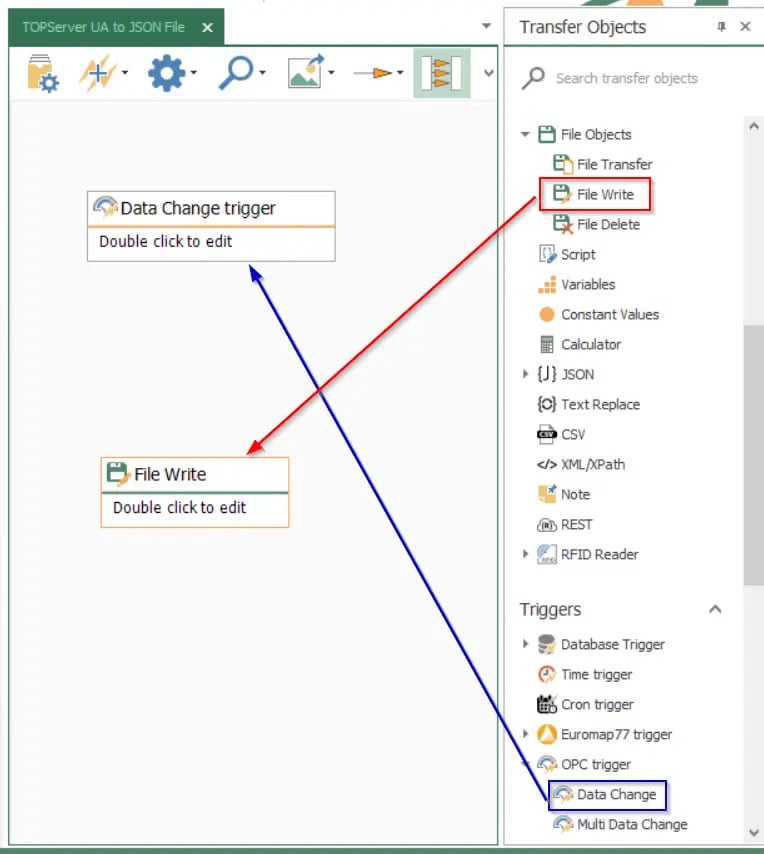
- To configure the source plugin, Double click on the Data Change Trigger.
- Use the OPC access data drop-down to select the OPC UA Server plug-in that was previously configured (TOP Server UA).
- Press the Tag Browser button or manually enter the node ID of the OPC item that you would like to use to trigger the JSON Write transfer. Browse to the points that should be read from the OPC UA Server. For this demonstration we will be using a simple Boolean Tag named “On”.
NOTE: The detailed procedure of configuring this trigger is beyond the scope of this blog post. Feel free to reach out to our support team for assistance if needed.
Once completed, the Date Change Trigger source definition will reflect the changes made within the properties. Please see our example below for what to expect.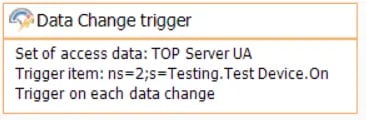
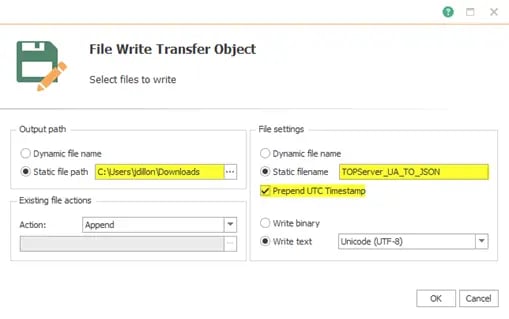
- Next, double-click the File Write Transfer Object and set the Output Path to Static and choose the desired directory.
- Set the File Name to a static file name and give it a friendly name. For this example, we will be enabling Prepend UTC Timestamp to the saved file name. You may notice below that Dynamic file names are also supported but discussion of that added flexibility is beyond the scope of this blog post.
Once complete, the File Write Transfer Object will reflect all configured properties as seen below.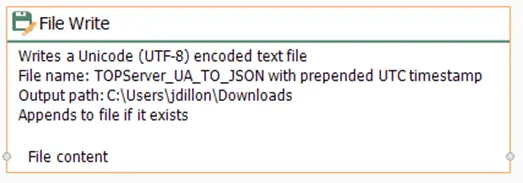
Configuring Transfer Object – JSON Write
Now that we have our source and destination definitions defined, we will now configure the JSON Write object, which will consolidate all parameters that will be returned as the JSON Document.
- Click and drag the transfer object JSON Write to the connection workspace.
- Double-click on the JSON Write Transfer Object to begin configuration.
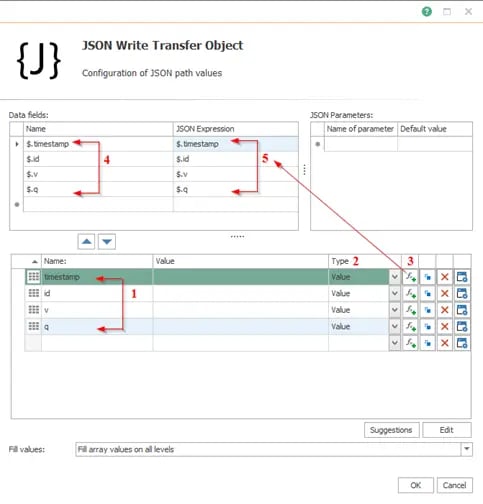
- Add any parameters (1) that should be returned as part of the JSON payload. For our example, the parameters we need for our Boolean item are the following:
- Timestamp
- Item name (id)
- Value of the item (v)
- Quality of the item (q).
- Specify the Type (2) of each JSON parameter. All parameters will be set to Value (available types are Value, Array and Object).
- Next, use the Function button (3) to automatically add the configured parameters to the data fields section. These are what will be used in the JSON Document/Payload.
- Verify that all desired parameters are added to the Data fields section (4), and that they each have a valid JSON Expression (5) associated with them. When using the function button mentioned above, the JSON Expression is configured automatically which helps assure a valid JSON expression for you. Click OK to finish.
Mapping the Connections
Now that we have successfully configured each component required for a successful JSON Write, let’s review our connection workspace. At this point you should have the following configured:
- OPC Data Change Trigger Source Definition
- File Write Transfer Object Destination Definition
- JSON Write Transfer Object
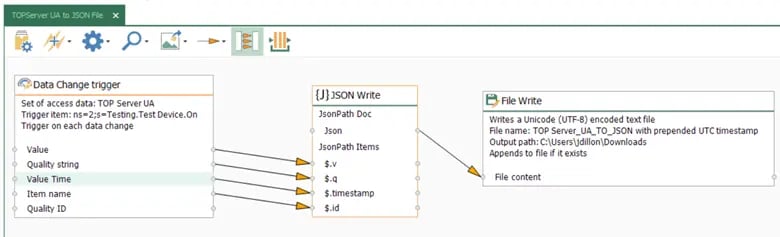
We will now connect each component by adding connecting arrows between each. First, connect the OPC Data Change Tigger Item name, Quality string, Value Time, and Value to the associated JSONPath items. Upon a data change of our monitored OPC item, each trigger item will be read from TOP Server and written to the JSON Document. The Data Change Trigger timestamp will log the time the data point changed as per TOP Server.
Next, we will map the JsonPath Doc output to the File Write content. This will output the JSON File to our configured local file path C:\\Users\jdillon\Downloads.
You now have completed a full path from OPC UA to JSON files and you’ve not written a line of code, and you have a clear visual representation of your solution. You may be wondering what if have a lot more of these to do? OPC Router supports templates that you can setup and then generate instances of workflows from a CSV import to rapidly scale your configurations.
Deploying the Configuration to the Run Time Service
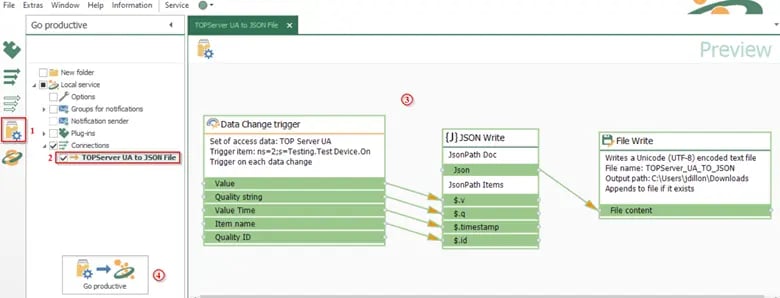
- Open the Go Productive section of the configuration (1) and review the connections to be deployed (2).
- Review the Connection components that will be deployed once set productive (3) and use the Go Productive Button (4) to push the configuration to the runtime service.
Monitoring the Deployed Connection
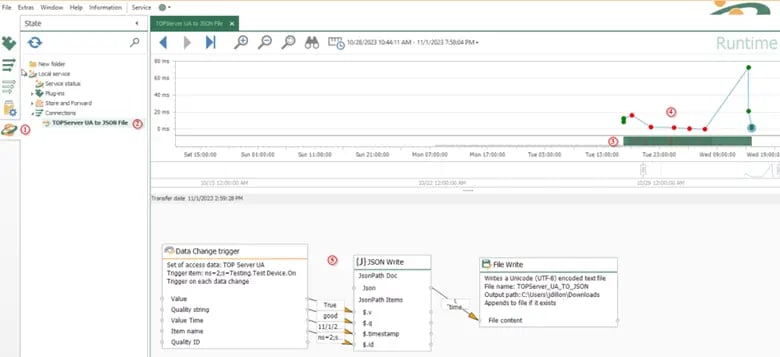
- Open the State Tab where the connections can be monitored (1) and select your configured connection to monitor (2).
- The colored bar (3) shows when the connection was started, was initialized, and when it sat idle. You can hover your mouse over any part of this bar to show the state the connection was at that moment in time. The graph also shows individual data transfers (4) with each dot representing a new triggered transfer of data between the OPC UA Server (TOP Server) and the JSON File Write.
- The Connection view itself (5) shows the values being transferred over each arrow/data link and can be used to monitor data flow between items in the connection. Imagine if you had to debug your OPC UA to JSON file application written in code? With OPC Router, the same visual view you design in becomes your runtime troubleshooting interface.
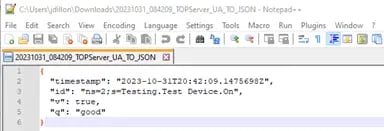
Upon a successful transfer, the JSON Files will appear in the configured Output path of the File Write Transfer Object. In our case, this is C:\Users\jdillon\Downloads. Below, you can see the Date Modified of each JSON file matches the time each dot was logged in OPC Router.

After opening the JSON File, we can see that the values logged match the values of each connection.
This was a basic example of how OPC Router can be used to visually convert OPC Data to JSON data packages, thus enabling the OPC Router to extract and provide the desired information whenever and wherever needed. As you can see, JSON is quick to learn and can easily be integrated into existing systems when you don’t have to write code!
Don't forget to subscribe to our technical blog to not only be notified of future posts on OPC Router and other software applications from Software Toolbox, but to also find out about more relevant technical topics applying to industrial process automation and solving related challenges.
Ready to try OPC Router for yourself? Download the free trial.