If you've seen our other, more detailed posts (specifically our Exploring OPC UA post and the DataHub OPC UA video how-to) on getting Cogent DataHub working with OPC UA clients and servers, you are probably already familiar with configuring Cogent DataHub for secure access from an OPC UA client. However, we are commonly asked how to quickly get the DataHub OPC UA server interface ready for an OPC UA client to securely connect for accessing data from the variety of other interfaces that DataHub supports.
Continuing our Tech Support Corner blog series, this short post covers just the basics for setting up the Cogent DataHub OPC UA server interface to use the highest level of security and to require a client to specify a username and password for authentication.
Increased security is one of the primary reasons the OPC UA standard continues to increase in adoption compared to its predecessor, OPC DA Classic. Rather than relying on COM and DCOM for security, OPC UA relies on sophisticated encryption and enables secure user authentication to ensure your important industrial data is safe from would-be cyber threats while still being straightforward to configure.
Since the process to configure an OPC UA client or server differs slightly from one vendor to the next, it's not uncommon for users to need a little guidance setting up OPC UA security and authentication. The basic steps are pretty much universal regardless of vendor but the specifics are usually never identical.
To that end, let's quickly step through the basics of configuring the Cogent DataHub's OPC UA server interface for secure encryption and to require an OPC UA client application to authenticate via username and password (alternately, if your OPC UA client supports it you can also use a certificate for authentication).
How to Enable OPC UA Server Security in DataHub
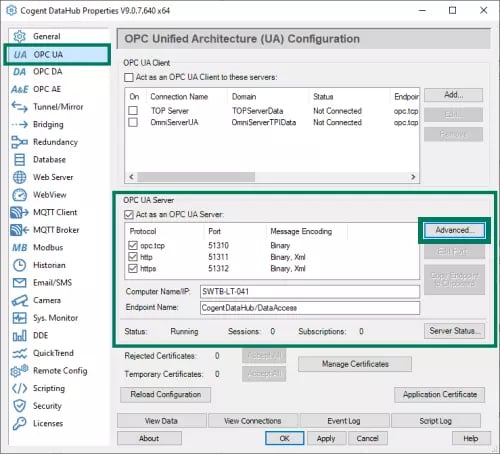
The first part of securing Cogent DataHub's UA server interface is making some basic changes to the default options for the OPC UA server security settings. So, in the OPC UA section, you can see the bottom portion of that section is dedicated to the OPC UA server interface.

To secure that interface, we need to:
- First, make sure the "Act as an OPC UA Server" setting is checked/enabled. Otherwise, no OPC UA client will be able to make a connection, regardless of the other configured settings.
- Next, click the Advanced button.

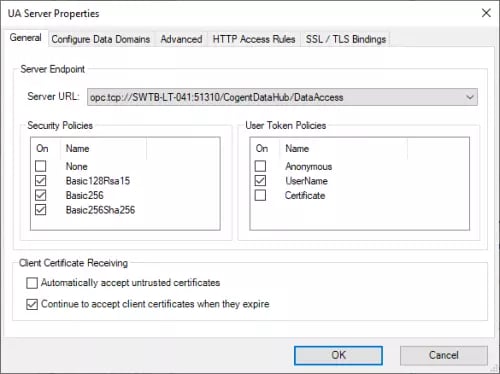
- Here, we're only concerned with the settings in the General section:
- First we need to disable the "None" Security Policy - this will prevent OPC UA clients from connecting to DataHub without encrypting the connection. Your OPC UA client will need to support one of the remaining selected security policies and use it when connecting to DataHub.
- Next, we need to disable the "Anonymous" User Token Policy - this will prevent OPC UA clients from connecting to DataHub without authenticating. (You would also want to disable "Certificate" here if you wish to restricts OPC UA clients to only using an approved username and password (we'll get to where you specify that approved username and password shortly).
- Then just click OK to apply those changes and make sure to always click the Apply button back in the main DataHub interface to ensure all changes are applied.
How to Add a New Secure DataHub User for OPC UA
Now I just mentioned requiring OPC UA clients to specify an approved username and password. But what does that mean and where does it get configured?
Well an "approved" user in DataHub is just a username and password that you've configured in the Security section with the appropriate permissions. The OPC UA client will need to specify that exact username and password. And you're not limited to having just one - you're certainly welcome to configure a user for each person that might be accessing DataHub via OPC UA. In fact, having each user use a unique username and password can help with keeping track of who is accessing DataHub through the OPC UA server interface.
So, to add a new user, we'll need to:
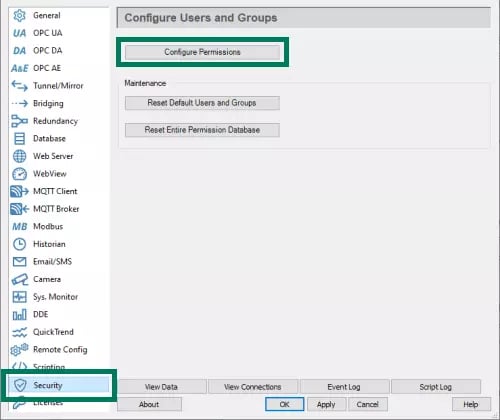
- First, we head over to the Security section of the DataHub configuration.

- Next, click the Configure Permissions button.

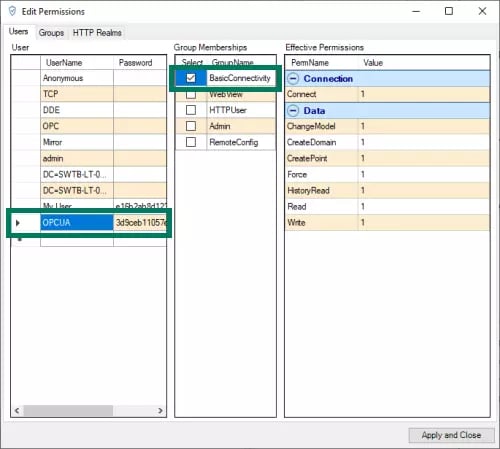
- Adding a new user here is as simple as starting to type the desired username on the next available empty line in the UserName column (in the screenshot above, you can see a new user named "OPCUA", then entering the desired password in the Password column for that user.
- Next, with that new user selected, simply add the user to the "BasicConnectivity" group by checking that box under the Group Memberships section.
- Then simply click the Apply and Close button and then the Apply button back in the main DataHub configuration again.
You can now use your new username and password in your OPC UA client when configuring your OPC UA connection to DataHub (remember to use one of the security policies for encryption still enabled in DataHub). For a full walkthrough from start to finish, you can also watch the how-to video on connecting OPC UA clients to DataHub.
Don't forget to subscribe to our blog to find out about more relevant technical topics applying to industrial process automation and solving related challenges. Want to try integrating non-OPC UA data sources with your own OPC UA client applications using the Cogent DataHub?


