Many AVEVA™ users are probably already aware of the native connectivity options they have for interfacing with different systems. Many AVEVA users have also turned to TOP Server over the years, both for standardizing device connectivity in a single server and for drivers/protocols not available as native AVEVA options.
Those users of AVEVA System Platform have traditionally connected to TOP Server directly via either its native SuiteLink interface or OPC DA Classic. AVEVA's OI Gateway provides those users the additional option of connecting to OPC UA data sources, for easier and more secure remote connections to such data sources.
In this blog post, we will cover the basic steps to connect AVEVA System Platform to TOP Server via OPC UA, expanding device connectivity options for AVEVA users.
While AVEVA™ users certainly have their own options for connectivity, there are often devices where there isn't an existing OI Server or native driver available. AVEVA users have been using TOP Server for connectivity to a wide range of additional protocols and device types for many years. While System Platform can certainly still connect directly to TOP Server via its native SuiteLink and OPC DA Classic interfaces, if your system architecture requires that System Platform and TOP Server reside on different remote machines, OPC UA is an easier to configure option (no remote DCOM!) that provides greater security, as well.
To that end, TOP Server also has a native OPC UA server interface with multiple supported security encryption policies with or without user authentication via TOP Server's built-in User Manager. Since System Platform can access OPC UA server data sources through the OI Gateway acting as an OPC UA client, users can still take advantage of TOP Server's flexible functionality and driver selection over secure OPC UA connections.
There are five basic steps AVEVA users will need to follow to get System Platform connected to TOP Server using OPC UA.
1. Configuring Device Communications in TOP Server
With TOP Server, there is an extensive list of available drivers to choose from for connectivity to the widest range of PLCs, RTUs, injection molding machines and many other device types (including other OPC DA, OPC XML-DA, DDE and ODBC data sources).
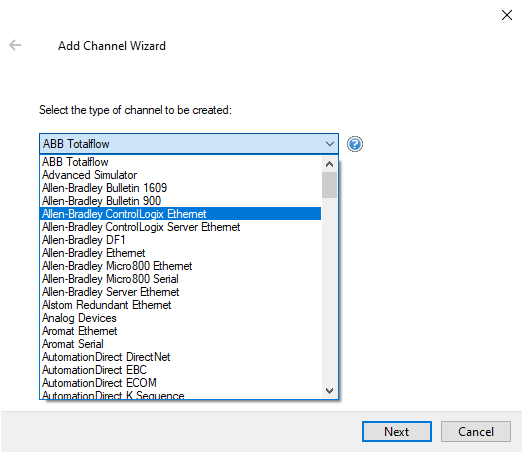
In TOP Server, you'll have a channel, which is where you specify the driver to use and the physical connection/path to the devices under that channel (i.e. a COM port or Ethernet adapter). Under the channel, you'll have a device that represents the physical device or data source you need to collect data from with settings specific to that device. And you'll have tags that represent the variables or parameters that you need to access for that device.
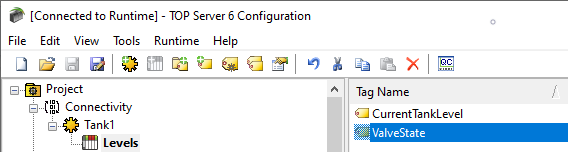
This post assumes that you already have a channel and device configured in TOP Server for communications with the desired device or data source and at least one static tag (if you plan to use static tags in TOP Server - for details on static vs dynamic tag usage with TOP Server, click here).
If not, however, it's easy to get started. While this post isn't intended to focus on setting up those channel, device and tag settings for a specific device, we have some other detailed resources below that cover those steps to help you get started, including a getting started tutorial and other more specific how-to videos by specific topic or driver.
Once your TOP Server is configured with channels, devices and tags, we recommend then confirming successful communication using the OPC Quick Client that installs with TOP Server. This ensures that your TOP Server channel, device and tag settings are correct before moving on to the next steps of getting AVEVA System Platform connected. If you've chosen to use dynamic tags (instead of static tags), we still recommend configuring at least one known good static tag for each device in TOP Server, which allows you to easily launch the OPC Quick Client from the toolbar in TOP Server and have it automatically subscribe to those items for easy confirmation of successful communications.
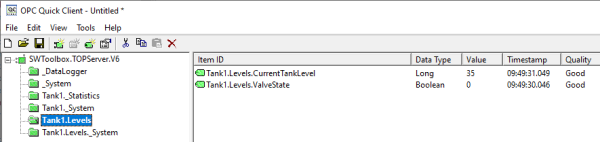
The OPC Quick Client Users Guide has full details on using the test client. Alternately, we have a how-to tutorial video on using all of the TOP Server testing and troubleshooting tools, including the OPC Quick Client available here.
AVEVA users will also be familiar with "topics" as a way to access a specific device using a specific driver. With TOP Server, you have two options for topics:
- The default topic for a device in TOP Server is a combination of the channel name and device name - Channel1_Device1, for example, where the channel name is "Channel1" and the device name is "Device1".
- A more user-friendly Alias name - the TOP Server Alias Map provides users with the ability to define meaningful topic names and map them to any channel and device combination configured in TOP Server. For full details on using the Alias Map in TOP Server, click here.

Either method results in the topic you'll use during configuration of your items/tags in System Platform later. For instance, in the image above, both of the highlighted aliases are valid topics for the same channel/device - the first is the system generated topic and the bottom one is a user-defined topic with a shortened user-friendly name. Either are valid and either can be used to access the same device. With device communications successfully configured and an associated topic for the device, you can move on to specific settings related to the TOP Server OPC UA server interface.
2. Configuring TOP Server OPC UA Server Interface
The settings relevant to TOP Server's OPC UA server interface are located in two parts of the TOP Server configuration settings:
- Project Properties of the TOP Server Configuration project in the OPC UA section
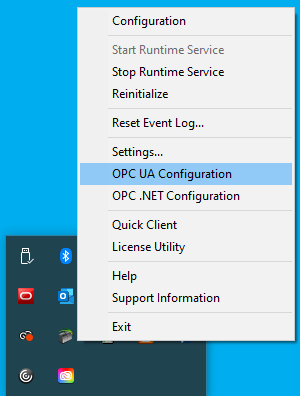
- TOP Server User Manager (accessible from the TOP Server Administration menu under "Settings" in the Windows system tray)
- OPC UA Configuration Manager (accessible from the TOP Server Administration menu in the Windows system tray)
OPC UA Settings in the TOP Server Project Properties
In the TOP Server Configuration, there are general settings related to the OPC UA server interface located in the Project Properties (right-click on “Project” in the tree view and select “Properties”). In the OPC UA section, the majority of these settings can be left at the default values but the following are the 3 most important ones that you’ll need to be aware of here and potentially change from the default values.
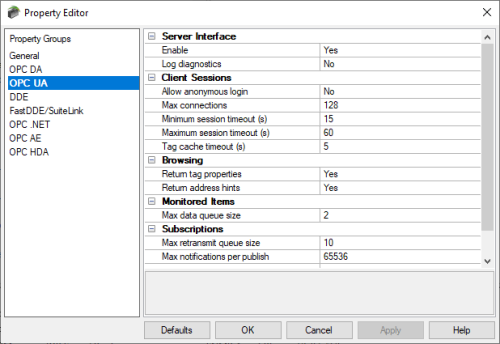
- Enable
By default, for the highest level of security out of the box, the TOP Server OPC UA server interface is disabled. As such, in order to actually connect OI Gateway as an OPC UA client to TOP Server, you’ll need to change toggle this setting to “Yes”. - Log diagnostics
TOP Server includes a powerful diagnostics tool for viewing and capturing OPC transactions – this can be used for OPC UA, OPC DA and OPC AE client connections (accessed under View -> OPC Diagnostics). By default, though, diagnostics for each of those interfaces is disabled. To capture OPC UA diagnostics using this feature, you need to toggle this setting to “Yes”. I mention this for awareness in the event you ever have to troubleshoot the connection from OI Gateway at any point in the future. You may choose to leave this disabled for now or go ahead and enable it in case you need to use it later. - Allow anonymous login
By default, TOP Server requires that an OPC UA client authenticate by providing a username and password (authorized users are defined in the TOP Server User Manager, which we’ll be covering next) that has been permitted to access TOP Server. While not recommended for live production operations, it is supported to allow UA clients to connect to TOP Server anonymously by toggling this setting to “Yes”. So if your TOP Server is on a machine that is not accessible from the internet and your IT team is comfortable that your network is secure enough for this, you can allow anonymous access.
OI Gateway, by default, requires user authentication so you can leave this setting at the default, if you plan to use OI Gateway default settings to connect to TOP Server.
OPC UA Authentication in TOP Server User Manager
TOP Server's built-in User Manager is accessed from the TOP Server Administration system tray icon (right-click and select “Settings” then “User Manager”). The User Manager provides a number of benefits including auditability in your TOP Server event log and granular assignment of permissions by user (even down to the tag level when using the Security Policies plug-in). For our purposes, if you plan to use user authentication with OI Gateway for the connection to TOP Server, you will need at least one user defined with permissions to access TOP Server via OPC UA.
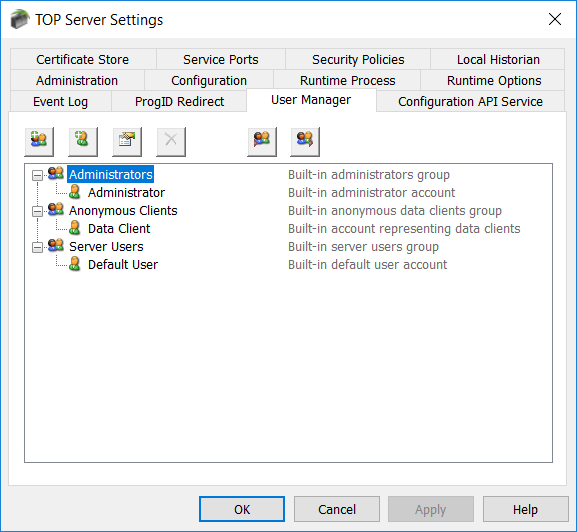
A defined user inherits it's permissions from the group it is assigned to so the actual permissions are defined at the group level in the User Manager. This means a user can belong to any defined group (Administrators, Server Users, User Defined) as long as that group allows the user the required access to the tags you need to read and/or write in TOP Server. Capabilities that you will want your user/users to have at a minimum include:
- I/O Tag Access (including the ability to use dynamic addressing where static tags are not defined in your devices in TOP server)
- System Tag Access (accessing the special properties and statistics tags available at the server, channel and device levels)
- Internal Tag Access (access special internal tags available for certain drivers)
- Browse Project Namespace (for browsing and selecting static tags, including system, statistics and internal tags).
For more details on using the User Manager and the Security Policies plug-in, we recommend reviewing our blog post on the subject here. Once you have at least one user defined in a group with those permissions, make sure to note the name and password, as you'll need it for configuring the OPC UA client settings in OI Gateway.
OPC UA Settings in the TOP Server OPC UA Configuration Manager
And last, but definitely not least, the TOP Server OPC UA Configuration Manager is where the bulk of the connection-specific and security-specific settings for TOP Server are configured. It's accessible by right-clicking on the TOP Server Administration icon in the Windows system tray and selecting “OPC UA Configuration” from the menu.
While you'll notice a number of different sections available, right now, you're only interested in the settings related to OPC UA server endpoints. I'll highlight the relevant settings at this stage in the process below.
-
Server Endpoints
In case you're not familiar with OPC UA, the endpoint for an OPC UA server is how an OPC UA client specifies a connection. This is equivalent to the OPC DA Server ProgID at a very basic level, if you're more familiar with OPC DA Classic. This section is where you configure the server endpoints that you would like to be available to OI Gateway and any other OPC UA client applications you may have.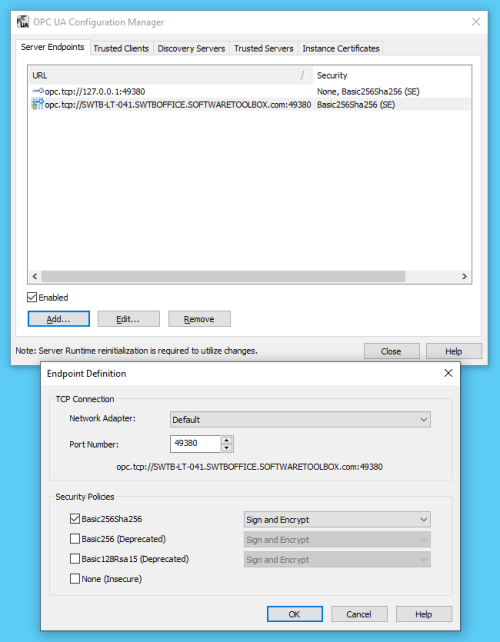
A server endpoint consists of the prefix “opc.tcp://” followed by either the IP address or Hostname of the machine where TOP Server is installed, followed by a colon and then the Port Number, which is configurable for each endpoint in TOP Server. You can specify the Network Adapter the endpoint should use (which will determine the IP address or Hostname that is used) or if the connection should only allow local OPC UA clients to connect to it (thereby preventing any OPC UA clients on remote machines from connecting to that endpoint).
The endpoint is also where you define the level of secure encryption options that an OPC UA client must support and use to make a connection to that specific endpoint. These options are updated for TOP Server as technology advances – currently, options include Basic256Sha256, Basic256, Basic128Rsa15, and None (ranging from highest level of security to no security at all which is not recommended).
For each option (other than None, of course), you can also select whether the endpoint requires Sign and/or Sign and Encrypt (for full details on Sign and Encrypt, have a look at Part 1 of this blog series on OPC UA Certificate Basics).
For the purposes of connecting OI Gateway, currently the default Security Policy in TOP Server matches the default security settings in OI Gateway, so you should be able to use the existing endpoint, if the default settings in OI Gateway are retained.
And, conveniently, the displayed endpoint text underneath the Port configuration can be copied and pasted during the OI Gateway configuration later for ensuring accuracy.
Again, yes, there are more sections but for the purposes of connecting OI Gateway to TOP Server, these are the only settings needed for now. You'll be coming back to the OPC UA Configuration Manager after the first connection from OI Gateway shortly.
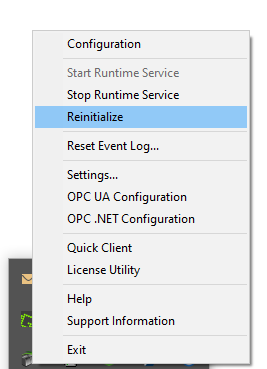
So, for now, you can "Cancel" out of the OPC UA Configuration Manager (as long as you didn't make any changes - if you did make any changes to the Port Number, etc, you'll want to click "OK" instead) and the runtime will need to be reinitialized by right-clicking on the TOP Server Administration system tray icon and selecting "Reinitialize". TOP Server is ready for a connection from OI Gateway.
3. Configuring AVEVA OI Gateway as an OPC UA Client to TOP Server
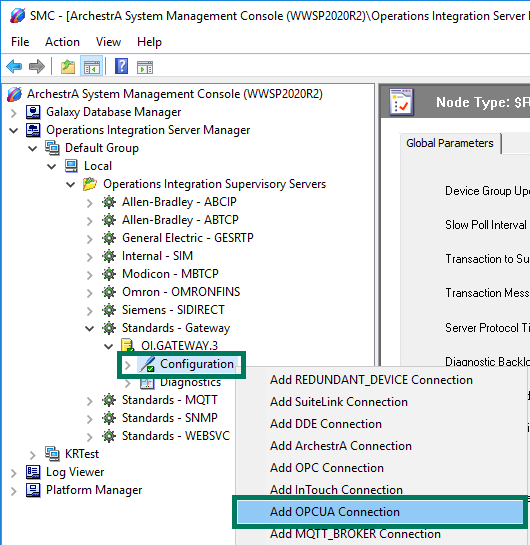
Next, you need to configure OI Gateway as an OPC UA client and connect it to TOP Server. In the AVEVA System Platform Management Console (SMC), you'll expand "Operations Integration Server Manager" in the tree view, the Node group, the desired Node, then the Operations Integration Supervisory Servers group, then the OI Gateway OPC DA ProgID ("OI.GATEWAY.3").
Click on "Configuration", then right-click and select "Add OPCUA Connection" and give the connection a meaningful name such as "TOP_Server".
For the "OPCUA Server Details", if TOP Server is on the same machine as OI Gateway, you can leave the "Server Node" as "localhost". If they are on separate machines, the "Server Node" will need to be the IP Address or Hostname of the TOP Server machine. And the "OPCUA Server" field should be the endpoint from the TOP Server OPC UA Configuration Manager settings we reviewed earlier (yes, you can paste the endpoint URL here, if you were able to copy it from TOP Server - otherwise carefully enter it here).
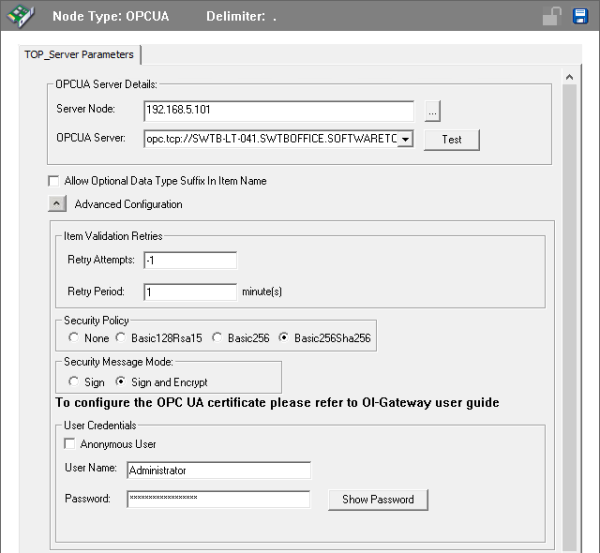
By default, OI Gateway uses the most secure options for "Security Policy" and "Security Message Mode" - all of the options currently supported are valid for TOP Server (as long as the policy has been enabled in the TOP Server endpoint. OI Gateway's default is Basic256Sha256, matching the default for the endpoint in TOP Server - so no changes are needed here if the defaults were maintain in your endpoint in TOP Server.
OI Gateway also requires that User Credentials be specified, by default, so you'll need to enter your valid User Name and Password as configured in the TOP Server User Manager, as discussed previous (if you've chosen to allow Anonymous log-in and enabled that earlier in TOP Server, you'll need to also enable "Anonymous User" here in OI Gateway).
At this point, you can click the "Test" button to the right of where you entered the "OPCUA Server" endpoint. You'll get the following message indicating the connection failed.
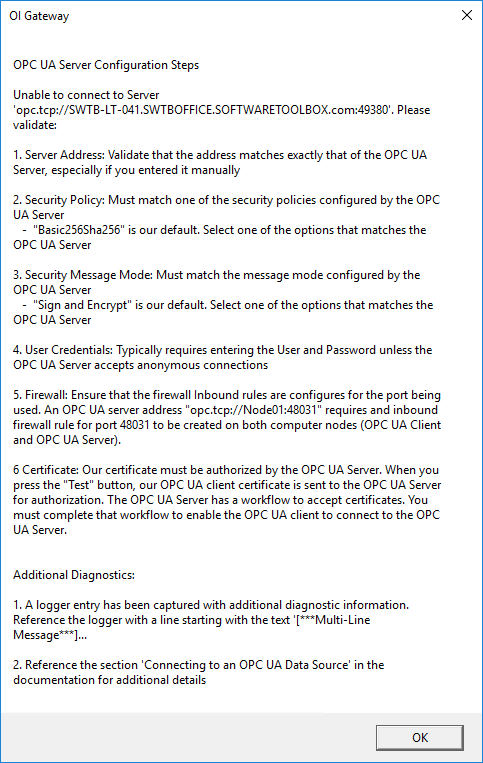
Assuming the following are true (which are actually conveniently detailed in the error message itself), this is due to the fact that TOP Server doesn't currently trust OI Gateway's security certificate:
- The "Server Node" and "OPCUA Server" endpoint fields are correct
- The selected Security Policy, Security Message Mode and User Credentials match what is configured in TOP Server
- Where applicable, an exception has been added to any firewalls for the port used by TOP Server (default is 49380).
So, to allow the Test functionality to work, you need to go back to TOP Server. Back in the OPC UA Configuration Manager, under "Trusted Clients", you should now notice an entry for OI Gateway with a red "X" over the certificate icon at the left of the entry from the attempted test.
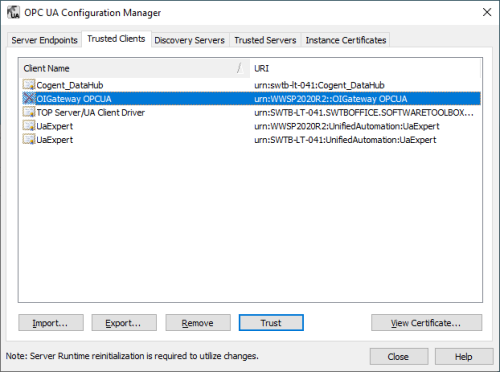
You can simply highlight that certificate and click the "Trust" button at the bottom to tell TOP Server to trust OI Gateway connections from that machine using that certificate.
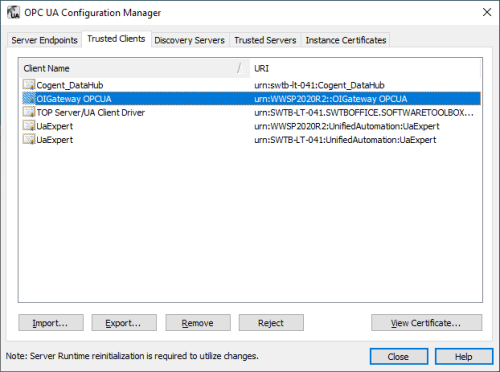
Click "Close" then you'll need to reinitialize the TOP Server runtime service by right-clicking on the TOP Server Administration system tray icon and selecting "Reinitialize" to apply the changes to the runtime.
You can now go back to OI Gateway and the "Test" button will result in a successful test connection (OI Gateway doesn't have any certificate management interface and trusts certificates by default - there is a folder structure under C:\ProgramData\Wonderware\OI-Server\$Operations Integration Supervisory Servers$\OI.GATEWAY\CertificateStores .
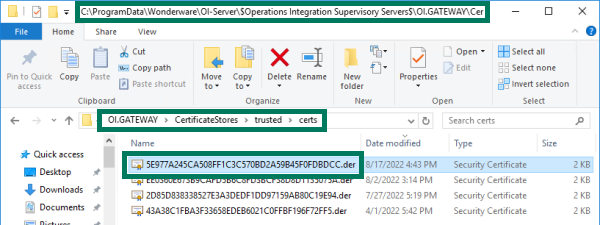
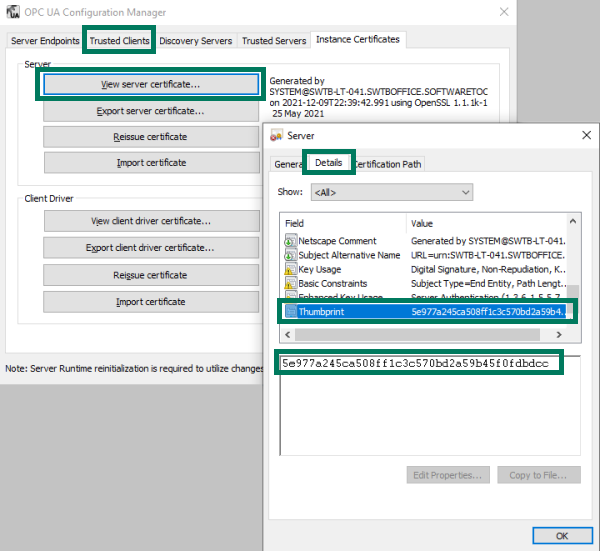
The "trusted" folder contains OPC UA server certificates that have previously been trusted (the filename of the certificate is the thumbprint of that certificate - not particularly user-friendly but you can compare these filenames to the Thumbprint field of TOP Server's certificate (accessible in the TOP Server OPC UA Configuration Manager under "Instance Certificates" by clicking the "View server certificate" button and then going to the "Details" tab - the Thumbprint is the last field at the bottom).
Because TOP Server's certificate is in the Trusted folder for OI Gateway and we've trusted OI Gateway's certificate in TOP Server, this allows OI Gateway to securely connect because the client and server trust each other now. You can confirm the Test now works (no, unfortunately, there isn't a message that explicitly confirms the test was successful), you'll notice the OPC UA Namespace at the bottom of the configuration in OI Gateway is now populated for TOP Server.

So we can go ahead and Save our settings by clicking the Save button in the upper right corner of the configuration.
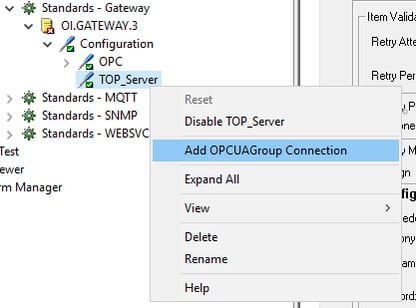
The next step is adding some nodes/tags/items from TOP Server that you want to access with System Platform (or other OPC DA or SuiteLink clients that connect to OI Gateway). So you need to right-click on the OPC UA server under the Configuration branch in the tree view and select "Add OPCUAGroup Connection" - you'll want to enter a meaningful name.
The "Browse OPCUA Server" button will allow you to browse the TOP Server address space.
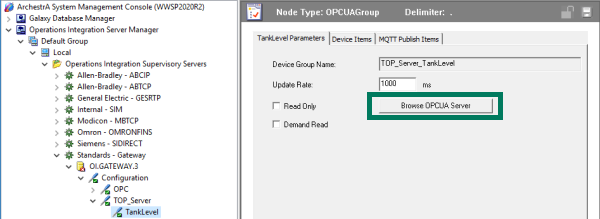
You can then select the desired data points that you wish to access in the OPCUA Tag Browser window that appears (be patient - it can sometimes take a few seconds and appear that nothing happened when you click the button). The "Add to list" button then adds the selected items.

Click "OK" once all of the desired points have been added - for our purposes, there is a "Tank1_Levels" topic with several data points in this TOP Server that will provide changing data.
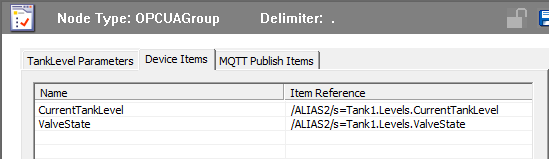
Back in the main configuration, you can then go to the "Device Items" tab and confirm that your points have been added to the item list here. Optionally, you may also choose to rename the items here with a more user-friendly name - this is helpful since the "Name" defined here will be used in the SuiteLink Topic attributes as the Item Reference in System Platform . Clicking the Save button at the top-right corner applies the additions and edits.
Now, if your OI Gateway has been deactivated, you'll need to right-click on the top level "OI.GATEWAY.3" in the tree view and select "Activate". Otherwise, you'll need to deactivate then activate to apply the changes to the runtime. Now that OI Gateway is configured, it is typically a good idea to confirm that your configuration is working as expected prior to moving on to the next step.
To that end, you can connect to OI Gateway using a SuiteLink or OPC DA test client (the OPC Quick Client that installs with TOP Server, as shown below which was already installed on the AVEVA System Platform machine, or the Software Toolbox OPC Test Client is available as a standalone installation you can request here. As you can see from the image below, the test client successfully connects to the OPC DA ProgID "OI.GATEWAY.3" and is receiving good quality and values from the TOP Server points configured for the OPC UA connection.

The next step is accessing OI Gateway from System Platform.
4. Configuring AVEVA System Platform DI Objects
The first step is creating/adding an instance of the OPC or SuiteLink Device Integration (DI) object in the desired System Platform (ArchestrA) galaxy, since OI Gateway supports either interface for client connectivity. The following assumes that you already have a WinPlatform, AppEngine and Area created where either of the DI objects can be assigned. For our purposes, we'll use a SuiteLink DI Object below.
Adding a SuiteLink Device Integration Object
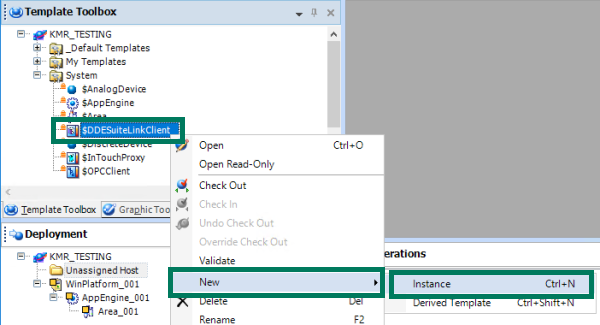
In the ArchestrA IDE for the galaxy you want to connect to TOP Server, go to the Template Toolbox under System objects and find the $DDESuiteLinkClient DI object template. Right-click and select New -> Instance which will create a new instance in the "Unassigned Host" folder in the Deployment view which you can rename to something meaningful such as "OIGW_TOP_Server".
You can drag-and-drop the new instance to the desired AppEngine. Then you can double-click on the new instance to open the properties.
The SuiteLink DI object involves configuring the following:
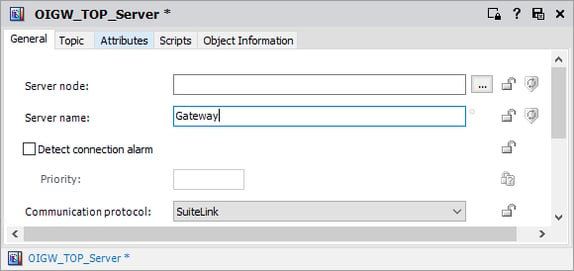
- Defining the "Server node" or IP / DNS name of the machine where OI Gateway is installed on your network (if OI Gateway is installed on the same machine as System Platform (which is most likely), the Server node gets left blank).
- Entering the "Server name" for OI Gateway (the SuiteLink service name for OI Gateway is just "Gateway").
- The "Communication protocol" should remain at the default of "SuiteLink".
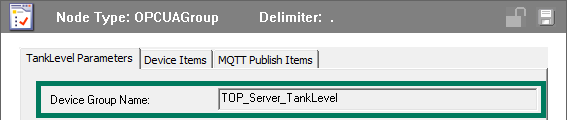
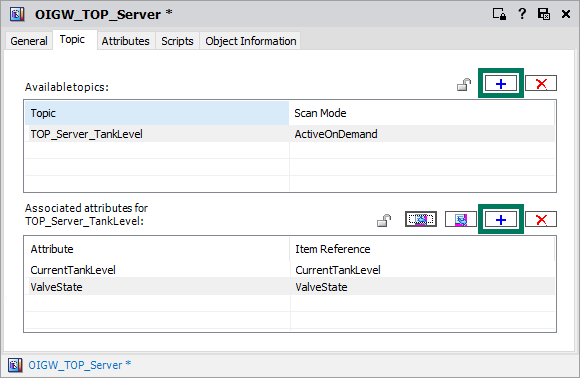
- Creating a Topic under the "Topic" section (this needs to match the Device Group Name from the OPC UA group defined in OI Gateway from earlier - you can go back to OI Gateway and copy/paste the name from there, if needed.
- Adding Attributes to that Topic - you basically need to define an Attribute here for each Item that you want to access from OI Gateway using the "+" button above the "Associated attributes" section. For the "Item Reference" you'll use the "Name" for the item from your "Device Items" section in OI Gateway (the "Attribute" name itself can be the same or different - below you see the same name for simplicity). You can also use CSV import/export to populate this list, if you have a lot of attributes to add.
- Once finished, just click the Save button at the top right of the DI object properties and check the object back in.
These are the high level settings that get System Platform connected to OI Gateway via the SuiteLink DI Object.
5. Adding AnalogDevice or DiscreteDevice Objects for Attributes
Once the SuiteLink DI object is configured and checked back in, it will be necessary to define an instance of the $AnalogDevice object to represent analog values such as integers and floats (for discrete/boolean values, an instance of the $Discrete Device object would be required and is basically the same process).
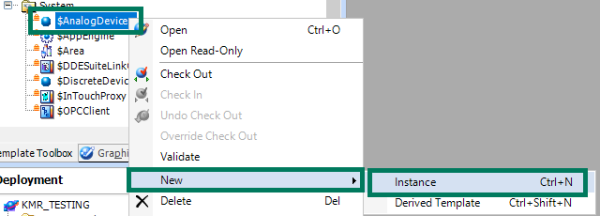
So back in the Template Toolbox under System, you need to right-click on $AnalogDevice and select New -> Instance which will add the instance to the "Unassigned Host" folder where you can give it a meaningful name to represent the data points it will be linked to. You can drag-and-drop the instance to the desired Area to assign it.
Double-clicking on the object will open its properties where you need to go to the "Attributes" tab.
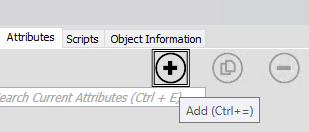
Here you need to click the "+" button at the top center of the tab to add an attribute.
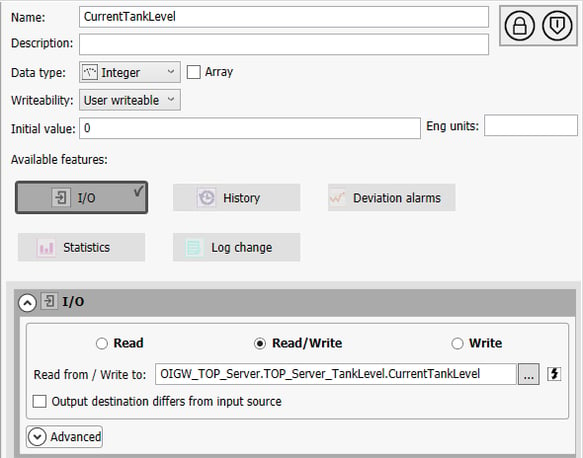
Then configure the following:
- Name - this should be a meaningful to represent the specific item you want this object to access from OI Gateway - for simplicity, we're using the same name as the attribute in the Topic that was just configured.
- Data Type - this should match the corresponding data type of the item you're accessing from TOP Server. In the example, this is an Integer value.
- Available Features - Enable "I/O" here which allows you to select the input source.
- Read from / Write to - this is where you map to the item in OI Gateway that corresponds to the TOP Server point/item you want this object to represent.
- If the "Name" is something different from the attribute you defined in the SuiteLink DI object, you can click the "..." ellipses button to browse available attributes (which will allow you to select from the list of attributes you defined earlier in the SuiteLink DI Object Topic).
- This brings up the Galaxy Browser, where you can select the instance of the SuiteLink DI object you just configured and you'll find the associated attributes listed to the right - select the desired attribute and click "OK".

- This brings up the Galaxy Browser, where you can select the instance of the SuiteLink DI object you just configured and you'll find the associated attributes listed to the right - select the desired attribute and click "OK".
- Alternately, you can manually enter the path to the item - either of the following syntax is valid:
- <SuiteLinkDIObjectName>.<TopicName>.<DeviceItemName> (for directly accessing items from OI Gateway)
- <SuiteLinkDIObjectName>.<TopicName>.<AttributeName> (for accessing the attribute name defined in the Topic in the SuiteLink DI Object)
- Honestly, with the attributes already defined in the SuiteLink DI Object, browsing and selecting is the easiest method here and also ensures the correct syntax.
- If the "Name" is something different from the attribute you defined in the SuiteLink DI object, you can click the "..." ellipses button to browse available attributes (which will allow you to select from the list of attributes you defined earlier in the SuiteLink DI Object Topic).
- You'll need to do the same thing to add each of the additional attributes that you defined earlier in the Topic of your SuiteLink DI Object.
- Then all that remains is clicking the Save button at the top right, accept any warnings and check the object back in.
- Read from / Write to - this is where you map to the item in OI Gateway that corresponds to the TOP Server point/item you want this object to represent.
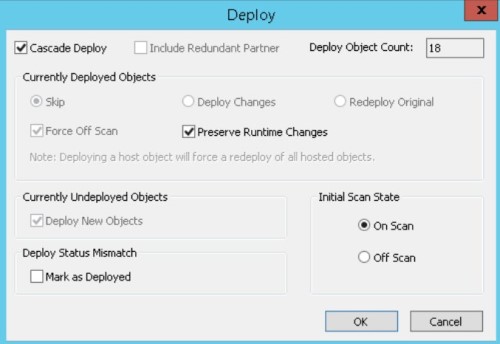
7. Deploying the Device Integration Object in System Platform
And last, but not least, once the SuiteLink DI object is configured with the desired items/tags and assigned appropriately depending on your galaxy architecture, it's necessary to deploy the SuiteLink DI object and related Application Objects for the associated tags. This deployment is accomplished the same way as for deploying any other objects and changes in System Platform - by right-clicking on the Galaxy object in System Platform (in the Deployment view) and selecting the "Deploy" option.
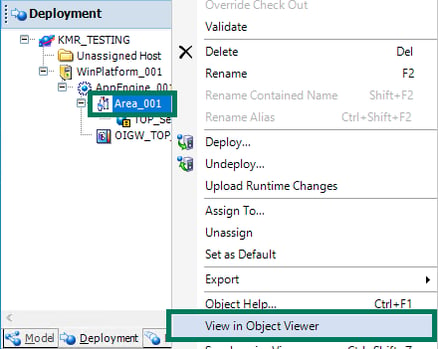
And the System Platform Object Viewer can then be used to confirm you are successfully connected and communicating by right-clicking on the Area and selecting "View in Object Viewer".
Underneath the Area branch, you can select the AnalogDevice and/or Discrete Device objects then can find the points/attributes that you added and highlight them then "Add to Watch" if you'd like to watch them update in real-time (though you can already see values and good quality). Once the points have initialized, you can watch the selected attributes/items updating per their defined update rate with good values and quality.
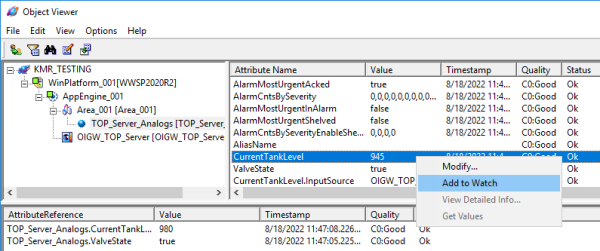
This indicates you're receiving data all the way from TOP Server through the OI Gateway and into System Platform via OPC UA, for easy access to all of your devices over secure remote OPC UA connections.
Don't forget to subscribe to our blog to not only be notified of future posts on TOP Server and AVEVA applications but to also find out about more relevant technical topics applying to industrial process automation and solving related challenges.
Want to try TOP Server for Integrating Your Own Devices with AVEVA System Platform? Download the free trial.


